| [ Team LiB ] |
|
13.1 Backing Up Active DirectoryBacking up Active Directory is a straightforward operation. It can be done using the NT Backup utility provided with the Windows operating system or with a third-party backup package such as Veritas NetBackup. Fortunately, you can backup Active Directory while it is online, so you do not have to worry about taking outages just to perform backups like you do with other systems, such as Exchange 2000. To back up Active Directory, you have to back up the System State of one or more domain controllers within each domain in the forest. If you want to be able to restore any domain controller in the forest, you'll need to back up every domain controller. On a domain controller, the System State contains the following:
The user that performs the backup must be a member of the Backup Operators group or have Domain Admins equivalent privileges. Due to the way Active Directory handles deleted objects, your backups are only good for a certain period of time. When objects are deleted in Active Directory, initially they are not removed completely. A copy of the object still resides in Active Directory for the duration of the tombstone lifetime. The tombstone lifetime value dictates how long Active Directory keeps deleted objects before completely removing them. The tombstone lifetime is configurable and is defined in the tombStoneLifetime attribute on the following object: cn=Directory Services, cn=WindowsNT, cn=Services, cn=Configuration, <ForestDN>
The default value for tombStoneLifetime is 60 days. That means deleted objects are purged from Active Directory 2 months after they are initially deleted. As far as backups go, you should not restore a backup that is older than the tombstone lifetime because deleted objects will be reintroduced. If for whatever reason you are not able to get successful backups at least every 60 days, consider increasing the value of tombStoneLifetime. Another issue to be mindful of in regard to how long you keep copies of your backup has to do with passwords. Computer accounts change their passwords every 30 days. They keep their previous passwords and attempt to use them if their current passwords do not work. So if you restore computer objects from a backup that is older than 60 days, those computers will more than likely not be able to participate in the domain and will have to be reset. Trust relationships can also be affected. Like computer accounts, the current and previous passwords are stored with the trust objects, but unlike computer accounts, trust passwords are changed every 7 days. That means if you restore trust objects from a backup that is older than 14 days, then you will need to reset the trust. 13.1.1 Using the NT Backup UtilityThe NT Backup utility is installed on all
Windows 2000 and Windows Server 2003 machines. It is available by
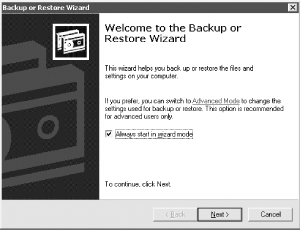
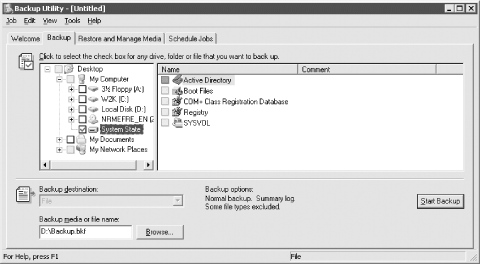
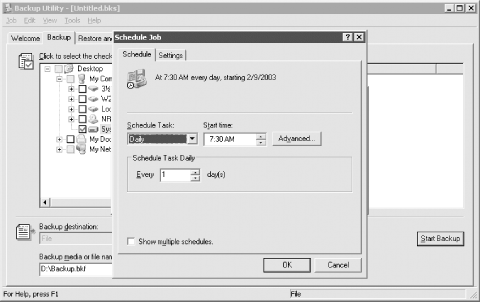
going to Start Figure 13-1. NT Backup Wizard The NT Backup utility can be used to back up the system and also to perform a restore. We will cover restores in the next section. If you click on the "Advanced Mode" link in the first screen, you'll then see a screen such as that in Figure 13-2. Figure 13-2. Advanced mode NT backup In this case, we clicked on the Backup tab and then selected the box beside System State. We could also back up any of the other drives if we wanted, but the System State is all that is required when doing a basic restore of Active Directory. By clicking the "Start Backup" button, we can kick off the backup. In Figure 13-2, we configured the D: drive to be where the backup file gets stored. This could have been to a remote file server or other backup media if we wanted. We can also schedule a backup to run at an interval of our choosing by clicking the "Start Backup" button and then the "Schedule" button. After that, we click the "Properties" button and the screen shown in Figure 13-3 pops up. Figure 13-3. Scheduling NT backup In this case we've configured the backup to run once a day at 7:30 A.M. The screen in Figure 13-3 is actually part of Scheduled Tasks, which is the job scheduling system available in Windows 2000 and Windows Server 2003. |
| [ Team LiB ] |
|