4.1 Apache
Apache is an open
source web server — and the most popular web server in use today
(including both open source and commercial web servers). Apache is fast, efficient, easy to
configure, and very stable on the widest variety of platforms.
Apache runs on
virtually every operating system, including Win32, Linux, BSD,
Solaris, and many other varieties of Unix. The main web site for
Apache is:
- http://www.apache.org/
Apache and Perl are fast friends. This
chapter focuses on Perl-based applications for Oracle that are
implemented as CGI scripts or daemons. In Chapter 5, we'll discuss
Apache's mod_perl module, which
makes the Apache/Perl connection a more efficient one.
To obtain the downloads and information concerning Apache for Unix,
Win32, and Oracle's use of Apache, check out the
following URLs:
- http://www.apache.org/
-
Main Apache umbrella web site for
all the Apache Software Foundation (ASF) related projects.
- http://httpd.apache.org/
-
Central site for the actual Apache web server, the
ASF's core offering.
- http://httpd.apache.org/dist/httpd/
-
Main download page for Apache on Unix.
- http://httpd.apache.org/docs/windows.html
-
Page dedicated towards helping Win32
users of Apache.
- http://httpd.apache.org/dist/httpd/binaries/win32/
-
Download page for Win32 Apache.
- http://www.oracle.com/ip/deploy/ias/index.html?web.html
-
Oracle Corporation's
use of Apache as the Oracle9i Application HTTP
Server (iAS).
- http://httpd.apache.org/docs/mod/directives.html
-
The Apache Run Time Configuration
Directives page.
Because Apache is supplied these days as part of your Oracle
installation, you may simply choose to use that version because
it's highly compatible with the Oracle development
environment. The only problem is that it might be a fairly old
version of Apache, depending on the Oracle version
you're using, and it might therefore be difficult to
modify in order to meet your own production standards or to blend in
with non-Oracle toolsets. In case you need to customize Apache for
your environment, we'll describe in the following
sections how to install an independent Apache directly on both Unix
and Win32. This way, you get the latest and greatest Apache, with
complete freedom to modify it to meet your personal requirements.
4.1.1 Installing Apache on Unix
Download the latest stable version
of Apache from:
- http://httpd.apache.org/dist/httpd/
Get the latest stable tarball (we used
apache_1.3.24.tar.gz) and unpack it into a
temporary working directory:
$ gzip -d apache_1.3.24.tar.gz
$ tar xvf apache_1.3.24.tar
$ cd apache_1.3.24
$ vi README INSTALL
The main installation instructions are within the
INSTALL file where you're
offered two options:
Unless you enjoy pain, we recommend that you go for APACI every
time!
 |
Although we're
installing Apache as root, it may not always be
a good idea to run the resultant httpd servers
as root. Most Unix systems immediately switch
Apache to the nobody user in
nogroup (a harmless person) once
they've attached to port 80. However some may not
and you may therefore risk superuser permissions being accessible
over the Web. Alternatively, you may simply wish to run a thoroughly
secure system. To achieve this goal, you may want to create a special
user to run Apache, typically webuser in
webgroup. Check out the
Group and User directives
on the Apache configuration directives page mentioned previously or
via the two following references:
|
|
Let's run through the Unix installation instructions:
We're going to take the
option to build Apache with Perl. To do this, find out where your
Perl executable is living, and then configure Apache under APACI
using this address, combined with the
-- with-perl directive. Also, let the
./configure program know where you want to
ultimately install Apache with the
-prefix=MyApacheDir switch. We'll assume for now
that you're happy to install Apache in the usual
place, /usr/local/apache, as the
root user:
$ type perl
perl is hashed (/usr/bin/perl)
$ ./configure --prefix=/usr/local/apache --with-perl=/usr/bin/perl
We should now be ready to go straight into the installation: $ make
$ make install You're looking for the following output:
+--------------------------------------------------------+
| You now have successfully built and installed the      |
| Apache 1.3 HTTP server. To verify that Apache actually |
| works correctly you now should first check the         |
| (initially created or preserved) configuration files   |
...
+--------------------------------------------------------+
Finally, get the Apache httpd server itself up
and running:
$ /usr/local/apache/bin/apachectl start
/usr/local/apache/bin/apachectl start: httpd started
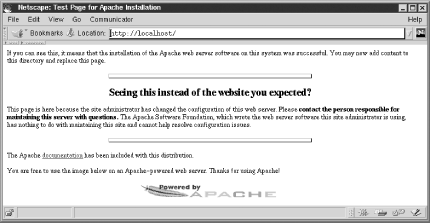
You can test the successful installation by visiting
localhost with your browser, as shown in Figure 4-1.
Now visit the httpd.conf configuration file and
find out where the /cgi-bin/ directive will look
for CGI scripts:
$ vi /usr/local/apache/conf/httpd.conf The default should look like this:
ScriptAlias /cgi-bin/ "/usr/local/apache/cgi-bin/" All CGI scripts should go in the
/usr/local/apache/cgi-bin
directory.
Now search for the following line, dealing with
.cgi scripts:
#AddHandler cgi-script .cgi Uncomment this, and add a similar line to deal with
.pl scripts:
AddHandler cgi-script .cgi
AddHandler cgi-script .pl
If you're not root, or
you'd like a separate development port, you might
like to change the Port value from 80, the default for the Internet,
to some other value higher than 1024. A typical development port is:
Port 8080
To restart Apache, with the new configuration, run the following
command:
$ /usr/local/apache/bin/apachectl restart
(You will find that the Apache logs go into the
/usr/local/apache/logs directory or in
<server_root>/logs, depending upon how
you've configured httpd.conf.)
You'll find a Perl CGI example script in Example 4-1.

4.1.2 Installing Apache on Win32
The process of installing Apache on Win32
platforms has improved by leaps and bounds in the last few years, and
it's now a straightforward install. We downloaded
this self-extracting file:
- apache_1.3.24-win32-x86-no_src.msi
which we obtained from:
- http://httpd.apache.org/dist/httpd/binaries/win32/
If you have the MSI installer program on your Windows box (as
discussed in Chapter 2), double-clicking on the
Apache MSI file should result in a typical pain-free Windows-style
installation.The main question you'll be asked is
whether you want to run Apache as a Windows service or as a console
application. We opted for the second choice because the Win32 version
of mod_perl (which we'll be
installing in Chapter 5) expects Apache to be run
in console mode. Follow these
steps:
As with the earlier Unix installation, we made some tiny changes to
the httpd.conf file to enable the execution of
our CGI Perl files before starting up Apache to test them. To gain
direct access to httpd.conf from the Windows
Start menu, click through the
following:
Start->Programs->Apache HTTP Server->Configure Apache Server->
Edit the Apache httpd.conf Configuration File
Once inside httpd.conf, note the location of
CGI's script bin:
ScriptAlias /cgi-bin/ "C:/Program Files/Apache Group/Apache/cgi-bin/" Now find the handler line dealing with .cgi
scripts:
#AddHandler cgi-script .cgi Uncomment it to activate it and add a similar line to deal with
.pl scripts:
AddHandler cgi-script .cgi
AddHandler cgi-script .pl
At this point, you might want to review the discussion of the Port
value in the Unix installation section, but on Win32
we're generally happy with the default HTTP value,
unless we know something else is running on it:
Port 80 Fire up Apache as a console application from the
Start menu:
Start->Programs->Apache HTTP Server->
Start Apache in Console
To shut down Apache via its console, simply close down the console
window. Any errors will have appeared in:
C:\Program Files\Apache Group\Apache\logs\error.log The best web server in the world is now ready to do your bidding.
4.1.3 Using DBD::Chart with Apache
After dealing with all of these
installation procedures, you're probably itching to
see some action. In a bid to avoid disappointment,
we'll try out the DBD::Chart
Perl script shown in Example 4-1. (We introduced
DBD::Chart in Chapter 3.)
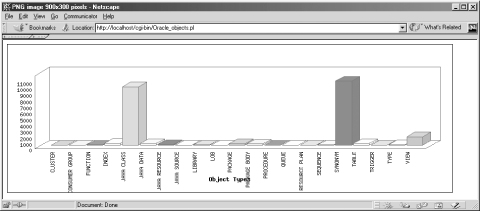
This example graphically charts Oracle database objects. (Check out
the DBI API details in Appendix B, if you need more
detailed
information.)
 |
If you're using
ActivePerl, all of the Perl CGI scripts you place into
Apache's ../cgi-bin/ directory,
under Win32 must have the following first line:
#!/perl/bin/perl
This tells the Apache web server to execute them with ActivePerl,
which is generally available as:
C:\Perl\Bin\perl.exe
If the ActivePerl perl.exe executable is in a
different or nondefault location, alter the Apache directive
appropriately.
|
|
Example 4-1. Oracle_objects.pl
#!/perl/bin/perl
use strict;
use DBI;
use Socket qw(:DEFAULT :crlf); # Built-in Perl module, provides $CRLF

# Step 1: Tell the calling browser a mime.types PNG is on its way.

print "Content-type: image/png$CRLF$CRLF";
# Step 2: Connect to Oracle and prepare the SQL.

my $dbh = DBI->connect( 'dbi:Oracle:orcl', 'system', 'manager',
                        { RaiseError => 1 } );

my $sth = $dbh->prepare( 'SELECT object_type, ' .
                         '       COUNT(*)' .
                         '  FROM dba_objects ' .
                         ' GROUP BY object_type' );
$sth->execute;

# Step 3: Create the DBD::Chart graph, and prepare to insert bars.

my $chart_dbh = DBI->connect('dbi:Chart:');
$chart_dbh->do(
  'CREATE TABLE bars (object_type CHAR(30), object_count FLOAT)' );

my $chart_sth = $chart_dbh->prepare('INSERT INTO bars VALUES(?, ?)');

while ( my @res = $sth->fetchrow) {

   # Step 4: Add an entry to chart.

   $chart_sth->execute( $res[0], $res[1] );
}

# Step 5: Prepare the Chart for output without the need for any
# temporary file storage of the default PNG output.

$chart_sth =
   $chart_dbh->prepare( "SELECT BARCHART " .
                        "  FROM bars " .
                        " WHERE WIDTH=900 " .
                        "   AND HEIGHT=300 " .
                        "   AND 3-D=1 " .
                        "   AND X-ORIENT= 'HORIZONTAL' " .
                        "   AND TITLE =  'Object Types' ");

# Step 6: Send the PNG on its way back to the browser, then clean up.

$chart_sth->execute;
my $row = $chart_sth->fetchrow_arrayref;
binmode STDOUT;
print $$row[0]; # PNG file sent here! :-)
$chart_dbh->do('DROP CHART bars');
$chart_dbh->disconnect;

$dbh->disconnect;
Here's what's going on in this
script:
Before we pump out the PNG's binary image, we need
to tell the calling browser to expect a
mime.types PNG output.
Note the $CRLF newline pair included here; it is
used to separate the content-type declaration from the actual
content. The $CRLF variable from
Perl's built-in Socket.pm
ensures that we get the right combination of
\015\012 for Internet line endings. The
\n character normally represents
\012, and \r normally
represents \015; however, this may vary from
system to system. To be strict about what we output, we use
Socket's $CRLF, which
guarantees to be \015\012 (also known as CRLF,
for carriage return/line feed). Many systems also recognize
\n as a CRLF, so web people often use the
\n\n pair.
We create the SQL to extract the required information from Oracle. Next, we create the destination bar chart and get it ready for data
entry.
Row by row, we fill up the bar chart with SELECT results. We prepare to output the final dynamic chart using the DBI API. We send the PNG directly to the browser. This is done entirely in
memory, without the need for a transitional operating system file.
Once we've sent the PNG on its way, we clean up and
free our resources.
Store this Perl script in your CGI bin directory under either Unix or
Win32:
/usr/local/apache/cgi-bin/
C:/Program Files/Apache Group/Apache/cgi-bin/
(Notice how Apache, even on Win32, still prefers the Unix-style
forward slash, which is used internally by Win32 systems anyway.)
If you're using Unix, you will need to change the
script's first line to call your local Perl
version — for example:
#!/usr/bin/perl
Now call up the following address on your browser:
- http://localhost/cgi-bin/Oracle_objects.pl
You should see something like Figure 4-2.
As we discussed in Chapter 3,
DBD::Chart is a fine piece of work, one whose
limitations are bounded only by feverish imagination. All we need now
is a collection of SQL scripts, a CGI program providing a pick-list
of these scripts, a wing, a prayer and a few parameter switches. If
we had all of these, we could create a really lovely Oracle DBA tool.
Or maybe we should just download a single canned application that
does all of this for us? Read on. . . .

|


