Now that the application works, how do you deploy it? The good news is that in .NET there is no Registry to fuss with; you could, in fact, just copy the assembly to a new machine.
For example, you can compile the program in Example 13-3 into an assembly named FileCopier.exe. You can then copy that file to a new machine running .NET and double-click it. Presto! It works. No muss, no fuss.
For larger commercial applications, this simple approach might not be enough; sweet as it is. Customers would like you to install the files in the appropriate directories, set up shortcuts, and so forth.
Visual Studio provides extensive help for deployment. The process is to add a Setup and Deployment project to your application project. For example, assuming you are in the FileCopier project, click Add Project and choose Setup and Deployment Projects. You should see the dialog box shown in Figure 13-11.
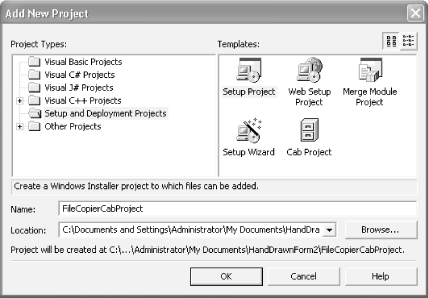
You have a variety of choices here. For a Windows project such as this one, your choices include:
Much like a ZIP file, this compresses a number of small files into an easy-to-use (and easy-to-transport) package. This option can be combined with the others.
If you have more than one project that use files in common, this option helps you make intermediate merge modules. You can then integrate these modules into the other deployment projects.
This creates a setup file that automatically installs your files and resources.
Helps you deploy a web-based project.
You would create a Cab Project first if you had many small ancillary files that had to be distributed with your application (for example, if you had .html files, .gif files, or other resources included with your program).
To see how this works, use the menu choice File->Add Project->New Project and choose and name a Setup and Deployment Project, selecting CAB File. When you name the project (for example, FileCopierCabProject) and click OK, you'll see that the project has been added to your group, as shown in Figure 13-12.
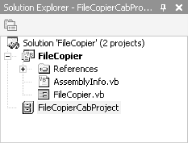
Right-clicking the project brings up a context menu. Choose Add, and you have two choices: Project Output... and File... The latter allows you to add any arbitrary file to the Cab. The former offers a dialog box of its own, as shown in Figure 13-13.
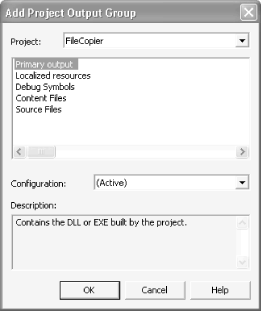
In the Add Project...dialog box you can choose to add sets of files to your Cab collection. The Primary output is the target assembly for the selected project. The other files are optional elements of the selected project that you might or might not want to distribute.
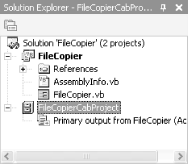
Select Primary output. The choice is reflected in the Solution Explorer, as shown in Figure 13-14.
You can now build this project, and the result is a .cab file, which you can examine with WinZip, as shown in Figure 13-15.
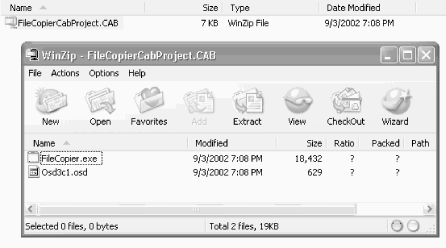
You see the executable file you expect, along with another file, Osd3c1.osd. Opening this file reveals that it is an XML description of the .cab file itself, as shown in Example 13-4.
<?XML version="1.0" ENCODING='UTF-8'?>
<!DOCTYPE SOFTPKG SYSTEM "http://www.microsoft.com/standards/osd/osd.dtd">
<?XML::namespace href="http://www.microsoft.com/standards/osd/msicd.dtd" as="MSICD"?>
<SOFTPKG NAME="FileCopierCabProject" VERSION="1,0,0,0">
        <TITLE> FileCopierCabProject </TITLE>
            <MSICD::NATIVECODE>
                <CODE NAME="FileCopier">
                    <IMPLEMENTATION>
                        <CODEBASE FILENAME="FileCopier.exe">
                        </CODEBASE>
                    </IMPLEMENTATION>
                </CODE>
            </MSICD::NATIVECODE>
</SOFTPKG>
To create a Setup package, add another project, this time choosing Setup Project from the New Project dialog box. This project type is very flexible; it allows all of your setup options to be bundled in an MSI installation file.
If you right-click the project and select Add, you see additional options in the pop-up menu. In addition to Project Output and File, you now find Merge Module and Assembly.
Merge modules are mix-and-match pieces that can later be added to a full Setup project. The Assembly menu option allows you to add .NET components that your distribution might need but which might not be on the target machine; just add the target executable through Project Output.
The user interface for customizing Setup consists of a split pane whose contents are determined by the View menu. You access the View menu by right-clicking the project itself, as shown in Figure 13-16.
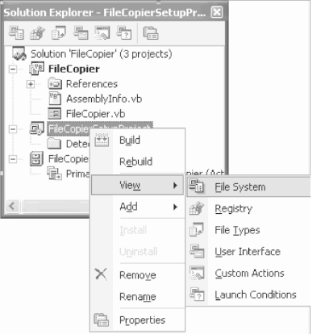
As you make selections from the View menu, the panes in the IDE change to reflect your choices and to offer you options.
For example, if you choose File System, the IDE opens a split-pane viewer, with a directory tree on the left and the details on the right. Clicking the Application Folder shows the myriad files you've already added (the primary output and its dependencies), as shown in Figure 13-17.

You are free to add or delete files. Right-clicking in the detail window brings up a context menu. There is great flexibility to add precisely those files you want.
The folder into which your files will be loaded (the Application Folder) is determined by the Default Location. The Properties window for the Application Folder describes the Default Location as [ProgramFilesFolder]\[Manufacturer]\[Product Name.
ProgramFilesFolder refers to the program files folder on the target machine. The Manufacturer and the Product Name are properties of the project. If you click the Project and examine its properties, you see that the IDE has made some good guesses, as shown in Figure 13-18.
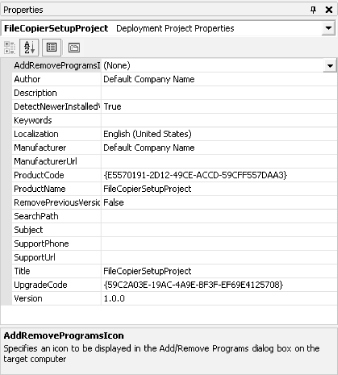
You can easily modify these properties. For example, you can modify the property Manufacturer to change the folder in which the product will be stored under Program Files.
If you want the install program to create a shortcut on the user's desktop, you can right-click the Primary Output file in the Application Folder and drag it to the user's Desktop, as shown in Figure 13-19.
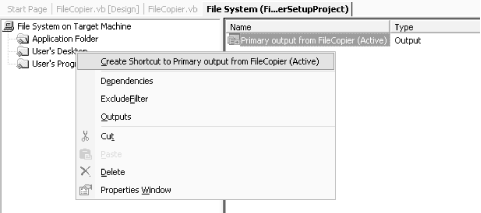
You can add items to the My Documents folder on the user's machine by placing them in the User's Personal Data Folder.
In addition to adding a shortcut to the desktop, you might want to
create a folder within the Start ![]() Programs menu.
To do so, click the User's Program Menu folder,
right-click in the right pane, and choose Add Folder. Within that
folder, you can add the Primary Output, either by dragging or by
right-clicking and choosing Add.
Programs menu.
To do so, click the User's Program Menu folder,
right-click in the right pane, and choose Add Folder. Within that
folder, you can add the Primary Output, either by dragging or by
right-clicking and choosing Add.
In addition to the four folders provided for you (Application Folder, User's Desktop, User's Personal Data Folder, User's Program Menu) there are a host of additional options. Right-click the File System On Target Machine folder to get the menu, as shown in Figure 13-20.
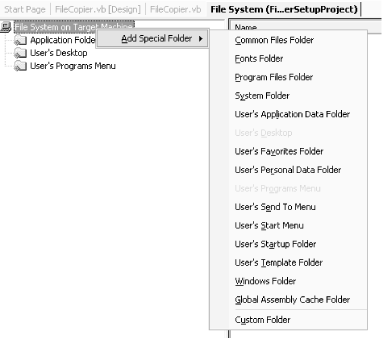
Here you can add folders for fonts, add items to the user's Favorites Folder, and so forth. Most of these are self-explanatory.
So far, you've looked only at the File System folders from the original View menu (pictured in Figure 13-16).
The following sections will review how you can use the deployment process to edit the Registry, set up file types, and otherwise customize the deployment process.
The Registry window (right click on FileCopierSetupProject, and select Registry from the View menu) allows you to tell Setup to make adjustments to the user's Registry files, as shown in Figure 13-21. Click any folder in this list to edit the associated properties in the Properties window.

|
The File Types choice on the View menu allows you to associate application-specific file types on the user's machine. You can also set the action to take with these files.
The View/User Interface selection lets you take direct control over the text and graphics shown during each step of the Setup process. The workflow of Setup is shown as a tree, as shown in Figure 13-22.
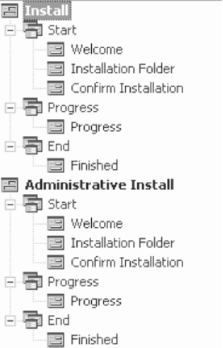
When you click a step in the process, the properties for that form are displayed. For example, clicking the Welcome form under Install/Start displays the properties shown in Figure 13-23.

The dynamic Properties window offers you the opportunity to change the Banner Bitmap and the text displayed in the opening dialog box. You can add dialog boxes that Microsoft provides, or import your own dialog boxes into the process.
If the workflow does not provide sufficient control, you can choose the Custom Options choice from the View menu. You can also specify Launch conditions for the Setup process itself.
Once you've made all your choices and set all the options, you can build the Setup project. The result is a single Setup file that can be distributed to your customers.
|
|
| Top |