
|
|
8.6 Tips and TricksMovable Type is a complicated application, and as you may have guessed from some of the sections earlier in this chapter and in Chapter 5, a very powerful application. This section contains some tips and tricks that may not be readily apparent via the Movable Type manual: how to display a random entry from your blog, how to display the last n non-consecutive days of entries on your blog, and so on. 8.6.1 Displaying a Random EntryA common request from users is the ability to display a random entry from their blogs on one of their pages. This can be useful in driving traffic to your site archives. By providing visitors with a teaser of one of your older entries, you could hook them for hours as they trawl through your archives, looking for similar gems. Because Movable Type produces completely static pages, there is not a built-in set of tags for displaying a random entry on your public site. It is fairly simple, however, to add this feature using a post-processing tool such as PHP or server-side includes. Following is an example of using PHP to include a random entry:
Now that you have created the index template, whenever you post a new entry, the file entry-pool.dump will be rebuilt. It will always contain the last 100 entries that you have posted to your blog. All that is left now is to write a script that will grab a random entry out of the random entry pool (the file entry-pool.dump) and display it. This can be done in PHP, Perl, or any other language. Here is a sample PHP solution, which can be pasted directly into your template if you are already using PHP: <?php
$filename = "entry-pool.dump";
$posts = explode('--------', implode('', file($filename)));
srand((double) microtime( ) * 1000000);
list($num, $it) = each($posts);
$it = trim($it);
while (list($num, $line) = each($posts)) {
$line = trim($line);
if ($line != '')
if (rand(0, $num+1) < 1)
$it = $line;
}
list($title, $url, $excerpt) = explode("\n", $it, 3);
echo "<a href=\"$url\">$title</a> - $excerpt<br />";
?>
8.6.2 Displaying the Last N Nonconsecutive Days of EntriesIn your blog configuration, you can set the number of days of entries that you'd like to appear on your index template. You can also customize the entries listed using either the days or lastn attributes to <MTEntries>. For example, <MTEntries days=10> will list the last 10 days of entries, and <MTEntries lastn="10"> will list the last 10 entries, no matter when they were posted. However, suppose that you wish to display the last 10 days on which you actually posted an entry to your blog. This is covered by neither of the above options, but there is a way to do it.
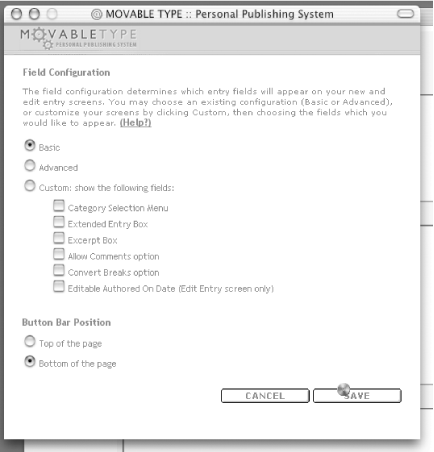
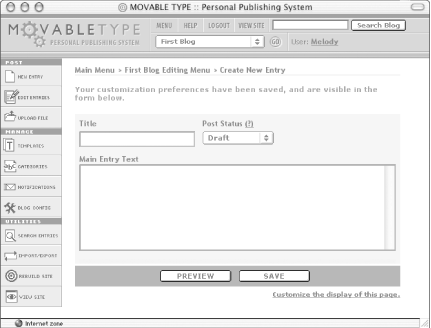
This works because <MTArchiveList archive_type="Daily" lastn="10"> always lists the last 10 days in your archives; and if you use the <MTEntries> container within <MTArchiveList>, it lists all the entries from that archive page (in this case, all the entries posted on that day). 8.6.3 Blog Locally, Publish GloballyIf you have a server account where you do not have the ability to run CGI scripts, you still may be able to use Movable Type to publish your blog. The caveat is that users will not be able to leave comments on your site, because comment functionality requires that the server where you host your site have CGI script access. To do this, you will need to set up your home computer as a web server, enable CGI scripting, and install the Movable Type application on your own system. Installing a web server on your home computer is beyond the scope of this tutorial, but note that for almost every platform that you may be running, the Apache web server is available to install on your computer. In fact, on many systems (OS X and Linux/Unix systems) it may already be installed. If you are on a Windows system, you can use either IIS or the Windows version of Apache. Once you have installed your web server, install Movable Type as usual (see Chapter 5). Then use the system as you would if it were installed on your public web server. When you publish your blog, however, you will need to manually copy the files over to your public web server. You can do this by using an FTP client to upload the files. Or, if you have the rsync tool installed on both your home computer and on your public server, you can use rsync to copy the files. For example: rsync -a -v -essh source username@hostname:destination This command looks complicated, but it is actually fairly straightfoward. -a tells rsync to run in "archive" mode, meaning that it should try to preserve all the file metadata between the source and the destination. -v tells rsync to be "verbose" about the operations it takes and the files it transfers. source, username, hostname, and destination are what you would expect (source and destination are directories). Here is a sample invocation of rsync: rsync -a -v -essh /Users/foo/Sites/blog/ bar@myhost:public_html/blog Copying your files using rsync will be faster than using FTP, because rsync transfers only the pieces of the files that have changed. Thus, using rsync means that less data must be sent over the network. 8.6.4 Customizing the Entry-Editing ScreenBy default, the entry-editing screen contains all the possible fields that can be associated with an entry: title, extended entry box, excerpt, and so on. This may be overkill for your particular use of Movable Type. For example, if you only use the title, the post status, and the entry body, you might want to display only those fields when editing entries. Movable Type allows you to customize the fields that appear on the entry-editing screen. When you are on that screen, click the Customize the Display of This Page link. The customization window (Figure 8-7) gives you the option of Basic, Advanced, or Custom configurations. In a Custom configuration, you can choose the exact fields that you would like to appear. Try changing the configuration to Basic by checking the button next to Basic, then clicking Save. You now see a much simpler new entry screen (Figure 8-8). Figure 8-7. Field configuration Figure 8-8. Saved customization preferences Using this same technique, you can enable or disable certain fields from appearing by choosing a Custom configuration. You can even choose where to display the button bar with the Delete, Preview, and Save buttons. 8.6.5 Multiple Blogs, One Movable Type InstallationAs mentioned earlier in Chapter 5, Movable Type easily supports running multiple blogs on one installation of the system. Running multiple blogs is a good way to create a complicated site containing different sources of content. For example, the site Sew Wrong (http://www.sewwrong.com) uses one blog to manage the news section on the main page and another blog to manage the projects (projects themselves are sorted using categories). To create a new blog, log in to Movable Type, then select the Create a New Blog link. You need to name your blog, and fill in the paths and URLs for the new blog. These values can be determined in the same way as when configuring your first Movable Type blog. See Section 5.2.4 in Chapter 5 for more information on selecting your blog directories, and Section 5.3.2 in Chapter 5 for information on setting these values. For example, if you have a blog whose Local Site Path is currently /home/foo/public_html/news/, the Local Site Path for the new blog that you create might be /home/foo/public_html/projects/. This might correspond to the URL http://www.foo.com/projects/ for your Site URL. When you create a new blog, you, as the author who created the blog, are given full permissions to the blog. This means that you can post, manage templates, rebuild, edit authors, and so on. Other authors currently in the system will not, by default, be allowed access to the new blog you have created. You can grant permission to existing authors by editing their permissions and associating them with the new blog. Because you may not wish to grant all your authors the ability to create new blogs in the system, the permission to "create a new blog" can be disabled for an author. 8.6.6 Displaying Entries on Other PagesA common scenario is one in which you have a personal site http://www.foo.com and a blog http://www.foo.com/blog/. In other words, this is a scenario where your main site does not contain your blog entries; instead you have a separate index of those entries. However, you would like to display the most recent entry from your blog on your main site, to draw visitors into your blog, and to keep your site timely. You can use Movable Type's index templates to easily distribute your blog content out to different pages of your site, even if those pages are not otherwise connected with the Movable Type system. Index templates are essentially output channels for your content. You can use them to push your blog content into syndicated format (RSS templates), into a pool of entries for random selection (Section 8.6.1), into your standard site index (your Main Index template), and so on. To include the most recent entry on your blog in a page unconnected to Movable Type, you first need to set up an index template containing only the most recent entry. (Note that this technique still applies if you would rather display the 2, 3, or however many most recent entries. All that needs to be changed is the number below in the lastn attribute.)
This template will produce a small chunk of HTML with your most recent entry, which can then be inserted into another page on your site using server-side includes (SSI), PHP, or another post-processing technology. For example to include this file in a page using PHP, you would use this code: <?php include('recent.html') ?>
To include the file in a page using SSI, use this code: <!--#include virtual="recent.html"--> Whenever you post a new entry to your site, your index templates will be rebuilt, including the Most Recent Entry template. The chunk of HTML will then be dynamically inserted into the main page of your personal site and will thus always reflect the most recent entry on your blog, without any manual work on your part. |

|
|