
|
|
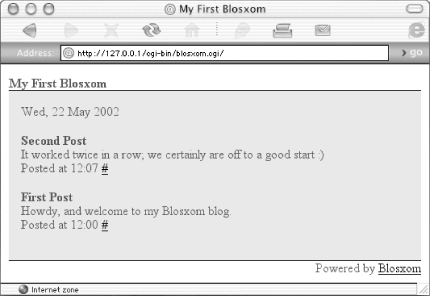
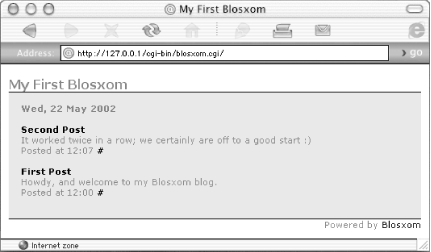
9.10 Customizing and StylingBlosxom's default style is more than a little drab, and purposefully so in the hope it will influence you to add your own look and feel. This section shows you how to do that. First, let's do away with that rather flat header and silly footer. In your text or HTML editor, create a new file containing any HTML you wish to add to the top of the document, before the actual weblog entries themselves. This might be a masthead, your site's standard toolbar, or simply a nicer looking title. Save the file to the $datadir directory as head.html. Example 9-1 shows a sample custom header. Example 9-1. A custom header<html> <head> <title>My First Blosxom</title> <link rel=stylesheet type="text/css" href="/blogbook.css"> </head> <body bgcolor="#ffffff" text="#333333" link="#000000" alink="#000000" vlink="#000000"> <table border="0" width="100%" cellpadding="0" cellspacing="0"> <tr> <td colspan="3"> <span class="title">My First Blosxom</span> </td> </tr> <tr> <td colspan="9" bgcolor="#000000" height="1" ></td> </tr> <tr valign="top"> <td bgcolor="#dddddd" width="15"></td> <td bgcolor="#dddddd" width="100%"> <br /> Do the same for the HTML to be displayed after the weblog entries. Save the file as foot.html. Example 9-2 shows HTML for a custom footer. Example 9-2. A custom footer<br /> </td> <td bgcolor="#dddddd" width="15"></td> </tr> <tr> <td colspan="9" bgcolor="#000000" height="1"></td> </tr> <tr> <td colspan="3" align="right"> Powered by <a href="http://www.raelity.org/lang/perl/blosxom/">Blosxom</a> </td> </tr> </table> </body> </html> The above pairing of head.html and foot.html dresses up the default weblog quite nicely, as shown in Figure 9-5. Figure 9-5. Custom header and footer HTML Now let's change the default font. You can apply HTML and CSS stylesheet magic, not only to your weblog's header and footer but also to the individual entries and daily date-stamps as well. A Blosxom entry's HTML looks something like Example 9-3 by default. Example 9-3. Blosxom's default weblog entry format... <SPAN CLASS="blosxomDate">Wed, 22 May 2002</SPAN> <p class="blosxomEntry"> <a name="second"><span class="blosxomTitle"><b>Second Post</b></span></a> <br /> <span class="blosxomBody">It worked twice in a row; we certainly are off to a good start : )</span> <br /> <span class="blosxomTime">Posted at 12:07</span> <a href="http://127.0.0.1/cgi-bin/blosxom.cgi/2002/May/22#second">#</a> </p> ... You'll notice standard CSS class calling for: blosxomEntry, blosxomTitle, blosxomBody, and blosxomTime. By pulling in a CSS stylesheet containing style definitions for these classes, you can control the look of weblog entries. Example 9-4 is the custom header from Example 9-1 with an inline stylesheet to change the entry font. Example 9-4. A custom header with style<html>
<head>
<title>My First Blosxom</title>
<!--<link rel=stylesheet type="text/css" href="/blogbook.css">-->
<style>
body,td { font-family: Verdana,Geneva,Arial,Sans-serif;
font-size: 11px; color: #666666; }
a { text-decoration: none; }
.title { font-size: 12pt; font-weight: bold; color: #336699; }
.blosxomDate {font-weight: bold; color: #336699; }
.blosxomTitle { font-weight: bold; color: #000000; }
.blosxomTime { text-decoration: italicize; color: #336699; }
</style>
</head>
...
Figure 9-6 shows the result of Example 9-4. Figure 9-6. A little CSS style Should you wish to go beyond CSS for altering the appearance of weblog entries, you can override the default template (see Example 9-3) and define your own using HTML and CSS, again in the form of a text file, story.html, saved to the $datadir directory. Example 9-5 subtly tweaks the default, bolding and underlining the title, removing the "Posted at" bit, and replaces the "#" with "permalink," as seen in Figure 9-7. Example 9-5. A custom entry format<p class="blosxomEntry"> <a name="$fn"> <span class="blosxomTitle"><b><u>$title</u></b></span> </a> <span class="blosxomBody">$body</span> <br /> <span class="blosxomTime"> $ti | <a href="$url/$yr/$mo/$da/$fn">permalink</a> </span> </p> Figure 9-7. Custom entry formatting All the $-prepended components are variables provided by Blosxom for use in your story.html template. They are:
In addition to the header, footer, CSS, and entry templating support Blosxom provides natively, you always have standard additional options available. You can pull a weblog's content into a server-parsed (.shtml) page using SSI, have your content management system pull in Blosxom output, and so on. |

|
|