15.2 Objective 2: Reconfigure,
Build, and Install a Custom Kernel and Modules
Because Linux is an open
source operating system, you are free to create a customized
Linux kernel that suits your specific needs and hardware. For
example, you may wish to create a kernel for your system if
your distribution installed a generic kernel that was compiled
using the 80386 instruction set. Such a kernel will run on any
compatible processor but may not utilize some of the
capabilities of newer processors. Running a kernel optimized
for your particular CPU can enhance its performance.
You can also install new kernels to add
features, fix bugs, or experiment with kernels still under
development. While the compilation of such kernels isn't much
of a leap beyond recompiling your existing version, it's
beyond the scope of the LPIC Level 1 exams.
15.2.1 Kernel Background
If you are new to the idea of building a
custom kernel, don't feel intimidated. Linux developers have
created a simple and reliable process that you can follow, and
everything you need is available in your Linux distribution.
15.2.1.1 Kernel versions
Nearly all software
projects, even small ones, use a numerical versioning scheme
to describe each successive release. Kernel versions are numbered using the
following convention:
major.minor.patchlevel
- Major release
-
Increments in the major release indicate
major developmental milestones in the kernel. The present
release is 2.x.x (don't let the low major release number
fool you -- there have been plenty of developmental
milestones in the Linux kernel's history).
- Minor release
-
The minor release indicates significant
changes and additions, which taken together will culminate
in a new major release. The Linux kernel minor release
numbers fall into one of the following categories:
- Even-numbered releases
-
Kernels with even-numbered kernel
versions (2.0, 2.2, 2.4, and so on) are considered stable.
- Odd-numbered releases
-
Kernels with odd-numbered minor release
versions (2.1, 2.3, and so on) are in development and are
primarily used by kernel developers. When goals for the
development of a minor release are met and testing shows
that the kernel is stable, a new even-numbered minor
release is created. This is how development kernels are
released as production kernels.
- Patch level
-
As bugs are found and corrected or as
planned features are added, the kernel patch level is
incremented (2.2.15, 2.3.38, and so on). Generally speaking,
it is safest to run the latest patch level of the kernel to
be assured of having the most current bug fixes. In reality,
it is more important to track kernel development and upgrade
your kernel only if your existing version is found to have a
serious problem or if you are already experiencing
difficulty.
15.2.1.2 Required tools and
software
To compile a custom
kernel, you need development tools including a C compiler,
assembler, linker, and the make
utility. If you selected a kernel development option when you
installed Linux, you should already have these tools on your
system. The C compiler is the program that translates C source
code into the binary form used by your system. The standard
compiler on most Linux systems is the GNU C Compiler, gcc. The assembler and linker are
needed for some portions of the kernel compilation.
The compilation process is controlled by
make, a utility that executes
commands such as gcc as
directed by a list of dependency rules. These rules are stored
in the Makefile. A brief introduction to make is provided in Section
14.3.
Of course, you also need the kernel source
code. Your Linux distribution will come with one or more
packages containing everything you need. For example, on a Red
Hat system, use the following two RPM packages (listed here
without their version numbers):
- kernel-source
-
This package contains the C language source
code for the kernel and modules.
- kernel-headers
-
This package contains C language header
files for the kernel. The header files define structures and
constants that are needed for building most C programs, as
well as the kernel itself.
On most systems,
the kernel's source code can be found in
/usr/src/linux, which should
be a symbolic link to the specific version of the kernel
you're using. For example, here is the /usr/src
directory for a system with several kernel versions: # ls -l /usr/src
lrwxrwxrwx 1 root root 12 Feb 16 04:19
linux -> linux-2.3.45
drwxr-xr-x 15 root root 1024 Jan 29 01:13 linux-2.2.14
drwxr-xr-x 17 root root 1024 Feb 16 03:00 linux-2.2.5
drwxr-xr-x 14 root root 1024 Feb 16 04:35 linux-2.3.45
In this example, symbolic link
/usr/src/linux points to the directory hierarchy for
development kernel 2.3.45. The /usr/src/linux link is
important when you work with multiple kernels, as it is
assumed that the link will be manually removed before
installing new kernel source trees. For the purposes of Exam
102, you need to be concerned only with the kernel source
installed by your distribution.
|
You will need to know where the kernel
source code is stored (e.g., /usr/src/linux).
Explore the kernel source tree to familiarize yourself
with its contents. Pay particular attention to
.config and the Makefile.
|
15.2.2 Compiling a Custom
Kernel
This section provides an overview of
kernel compilation and installation by way of example. This
example uses kernel Version 2.2.5, and our objective is to
create a single-processor 2.2.5 kernel for a Pentium system
with IDE disks to replace a
generic kernel that came with the distribution.
Assume that the development environment --
including compiler, make,
kernel source code, and kernel headers -- is installed. The
root account will be used to create and install the
kernel, although any user can compile a kernel given the
appropriate filesystem permissions. Before building a
customized kernel, you should read
/usr/doc/HOWTO/Kernel-HOWTO and
/usr/src/linux/README.
15.2.2.1 Creating a kernel
configuration
The first step in
creating a kernel is configuration. There are more than 500
options for the kernel, such as filesystem, SCSI, and
networking support. Many of the options list kernel features
that can be either compiled directly into the kernel or
compiled as modules. During configuration, you indicate for
each option whether you want that feature:
-
Compiled into the kernel ("yes" response)
-
Compiled as a module (module response)
-
Don't want the feature at all ("no" response)
Some selections imply a group of other
selections. For example, when you indicate that you wish to
include SCSI support, additional options become available for
specific SCSI drivers and features. The results from all of
these choices are stored in the kernel configuration file
/usr/src/linux/.config, which is a plain text file that
lists the options as shell variables set to one of y,
m, or n in accordance with your response for
each item.
To begin, set the current working directory
to the top of the source tree: # cd /usr/src/linux
There are several ways to set up
.config. Although you can do so, you should not edit
the file manually. Instead, you may select from three
interactive approaches. An additional option is available to
construct a default configuration. Each is started using make.
Syntaxmake config
Description
Running make
config is the most
rudimentary of the automated kernel-configuration methods and
does not depend on any form of display capability on your
terminal. In response to make
config, the system presents you with a question in your
console or window for each kernel option. You respond to the
questions with y, m, or n for yes,
module, or no, respectively. This method can
admittedly get a bit tedious and has the liability that you
must answer all the questions before being asked if you wish
to save your .config file and exit. However, it is
helpful if you do not have sufficient capability to use one of
the menu-based methods (described next). A make config session looks like
this: # make config
rm -f include/asm
( cd include ; ln -sf asm-i386 asm)
/bin/sh scripts/Configure arch/i386/config.in
#
# Using defaults found in arch/i386/defconfig
#
*
* Code maturity level options
*
Prompt for development and/or incomplete code/drivers
(CONFIG_EXPERIMENTAL) [Y/n/?]Y
Each option is offered in this manner.
Syntaxmake menuconfig
Description
This configuration
method is more intuitive and can be used as an alternative to
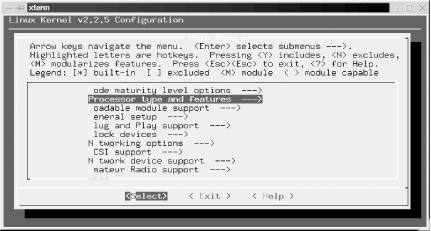
make config. It creates a
text-mode-windowed environment where you may use
up/down/left/right and other keys to configure the kernel. The
menu depends on the ability of your terminal or terminal
window to use curses, a
standard library of terminal cursor manipulation instructions.
If your terminal does not support curses (though most do), you
must select another method. The make
menuconfig window is illustrated in Figure
15-1 in an xterm.

Syntaxmake xconfig
Description
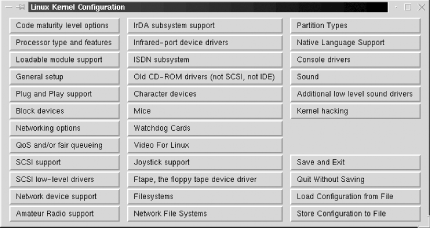
If you are running
the X Window System, the make
xconfig configuration method presents a GUI menu
with radio buttons to make the selections. It is the most
appealing visually but requires a graphical console or X
display. Figure
15-2 shows the top-level make
xconfig window.

The options presented in each case are the
same, as is the outcome.
Syntaxmake oldconfig
Description
make
oldconfig can create a
default .config file. This method sets up a default
.config file without interaction from the user. This is
convenient if you need a starting point and your distribution
did not install a default .config file. This method
will also build a new .config file from one customized
for a previous kernel release, but this is beyond the scope of
Exam 102.
 |
In the
absence of user responses, menuconfig and xconfig will create a
default .config file, equivalent to the one
created by oldconfig.
| |
Example
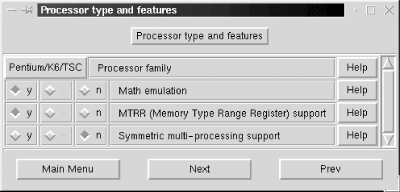
To create the .config file for this
example, the target processor is set as Pentium. Using make xconfig, the selection looks
like the window shown in Figure
15-3.

By setting the Processor family parameter to
Pentium/K6/TSC and saving the configuration, the
following revised configuration lines are written in
.config: # Processor type and features
#
# CONFIG_M386 is not set
# CONFIG_M486 is not set
# CONFIG_M586 is not set
CONFIG_M586TSC=y
# CONFIG_M686 is not set
CONFIG_X86_WP_WORKS_OK=y
CONFIG_X86_INVLPG=y
CONFIG_X86_BSWAP=y
CONFIG_X86_POPAD_OK=y
CONFIG_X86_TSC=y
CONFIG_MATH_EMULATION=y
CONFIG_MTRR=y
# CONFIG_SMP is not set
The complete .config file will contain approximately 800
lines. You should look through the other kernel options with
one of the windowed selectors first to familiarize yourself
with what is available before making your selections.
Now that .config is created, one small
change is made to Makefile to
differentiate our new custom kernel from the generic one.
Examining /usr/src/linux/Makefile, the first four lines look like this:
VERSION = 2
PATCHLEVEL = 2
SUBLEVEL = 5
EXTRAVERSION = -15
You can see that the kernel version is 2.2.5
and that an additional version number is available. In this
case, the generic kernel had the extra version suffix of
-15, yielding a complete kernel version number
2.2.5-15. This EXTRAVERSION parameter can be used to
indicate just about anything. In this example it denotes the
15th build of kernel 2.2.5, but -pentium is added to
the end for our custom version. Edit Makefile and
change EXTRAVERSION as follows: EXTRAVERSION = -15-pentium
This change completes the configuration for
this example.
15.2.2.2 Compiling the kernel
Once the
.config and Makefile files are customized, the
new kernel can be compiled by running the following commands:
-
make dep
In this step, source files (.c) are
examined for dependencies on header files. A file called
.depend is created in each directory containing
source files to hold the resulting list, with a line for
each compiled object file (.o). The .depend
files are automatically included in subsequent make operations to be sure that
changes in header files are compiled into new objects. Since
kernel code isn't being developed here, no header file
changes are needed. Nevertheless, make dep is an essential
first step in the compilation process.
-
make clean
The "clean" operation removes old output
files that may exist from previous kernel builds. These
include core files, system map files, and others. They must
be removed in order to compile a new, clean kernel.
-
make
bzImage
The bzImage file is our ultimate goal, a bootable kernel image file,
compressed using the bzip2 utility. It is
created in this step along with some additional support
files needed for boot time.
-
make
modules
Device drivers and other items that were
configured as modules are compiled in this step.
-
make
modules_install
All of the modules compiled during make modules are installed under
/lib/modules/kernel-version in this
step. A directory are created there for each kernel version,
including various extraversions.
The bzImage and modules
portions of the kernel-compilation process will take the
most time. Overall, the time required to build a kernel
depends on your system's capabilities.
After completing this series of make processes, compilation is
complete. The new kernel image is
now located in /usr/src/linux/arch/i386/boot/bzImage.
15.2.2.3 Installing the new kernel
and configuring LILO
Now that the new kernel has been compiled,
the system can be configured to boot it:
-
The first step is to put a copy of our new
bzImage on the root partition so it can be booted by
LILO. The copy is named just as it was named during
compilation, including the extraversion: # cp -p /usr/src/linux/arch/i386/boot/bzImage
/boot/vmlinuz-2.2.5-15-pentium
-
Now, a listing of kernels should show at
least your default kernel and your new one,
vmlinuz-2.2.5-15-pentium: # ls -1 /boot/vmlinuz*
/boot/vmlinuz
/boot/vmlinuz-2.2.14
/boot/vmlinuz-2.2.5-15
/boot/vmlinuz-2.2.5-15-pentium
/boot/vmlinuz-2.2.5-15smp
/boot/vmlinuz-2.3.45
-
Next, add
a new image section to the bottom of
/etc/lilo.conf : image=/boot/vmlinuz-2.2.5-15-pentium
label=linux-pentium
root=/dev/sda1
read-only
-
Finally, lilo (the
map installer) is run again to incorporate the new kernel:
# lilo
Added linux-smp *
Added linux-up
Added latest
Added linux-pentium
It's not uncommon to forget the execution of
lilo. If you do forget, lilo won't know about the new kernel
you've installed despite the fact that it's listed in the
lilo.conf file. This is because lilo.conf is not
consulted at boot time.
If everything has gone according to plan,
it's time to reboot and attempt to load the new kernel.
 |
As you review the README
file that comes with the kernel source, you may
see suggestions for overwriting your existing
kernel, perhaps with a generic name such as
vmlinuz, and reusing your existing LILO
configuration unaltered (i.e., without changing
lilo.conf ). Unless you're absolutely sure
about what you are doing, overwriting a known-good
kernel is a bad idea. Instead, keep the working
kernel around as a fallback position in case
there's a problem with your new one. | |
15.2.2.4 Examine the new
modules
Now that the new kernel is installed, you
should take a look at /lib/modules, which now has a new
directory for the new kernel: # ls -1 /lib/modules
2.2.14
2.2.5-15
2.2.5-15-pentium
2.2.5-15smp
2.3.45
|
Remember the series of make steps required to build
the kernel: config (or
menuconfig or xconfig), dep, clean, bzImage, modules, and modules-install. Be aware of
where the kernel source code is installed. Also, note
that you need to copy the kernel image file
(bzImage) to the root filesystem and that you
must rerun lilo before
you can boot it. By all means, practice compiling and
installing a kernel at least once before taking Exam
102. |
|