|
|
|
1.2 ProjectsA project has two main jobs: to act as a container for our source files and to compile those files into some kind of component, typically either a Dynamic Link Library (DLL) or Windows Executable (EXE). We shall now run through the main types of projects supported by VS.NET.[5]
1.2.1 Project TypesVisual Studio .NET classifies projects by implementation language and then by project type in its New Project dialog box. However, many of the project types have a great deal in common despite using different languages, so although VS.NET 2003 Enterprise Edition lists more than 90 distinct types, most fall into one of six groups: managed local projects, managed web projects, Smart Device projects, unmanaged local projects, unmanaged web projects, and setup projects.
A managed local project will create a .NET assembly. Managed web projects do the same, but the project output is intended to be accessed by a client over a network connection, typically using either a browser or a web service proxy. Web projects are therefore always associated with a web application on a web server. And although managed web projects produce a .NET assembly just like a managed local project, with a web project, Visual Studio .NET will place the assembly on the web server as part of the build process.
Smart Device projects are available only in C# and VB.NET, and they build applications that target Pocket PCs and other mobile devices. These projects are not available with VS.NET 2002. An unmanaged local project builds an unmanaged file (.dll or .exe). An unmanaged web project is the unmanaged counterpart of the managed web project type, in that its output will be deployed to and run from a web server. Setup projects are used to create Windows Installer (.msi) files that can be used to deploy the final output of your solution. 1.2.1.1 Managed localA managed local application could be written in C#, J#, VB.NET, or Managed C++ (MC++). VB.NET, C#, and J# all support the same local application types, which are shown in Table 1-1.
Each of these project types builds a .NET assembly. You may be surprised to see the Web Control Library in this "local" category, but bear in mind that the distinguishing feature of a web project is that it is associated with a specific web application on a web server. Web Control Libraries can be used in any number of web applications but are not specifically associated with any one web application in particular. These projects simply produce a .NET DLL as their output, and this DLL will then typically be used by one or more web projects. Managed C++ supports a subset of the project types available with C# and VB.NET. There is no MC++ Web Control Library project type, and on Visual Studio .NET 2002, the Windows Service, Windows Application, and Windows Control Library project types are also missing. The Visual Studio .NET designer does not support the use of Managed C++ to build Web Forms applications.
The MC++ project templates are in Table 1-2. Note that the names of these project types changed between VS.NET 2002 and VS.NET 2003, so both names are given in the table.
1.2.1.2 Managed web-basedIn a managed web-based project, the build output is copied to a web server and will run on that web server. (The web server can be either the one on your local machine or a remote server.) Of course, a web application typically needs more than just a compiled .NET assembly to run—there are usually files containing content such as .css and .html files, image files such as .gif or .jpeg files, and often files containing a mixture of code and content, such as .aspx files, that must be present on the server. So Visual Studio .NET does not just copy the compiled assembly to the web server—the entire project resides there.
MC++ has only one project template in this group: ASP.NET Web Service (.NET). (VS.NET 2002 called this project type Managed C++ Web Service.) This project type is essentially the same as the VB.NET, J#, and C# ASP.NET Web Service project. All of the VB.NET, J#, and C# managed web-based projects are shown in Table 1-3.
An empty web project is useful if you want to build either an ASP.NET web application or web service, but you do not want the default options or files generated by VS.NET. (Of course, you could also write your own wizard to generate files that are more to your liking—see Chapter 9.) 1.2.1.3 Smart DeviceSmart Device projects allow you to build applications that run on palmtop devices. These project types are not available on Visual Studio .NET 2002, and they target only C# and VB.NET. Each language lists just one Smart Device project. However, both the C# and VB.NET Smart Device projects open a wizard that allows you to target either the Pocket PC or the Windows CE platform, creating either a Windows Application, a Class Library, a Nongraphical Application, or an Empty Project. VS.NET ships with an emulator that enables you to test and run your applications on your PC without needing a real PDA. Detailed discussion of palmtop development is beyond the scope of this book. For more information on developing Windows Forms applications on the .NET Compact Framework, please see Essential Windows Forms (Addison-Wesley). 1.2.1.4 Unmanaged localUnmanaged local projects build unmanaged executable files. These projects fall into three groups based upon the library used: Active Template Library (ATL) projects, Microsoft Foundation Class (MFC) projects, and straight Win32 projects. See Table 1-4.
You may be surprised to see the MFC ISAPI Extension project listed as a local project, not a web project. But the defining feature of a web project is that it is associated with a particular web application on a server. MFC ISAPI Extension projects do not copy their build output to a web server—they work like any other local project. It is up to you to work out how to deploy the extension to a server. 1.2.1.5 Unmanaged web-basedTwo ATL web-based projects, ATL Server Project and ATL Server Web Service, let you build web applications and web services, respectively. Both kinds of project build ISAPI extensions, using the ATL Server classes. (These classes were added to the ATL to coincide with the release of VS.NET.) Like managed web-based projects, these projects connect directly to your web server and can contain other types of files than just the DLLs. To learn more about building unmanaged web-based projects with the ATL Server classes, see ATL Internals, Second Edition (Addison-Wesley). 1.2.1.6 Setup and deploymentThe setup and deployment projects included in VS.NET allow you to create Microsoft Installer files (.msi) to deploy any VS.NET project. See Chapter 6 for more information about these projects. 1.2.1.7 Other project typesA few project types stand on their own, rather than fitting into any broad category. Database projects are described in Chapter 5. VS.NET Add-in projects are described in Chapter 8. Appendix A contains a complete list of all project types. 1.2.2 Adding ProjectsNow
that
we have seen the available project types in VS.NET, let us see how to
add projects to a solution. Adding projects is fairly
simple—right-click on the solution in the Solution Explorer,
and select Add
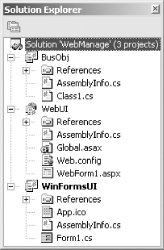
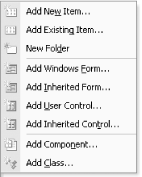
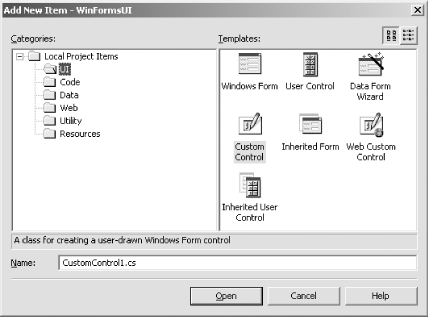
Figure 1-8 shows a typical example—a solution called WebManage containing three projects: a Class Library project named BusObj, an ASP.NET Web Application named WebUI, and a Windows Application named WinFormsUI. Figure 1-8 shows how this looks in the Solution Explorer. Figure 1-8. Multiple projects in the Solution Explorer 1.2.3 Managing filesProjects contain source files that will be compiled to produce the project's output. The following sections describe how to add new or existing files to a project and how to remove files from a project. 1.2.3.1 Adding a new fileYou can add a new file to your project by right-clicking on the project in the Solution Explorer and selecting an item the Add submenu, which is shown in Figure 1-9. (The same choices are also available from the main Project menu.) The options these menus will offer depends upon the project type you are using (e.g., Add Web Form will be available only on web projects). Figure 1-9. Adding a project item The list of items offered on the menus is not comprehensive; it merely shows the most commonly used items. You can get the full list by selecting Add New Item (Ctrl-Shift-A), which will display the Add New Item dialog box, as shown in Figure 1-10. (See Appendix B for a list of the available items, and see Chapter 9 for more information about customizing the items and adding your own.) Figure 1-10. The Add New Item dialog box 1.2.3.2 Adding an existing fileSometimes you will want to add an existing file to a project. For
example, if you have downloaded some sample code from MSDN, you may
want to add one of the sample's files to a project
of your own. To add an existing file, go to the Project menu and
select Project
With VB.NET, C#, and J# projects, if the file is already inside the project directory, no copy will be made. Otherwise, VS.NET will copy the file into the project directory. If you would like to force VS.NET to use the original file when it would normally make a copy, you can choose to link the file instead. If you look at the Open button on the Add Existing Item dialog, you will see that it has a drop-down arrow on its right. If you click on this, it pops up a menu with a Link File option. If you select this option, VS.NET will add the original file to the project, even when it would otherwise have made a copy.
1.2.3.3 Moving files between projectsIf you wish to move a file between two projects in the same solution, you can simply use drag and drop in the Solution Explorer. 1.2.3.4 Removing or deleting a fileYou can remove a file from a solution by highlighting it in the Solution Explorer and selecting Delete, either from the main Edit menu or from the file's context menu in the Solution Explorer. (You can also just press the Delete key.) For some project types, there will be a Remove option instead of a Delete option. Whether you see Remove or Delete will depend on the project type—VB.NET and C# projects offer Delete, everything else offers Remove. Either Delete or Remove will take the item out of the project's list of files, but Remove will leave the file in the directory, while Delete moves the file to the Recycle Bin. Although C# and VB.NET projects provide the destructive Delete option instead of Remove, you may still remove an item from these project types nondestructively. Instead of selecting Delete, you can select Exclude from Project. (This is available both from the file's context menu and from the main Edit menu.) This takes the file out of the project but leaves the file in place on your hard drive—in other words, this does exactly what Remove does on other project types. 1.2.3.5 File propertiesYou can see a file's properties in the properties window by selecting the file in the Solution Explorer. (You can move the focus to the properties window by pressing the F4 key.) The properties shown will depend on the type of file and the type of project. Most files have very few properties, and the only properties common to all files regardless of type are Name and FullPath (those being the name of and path to the file). We will discuss type-specific file properties as we look at the individual file types in question. 1.2.4 Solution ItemsSome files do not belong to any particular project in a solution. For example, you may have a solution that contains multiple web applications, all of which share a single Cascading Stylesheet (.css) file. You could arbitrarily pick one of the projects and make the file a member of it, but this does not accurately reflect how the file is used and could confuse other developers who use your code. Fortunately, you don't have to do this. Visual Studio .NET lets you add files to a solution without making them a member of any particular project. Such files are called solution items.
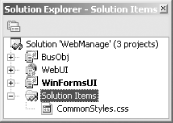
You can add a solution item by selecting the Solution node in the Solution Explorer then using Add New Item (Ctrl-Shift-A) from the File menu to create a new solution item or Add Existing Item (Shift-Alt-A) to add an already existing file to the solution items. You can add any file type you like to a solution. Figure 1-11 shows how VS.NET displays solution items in the Solution Explorer. Figure 1-11. Solution items in the Solution Explorer If you use the Add New Item dialog box to create a new solution item, the new file will be created inside of your solution's folder. If you use the Add Existing Item dialog box, however, the items can live in any folder (i.e., you can add files that do not live in your solution folder). This is useful because it allows you to give yourself easy access to files in projects outside of your solution. Suppose you are writing a program that consumes a web service. It may be useful to have access to the WSDL file for that service. (A WSDL file is an XML file containing a detailed formal description of the facilities offered by a web service.) This WSDL file will not be part of your client project—it will be supplied by the web service itself.[6] Although you can just go and find the file with the File Open dialog box every time you want to look at it, this gets old fast. You could also simply include the Web Service project in your solution, but that may slow down your load time and would also make it easier to modify and rebuild the project by accident. But if you just add the WSDL file to your solution as a solution item, it will be available in the Solution Explorer whenever you need it, without the need to include the project in the solution you are working on.
1.2.5 Miscellaneous FilesVisual
Studio .NET will let you open and edit files
that do not belong to any project and
that are not solution items—you can open any file with File
|
|
|
|