6.7 File System View
All applications need to
copy
one or more files onto the target computer. Visual Studio
.NET's Setup project File System view lets you
choose which files will be installed and where they will go. Figure 6-12 shows a typical File System view in a normal
Setup project. (Web Setup projects have different defaultsthey
just have a single folder labeled Web Application Folder.)
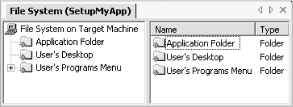
The tree on the left of the view represents various folders on the
target machine. Folders are never referred to by their exact path, as
hardcoding paths into installers is bad practice. System directories
tend to be in different places from one machine to the next. (For
example, the Windows directory might be C:\WINNT
or D:\WINDOWS.) Forcing a particular
installation path for the application is also bad practiceyou
should let users choose where to put the program. The exact path for
all folders will therefore be determined during installation.
Visual Studio .NET therefore supports a number of
predefined abstract folders. For
example, the Application Folder shown in Figure 6-12
represents the folder chosen by the user when installing the
application. (By default, this is typically, but not necessarily,
C:\Program Files\Company Name\Application Name.)
You would usually put your program's executable
files in here. For Web Setup projects, you will instead see a Web
Application Folder, which represents the virtual directory into which
the application is installed.
You can add other folders by choosing from the Add Special Folder
submenu of the "File system on target machine' node"s context menu. Most
of the standard system directories are supported. Table 6-3 describes each special folder.
Table 6-3. Special folders
|
Common Files
|
Where components shared between applications can be installed.
Usually C:\Program Files\Common Files.
|
|
Fonts
|
The system fonts directory. Typically
C:\Windows\Fonts.
|
|
Program Files
|
Where applications are usually installed. This is typically
C:\Program Files.
|
|
System
|
The Windows system directory. Usually
C:\Windows\System32.
|
|
User's
Application Data
|
Per-user application-specific data in the user's
profile. Typically C:\Documents and
Settings\<username>\Application Data.
|
|
User's Desktop
|
The user's desktop. This is usually
C:\Documents and
Settings\<username>\Desktop.
|
|
User's Favorites
|
The user's Favorites menu. Typically
C:\Documents and
Settings\<username>\Favorites.
|
|
User's Personal
Data
|
Per-user My Documents directory. This is usually
C:\Documents and Settings\<username>\My
Documents.
|
|
User's Programs
|
The Programs section of the user's Start menu.
Typically C:\Documents and Settings\<username>\Start
Menu\Programs.
|
|
User's Send To
Menu
|
The Send To submenu on the Windows Explorer file context menu. This
is usually C:\Documents and
Settings\<username>\SendTo.
|
|
User's Start Menu
|
The user's start menu. Typically
C:\Documents and Settings\<username>\Start
Menu.
|
|
User's Startup
Folder
|
Files to be executed when the user logs on. This is usually
C:\Documents and Settings\<username>\Start
Menu\Programs\Startup.
|
|
User's
Template Folder
|
Holds new document templatesused for the New submenu of
Windows Explorer. Typically C:\Documents and
Settings\<username>\Templates.
|
|
Windows Folder
|
The Windows directory. Usually C:\Windows.
|
|
Global Assembly Cache
Folder
|
The .NET Global Assembly Cache. Files added to this directory should
be strongly named .NET components. They will be added to the GAC at
installation time.
|
|
Module Retargetable Folder
(Merge Modules only)
|
A folder whose destination may be specified by any application that
includes this merge module.
Some merge modules don't care where their files are
installed so long as they are installed somewhere. They allow the
exact location to be chosen by the application that is using the
merge module. If you want to allow the same flexibility for your own
merge modules, put the files in this folder.
When you use a module that has retargetable files in an installer,
you can choose where to place the files with the Properties window.
Select the merge module in the project and expand its
MergeModuleProperties property. Modules with
retargetable output will have a child
ModuleRetargetableFolder property, allowing you to
choose where to put the merge module's output.
|
Having decided which directories you wish to populate during
installation, you must tell Visual Studio .NET what files it should
place in those directories. You do this by selecting the folder and
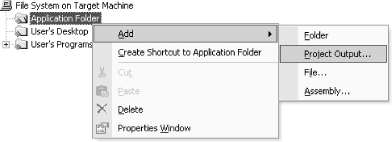
then selecting Add from the context menu.
As Figure 6-13 shows, you have several choices. You
can add a new subdirectory with Folder. You can install any file you
like. The Assembly item lets you install a .NET component and get
Visual Studio .NET to automatically determine which other components
it depends upon and install those too. Project Output lets you
install components built by other projects in the same solution as
your Setup project.
6.7.1 Adding Project Output
Whatever
else you choose to install on the target machine, you will almost
certainly want to copy your program's executable
code. The way to do this is to add a Project Output item to the
appropriate folder. (For a normal application, this will be the
Application Folder. For a web application, it will usually be the Web
Application Folder.)
 |
Do not place the Project Output of a web application in the Web
Application Folder's bin
subdirectory. Although this is where the DLL must be installed, the
web project will create the bin directory as
part of its output. So placing the output in the
bin subdirectory would cause the DLL to end up
in a bin\bin subdirectory. The correct (and the
default) place for a web application's output group
is therefore always the Web Application Folder.
|
|
When you select Add  Project Output... from a
folder context menu (as shown in Figure 6-13) the
Add Project Output Group dialog (Figure 6-14) will
appear. This lets you choose the project whose output you would like
to include (from the Project: combo box). It also allows you to
select which particular items you would like to
installprojects generate several outputs, but you
don't necessarily want to install all of them. Project Output... from a
folder context menu (as shown in Figure 6-13) the
Add Project Output Group dialog (Figure 6-14) will
appear. This lets you choose the project whose output you would like
to include (from the Project: combo box). It also allows you to
select which particular items you would like to
installprojects generate several outputs, but you
don't necessarily want to install all of them.
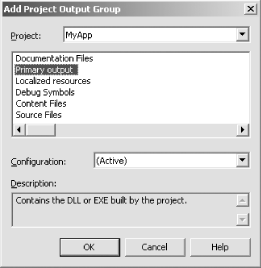
For nonweb applications, you will normally want just the Primary
Output group (see Table 6-4). The Primary Output
is the main file that the project builds. This will usually be either
a DLL or an EXE file, depending on the project type. For web
applications, you will also want to select Content Filesthis
includes .aspx pages and any graphics.
 |
If you use either this dialog or the wizard to add both Primary
Output and Content Files groups in one step, they will both end up in
the same directory, and you will need to move one of them afterward.
|
|
Table 6-4. Primary output groups
|
Documentation Files
|
C# source files can be annotated with special comments (starting with
///). The C# compiler strips out this information
to build an XML documentation file. Visual Studio .NET is able to use
these files to provide documentation tooltips.
You would include such output when building a Setup project whose
purpose is to install software components on a
developer's machine. You would not normally include
this output group in anything intended to be installed on an end
user's machine.
|
|
Primary Output
|
The Primary Output is the main file built by the project, usually a
DLL or an EXE file. You would normally include this output group in
any Setup project.
|
|
Localized Resources
|
Any satellite resources created for localized versions of an
application will be in this output group. You would include this
group for any project in which you have created localized resources.
|
|
Debug
Symbols
|
When compiling with debugging enabled, the compiler produces a
separate file containing the symbolic information required by the
debugger (a .pdb file). This output group
contains that information.
You would not normally want to redistribute debug symbols. However,
sometimes you will not be able to reproduce problems on a
developer's machine, in which case it can be useful
to install debug symbols on a target machine in order to try and
diagnose problems. You would include this group when building a
special debugging installation.
|
|
Content Files
|
Project files that do not get compiled will appear in this group.
(This will include any project item with a
BuildAction property of
Content.)
You usually want to include this output group for web applications
because .aspx files and graphics are all classed
as Content. For other applications, you usually
wouldn't include this group.
|
|
Source
Files
|
This group includes all of the source code in the project.
You would very rarely include this group. However, if you are
diagnosing a problem in situ, this, in conjunction with the Debug
Symbols group, would provide a way of installing everything required
to do source-level debugging on a machine without having to copy the
entire solution across.
|
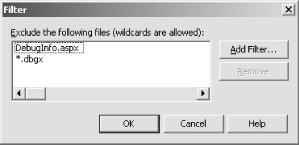
Sometimes, you may wish to include some but not all of the files in
an output group. For example, a web application may contain pages
that are for debugging purposes and that should not be deployed on a
live server. Visual Studio .NET allows you to leave out certain files
when installing an output group by setting the output
item's
ExcludeFilter property. You may add multiple filters
with this property. Each filter can be either a specific file or a
filename containing wildcards, as Figure 6-15 shows.
6.7.1.1 COM registration
If you have a project that builds
a COM component, you will need to make sure that the component is
registered correctly when it is installed. You can ensure this by
setting the project output's
Register property. The Properties page allows you
to select the Register property's
value from a listbox; the available options are
vsdrpNoRegister, vsdrpCOM,
vsdrpCOMRelativePath,
vsdrpCOMSelfReg, and vsdrpFont.
(vsdrpFont is used for installing new fonts and is
not used for COM registration.)
To install a COM component in the usual way, making it available to
any application on the machine, select the
vsdrpCOM option. Isolated registration is also
supportedyou can install the component in such a way that it
will be accessible only to your application, and not to the whole
system. For this, you should choose the
vsdrpCOMRelativePath option. (This works only when
the target system is Windows 2000 or later.)
vsdrpCOM and
vsdrpCOMRelativePath allow Windows Installer to
perform all registry updates. Visual Studio .NET will make sure that
all of the appropriate registry configuration information is stored
in the Windows Installer file. However, it is sometimes vitally
important that a component be allowed to do its own registration.
(For example, it may do more in its
DllRegisterServer function than just updating the
registry.) In this case, you should choose the
vsdrpCOMSelfReg option. As a rule, though, it is
better not to use vsdrpCOMSelfReg if
possibleyou should avoid creating COM components that require
it, because Windows Installer cannot robustly repair or roll back
installations that use this technique, as it doesn't
know what configuration changes are made by the component.
6.7.2 Adding Files
If you wish to install a specific file
that is not a part of a project, you can do this with the Add
File... option from the folder context menu. You
would normally do this only with isolated files such as bitmaps or
documents. You should avoid using this option to install
binariesyou should instead add the merge module for the binary
component to the project.
|
If Visual Studio .NET detects that you are adding a file for which
there is an associated merge module, it will allow you to add the
merge module to the install instead. You should choose the merge
module. But you should not let this lull you into a false sense of
securityMicrosoft does not ship all available merge modules
with Visual Studio .NET. Some of them must be downloaded from
Microsoft"s web site. Don"t get
into the habit of relying on Visual Studio .NET to notice when you
should be installing a merge module instead of a filejust
because it doesn't prompt you
doesn"t mean there isn"t a merge
module. Adding individual files is usually the right thing to do only
if those files are definitely not part of some larger component.
There is no authoritative global list of merge modules, because
anyone can produce a merge module. However, you can find a list of
popular ones at http://www.installsite.org/.
|
|
6.7.3 Adding Assemblies
If you want to add a .NET assembly
for which you don't have a merge module, you can at
least get Visual Studio .NET to do automatic dependency analysis for
the component. Instead of adding it as a file, select the Add
Assembly option from the folder context menu.
Visual Studio will present the Component Selector dialog. (This is
the same dialog used when adding a reference to a project, except it
shows only the .NET tab.) You can select assemblies that your project
requires from this list.
Most of the time you will not need to do thisif you add a
project reference to the component in the usual way, Visual Studio
.NET will detect the dependency automatically, and you will not need
to add it manually. You would need to add it this way only if the
reference was not automatically detectable (e.g., you are using the
assembly entirely through the .NET Reflection API).
6.7.4 Adding Merge Modules
If your application depends on
another component, you should include the merge module for that
component in your installer. Strictly speaking, merge modules are not
added to the File System view. This is because merge modules are
self-containedthey know where the files they contain need to
be installed.
You can add a merge module to the project explicitly with the Add
Merge Module... option of the Setup
project's context menu. This displays a normal File
Open dialog that lets you choose the merge module to include. By
default, it will show you the contents of C:\Program
Files\Common\Merge Modules, which is where Visual Studio
.NET installs redistributable merge modules.
This option is not available in a Merge Module Setup project, because
you cannot nest a merge module inside another. However, if your
component does depend on another component, you can add a reference
to its merge module with the project context menu's
Add Merge Module Reference... item. The result of
this will be that when your merge module is added to an application,
Visual Studio .NET will automatically add in all the other merge
modules that yours depends on.
|