6.9 Registry View
Some registry configuration has already
been dealt with—COM component registration can be managed in
the File System view; file types get their own special treatment. But
if you want to add other registry entries, you can use the Setup
project's Registry view.
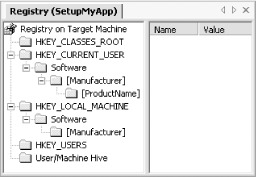
As Figure 6-17 shows, the Registry view looks like a
trimmed-down version of the Windows registry editor. The registry key
hierarchy is presented in a tree view on the left, and values can be
edited on the right. The most obvious difference is that only a small
subset of the keys is shown—only the structure required by the
application is present.

By default, Setup projects contain a certain amount of structure but
no data. Various HKEY_XXX roots are provided as a
convenience. As Figure 6-17 shows,
[Manufacturer] key will be added under
HKCU\Software and
HKLM\Software. (This is present only in
non-web-based applications.)
 |
As with most text values in Setup projects, you can use any installer
property as a name or value in the Registry view by placing it in
square brackets. All values and keys also support the
Condition property described earlier.
|
|
By default, the keys in this view will not be created at install time
unless they need to be—keys will be created only if you specify
values underneath them. (So, although a newly created Setup project
contains several keys in the Registry view, it will not cause the
registry to be modified unless you add some values.) If you want to
create keys without values, simply select the key and set its
AlwaysCreate property to true.
 |
If you choose to create registry entries underneath machine-wide keys
such as HKLM, this will require the user who installs the program to
have access to such keys. Machinewide keys are normally writable only
by Administrators. So you should avoid writing into these areas of
the registry if possible.
|
|
Registry keys have a DeleteAtUninstall property.
By default, this property is false, but this is often the appropriate
setting. The best way to understand this property is to think of it
as meaning "Force delete at uninstall." If an installer has to create a key at
installation time, it will usually delete it automatically when the
program is uninstalled. There is only one exception: if you forced a
key to be created by setting its AlwaysCreate
property to true, then you must also force its removal by setting
DeleteAtUninstall to true.
 |
The documentation for the DeleteAtUninstall
property is wrong. It says that a registry key will be deleted only
if this property is set to true and it says that to meet Windows Logo
requirements this property must be true. This is not true—you
need to set DeleteAtUninstall only on keys whose
AlwaysCreate property is also true.
|
|
 |
Setting DeleteAtUninstall will delete the key and
all of its children even if those keys were present before the
program was installed, so it should be used with care. It is better
to avoid using it, by making sure that all of your keys have their
AlwaysCreate property value set to false (which is
the default).
|
|
Registry settings can be imported into a Setup project. The context
menu for the Registry on Target Machine node in the Registry view has
an Import Node... item. This lets you open a
.reg file and import its contents into the
project.
|
