|
|
|
3.3 All About Emergency Repair DisksThe very phrase "emergency repair disk" sounds ominous, like something the crew aboard the ill-fated Mir space station might keep close at hand. In fact, the ERD (as it's usually called) is a terrific insurance policy that can protect you from a number of potential Registry mishaps, up to and including losing the password to your Administrator account. However, ERDs won't do you any good unless you keep them up to date; you must also be careful to keep close physical control over them, since they contain a good bit of sensitive data that could potentially make it easier to compromise a machine.
3.3.1 What Is an ERD?An ERD is nothing more than a FAT-formatted[2] floppy containing a subset of data needed to recover some of the system's configuration. A Windows NT ERD includes data from several Registry hives; when you create an ERD, you're actually making a backup copy of the Registry's most essential data in a form that Windows NT can directly use to replace damaged or missing keys. Windows 2000 ERDs don't include this Registry data, but you get the same functionality by backing up Windows 2000 Registry data using the Windows 2000 Backup application and storing it on a floppy or other backup media.
Both the Windows 2000 and NT ERDs keep copies of additional useful data:
ERDs created under Windows NT contain copies of the SAM, SECURITY, DEFAULT, SOFTWARE, and SYSTEM hives. This data comes from the %systemroot%\repair directory, which is usually updated as part of the process of generating an ERD. To get the same functionality under Windows 2000, you can copy these files yourself, use a batch file or script to do it, or use Windows 2000 Backup, as described later in the chapter.
Wherever this data is, it's specific to a particular machine, so you can generally use it to repair only the machine it originally came from. To be more exact, if you take the emergency repair data from one machine on another, portions of the target machine's Registry will be summarily replaced with the repair data's contents. In the case of the SAM database and large chunks of HKLM, this can render the machine unusable. When you back up Registry data under Windows 2000, what format the hives end up in depends on how you do it. If you just copy the files from the repair directory, you can load them with RegEdt32. If you use Windows 2000 Backup, you'll probably have a .bkf file that can be read only with the backup tool. Registry files on a Windows NT ERD are compressed, so you can't directly modify or view them; in all other respects, they're ordinary files, so you can back them up, archive them, or copy them to other media without uncompressing them.
3.3.2 What ERDs Can and Can't DoWindows 2000 ERDs can't restore any Registry data, but you can use them to restore system configuration settings. On the other hand, a Windows NT ERD can restore data for any of the hives it has backed up: SAM, SECURITY, DEFAULT, SOFTWARE, and SYSTEM. When you reapply ERD data to a system, you are generally restoring data on a wholesale basis, so the entire contents of a hive are replaced with the ERD's copy. When you restore a Windows 2000 Registry by using the system's recovery console, you can copy only entire hive files, so you can replace any or all of the individual hives. When running Windows NT setup, its repair application allows you to choose which hives to replace, but not which individual values to update. In either case, applying ERD data requires you be able to boot your machine. To use the Microsoft-provided repair utilities for 2000 or NT, you need your original bootable installation CD. If you prefer, you can install the Windows 2000 recovery console so that it is available when you need it, but you have to do this before you need it.[3]
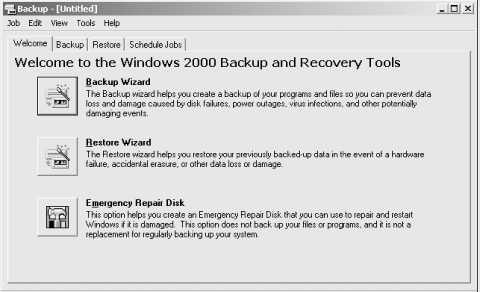
Applying a Windows NT ERD takes all the data in that section of the Registry back to status quo ante : all changes you've made since the ERD was created will be lost. As long as you keep your ERDs reasonably up to date, this shouldn't be a problem, especially since many applications and components are now smart enough to recognize when their Registry entries are missing and will recreate them when needed. As useful as the ERD is, it's not magical. First of all, it can't restore what's not on it; you must keep your ERDs up to date if you want them to be available to you at crunch time. Secondly, the Windows NT ERD doesn't store anything in HKU (or HKCU, for that matter) except ntuser.dat, so it doesn't preserve user-specific settings. It also doesn't restore all of HKLM\SOFTWARE , so be alert to the fact that application installations and user preferences in your Registry won't be preserved by the ERD. If you copy all the hive files when you're making your Windows 2000 ERD, you won't have this problem. 3.3.3 How to Make an ERDMaking an ERD is pretty simple. Both Windows 2000 and NT include utilities that do most of the work for you. However, if you want to create a repair disk that contains Registry information under Windows 2000, you have some additional work to do. 3.3.3.1 Using Windows 2000 BackupThe Windows 2000 Backup utility was completely rewritten, so it looks a lot different from its NT predecessor. It does the same things as Windows NT Backup, but it has a ton of new functionality, including the ability to back up files to disk or CD-R/CD-RW. It incorporates the function of the RDISK tool, too (as described in the next section), so you can use one tool to back up the Registry and create an ERD. The Windows 2000 Backup utility is discussed more fully in Section 3.4.3 later in the chapter, so for now I'll confine my discussion to the process of creating an ERD. When you launch Windows 2000 Backup, you see the Welcome screen,
shown in Figure 3.1. To create an ERD, you can
either click the Emergency Repair Disk button on this screen or use
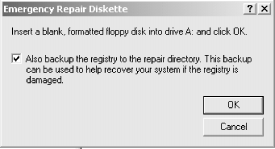
the Tools Figure 3.1. The Windows 2000 backup welcome screen, from which you can create an ERD When you tell Windows 2000 Backup to create an ERD by either method, you see a very simple dialog, as shown in Figure 3.2. Note that this dialog doesn't say anything about putting Registry data onto the repair floppy; that's because it does no such thing. You can, however, use the "Also backup the registry in the repair directory" checkbox to force Windows 2000 Backup to copy the hive files to the %systemroot%\repair directory, as I mentioned earlier. What do you do with the files once they're in that directory? For starters, you can use Windows 2000 Backup itself to make a backup copy; you can also copy the files to another computer via the network, onto a removable disk, or onto a CD-R or CD-RW. Figure 3.2. The ERD dialog 3.3.3.2
|
|
Clicking Yes in this dialog generates an ERD, while clicking No (as you'd expect) does nothing. You may notice that the dialog shown in Figure 3.4 is titled Setup; there's a good reason for it, namely that NT's setup executable uses the same dialog to ask if you want to build an ERD during installation. It's a good idea to build an ERD when you install NT on a machine, then file it away in a safe place so you can use it if the Administrator account password for the machine is ever lost or forgotten. This works because the original ERD contains whatever Administrator password you chose during the NT install process. However, remember that applying that ERD resets allthe Registry data to the state it was in when you made the ERD, not just the administrator password.
You can also kick off RDISK with two switches. /s has exactly the same effect as starting RDISK and clicking "Update Repair Info"; it copies the contents of the security and SAM hives to the floppy. If you instead use the /s- switch, that starts RDISK and copies the repair files into the REPAIR subdirectory without prompting you to insert a floppy disk. This latter switch is extremely useful for automating or scheduling Registry backups.
You actually create an ERD with the Create Repair Disk command, or by choosing Yes in the dialog presented after you use the Update Repair Info button. RDISK asks you to insert a formatted floppy (but not without warning you that its contents will be erased). Once you've inserted the floppy and clicked OK, RDISK creates an ERD by copying the system's copy of the repair files to the floppy. When the ERD's done building, you can pop out the floppy and put it in a safe place.
An ERD won't do you any good unless you can apply its data to a machine when needed. Depending on what's wrong with the machine you're trying to repair, you may be able to boot it or not. Which repair tack you take depends on whether or not you can boot the machine and log on with an account that has Administrator privileges.
![]() There's one caveat I need to share before we start talking
turkey: NT ERD floppies are compressed using Microsoft's
standard compression tool. You've undoubtedly seen files whose
extension ended with an underscore, like those on the NT distribution
CD. These files are compressed with Microsoft's tool, as are
the ERD files. To manually restore data from these files, you need a
copy of EXPAND.EXE, Microsoft's utility for
expanding these compressed files. You probably have a copy sitting
around somewhere on your disk, or perhaps on one of your Microsoft
product CDs. Make sure you have it handy before starting a manual ERD
restore. In fact, make sure you have a recent copy of
EXPAND.EXE; older versions can't handle NT
4.0's compression format.
There's one caveat I need to share before we start talking
turkey: NT ERD floppies are compressed using Microsoft's
standard compression tool. You've undoubtedly seen files whose
extension ended with an underscore, like those on the NT distribution
CD. These files are compressed with Microsoft's tool, as are
the ERD files. To manually restore data from these files, you need a
copy of EXPAND.EXE, Microsoft's utility for
expanding these compressed files. You probably have a copy sitting
around somewhere on your disk, or perhaps on one of your Microsoft
product CDs. Make sure you have it handy before starting a manual ERD
restore. In fact, make sure you have a recent copy of
EXPAND.EXE; older versions can't handle NT
4.0's compression format.
I've mentioned several times that a Windows 2000 ERD doesn't contain any Registry data, but the repair directory does, and (in conjunction with the ERD) you can use the Windows 2000 setup utility to repair a damaged Registry. To do this, boot with the Windows 2000 CD (or boot floppies, if you've made a set). When the setup program asks whether you want to install Windows 2000 or repair an existing installation, select the repair option and provide the ERD when prompted. Setup then asks you to choose a repair mode: fast or manual.
In fast mode, the setup program uses the files in the repair directory to repair the Registry. It also fixes the boot sector, the boot loader, the startup environment, and any system files that need repair. In manual mode, you get to choose which items the system attempts to repair, but repairing the Registry is not one of your choices! That means you can't rely on manual mode to save your bacon if you have a Registry problem; it's either fast mode or one of the other repair methods described in the rest of this section.
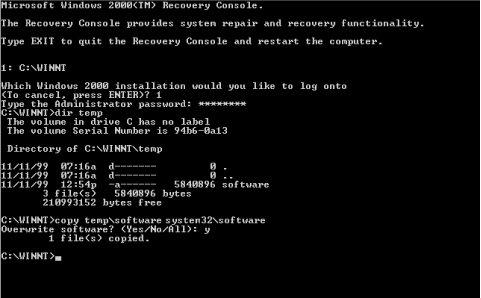
One of the best new features in Windows 2000 is its recovery console. The console offers you a limited command shell you can boot into; all told, it offers about 25 commands to do things such as repair the partition table, copy files hither and yon, or enable or disable system services. One of the things you can do is copy files. Assuming you have someplace to copy them from, you can quickly repair any individual hive file using this method. Figure 3.5 shows a sample of what this might look like.

Of course, for this approach to work you have to have the console available. There are two ways to start the console at boot time. One is to use the Windows 2000 setup CD (or boot floppies). When you boot using either of these media, you have to let the initial part of the boot sequence complete. Eventually, the setup program will ask whether you want to repair an existing installation or start a new one. Choose the repair option, then specify that you want to use the recovery console instead of the ERD. Why? Because the Windows 2000 ERD enables setup to scan for missing or downlevel files; it doesn't do anything to the Registry. Once the console comes up, you can use the copy command to copy any hive file to the system32 directory, then reboot the machine. (The second way to start the console is to use the boot-selection menu, but this only works if you've already installed the recovery console.)
The recovery console is a pretty blunt implement. There's no way to selectively reload individual keys or values, and (as of this writing) there's no way to extend the recovery console by adding arbitrary executables. However, when something drastic is wrong, you can often fix it using the provided tools.
|
If you can successfully boot the operating system and log into a privileged account, restoring data from an ERD is easy to do with RegEdt32. First, you have to find the ERD hive file you want to restore from.
![]() You then have to uncompress the hive file if it originally came from
an NT 4.0 ERD. EXPAND.EXE takes two arguments:
the source filename and its destination name. Since hive files
don't have extensions, you shouldn't specify one for the
output name. Here's an example:
You then have to uncompress the hive file if it originally came from
an NT 4.0 ERD. EXPAND.EXE takes two arguments:
the source filename and its destination name. Since hive files
don't have extensions, you shouldn't specify one for the
output name. Here's an example:
expand default._ default-save.
Next, launch RegEdt32. Depending on what
you're trying to restore, now is when you'll have to make
some choices. If you want to reload data that was accidentally
deleted, or that you need to refer to, without overwriting an
existing hive, you can load the hive from your ERD into a new subkey
of HKLM or HKU by using the Registry![]() Load Hive...
command. If you want to load the ERD data and replace the existing
hive, you need to use the Registry
Load Hive...
command. If you want to load the ERD data and replace the existing
hive, you need to use the Registry![]() Restore...
command. Both commands are documented more fully in Section 3.5.4 later in this chapter.
Restore...
command. Both commands are documented more fully in Section 3.5.4 later in this chapter.
Sometimes your only hope of restoring a downed NT machine is to restore all or part of the Registry from an ERD by using NT's setup program. This last-chance restoration is the original reason for the ERD, and there are times when nothing else will do the trick.
This scheme works because of the way NT's setup process works. NT's installer proceeds in three separate phases. In the first phase, NT copies just enough of the NT kernel and its support drivers and infrastructure to your hard disk. It then reboots into NT, using the newly made skeleton copy of NT and proceeds with the "blue screen" portion of the setup process. It's at this point that you can tell Setup you're repairing an existing NT installation. If you're not doing a repair, the third phase begins after another reboot; that's the familiar Windows GUI portion of the installation.
To get the ball rolling, you need to get NT setup started. If you have the original boot floppies and CD, you can use them; otherwise, if you have Windows 3.1, DOS, or Windows 95 installed (with appropriate CD drivers), you can boot it and run the setup program from the CD. Once you've done so, the first install phase completes, then your machine reboots. When it does, you can tell Setup whether you want to repair an existing installation (you do) or perform a complete installation. When you select the repair option, the setup installer asks you which hives you want to restore (SYSTEM, SECURITY, SOFTWARE, DEFAULT, and USERS are your choices). Once you've chosen, you are prompted to provide the ERD and the saved hives are restored. After the restoration's complete, you can reboot.
|
|
|