|
|
|
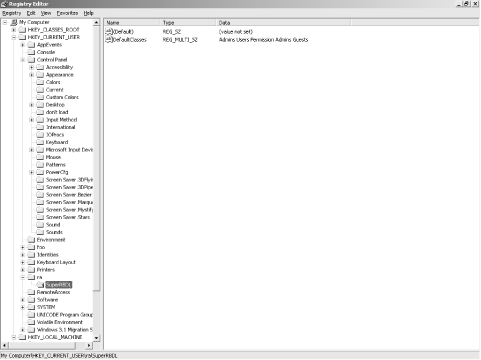
4.2 Learning the RegEdit InterfaceI have a weakness for power tools--the more powerful, the better! One thing I've learned is that it's a good idea to spend some time getting accustomed to a new tool before starting a real project with it. This break-in period helps me get familiar with how the tool works, teaches me how it feels as I use it to saw, drill, or whatever, and gives me some confidence that I won't screw up whatever I'm working on. In the same vein, allow me to present the user interface for RegEdit. As you read through this section and its successors, you'll gain an understanding of how RegEdit looks, feels, and works, but the best way to cement that knowledge is to launch it and experiment: practice moving around, searching for things, and exploring the Registry. Even after you've mastered the skills needed to administer the Registry, you'll still find RegEdit's search abilities to be quite useful in your everyday administration. 4.2.1 Don't I Know You from Somewhere?If you've ever used Windows Explorer (or even the old-style Windows File Manager), you'll feel instantly comfortable with RegEdit 's interface (shown in Figure 4.1). The application's window is divided vertically. The left pane (which I'll call the key pane from now on) shows a tree representing the Registry's hierarchy, while the right side (the value pane) shows the values associated with whatever key is selected in the key pane. You can adjust the relative widths of the two panes by dragging the gray bar that divides them. Figure 4.1. RegEdit's interface The value pane is further subdivided into two columns. The first, known as the name column, shows the value's name, while the second (the data column) shows the value's actual contents. You can change the width of these columns by clicking and dragging the divider bar in the header at the top of the value pane. By default, RegEdit 's main window includes a status bar across its bottom margin; when the status bar is visible, the full path of the currently selected key appears there. This provides a quick reference if you need to make a note of a particular key. When you first start RegEdit, the root keys (HKLM, HKCU, HKU, HKDD, HKCR, and HKCC) appear directly under the My Computer icon. As with Explorer, you can expand or collapse individual keys by clicking the small icon next to the key in the key pane. As you move around, clicking at will, the tree grows and shrinks to reveal the keys you're interested in. 4.2.2 Interface TriviaAs with most other system-administration tools provided with Windows 2000, RegEdit provides a View menu. For the most part, the commands here are of little use and seem to have been added for parity with the old-school NT 4.0 tools such as User Manager, WINS Manager, and so on. Nevertheless, in the spirit of completeness, let me briefly describe the commands that live there:
|
|
|
|