|
|
|
5.8 Editing Keys and ValuesRegEdt32 is a more powerful and flexible Registry editor than RegEdit. However, the two are roughly equivalent when it comes to adding and deleting keys and values. Since the underlying functionality of the Registry is identical, it makes sense that their workings should be identical as well. (Just a reminder: don't edit things unless you're sure they need editing. End of sermon.) 5.8.1 Viewing Values as Binary Data By default,
RegEdt32 shows each value as its native type.
Sometimes, though, it can be useful to see a Registry value in raw
form, without any kind of interpretation or formatting. Since hive
files are always open, you can't use a standard file or hex
editor to look at the file's contents; instead,
RegEdt32 gives you a way to get a hex dump of
any value in the Registry. The View Figure 5.5. The Binary Data dialog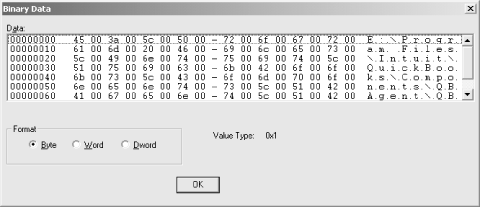 The radio buttons in the Format group let you control how RegEdt32 presents the data. The default setting, Byte, shows the data as individual bytes. As a bonus, the rightmost section of the dialog shows the ASCII representations of the data, making this setting particularly useful for viewing strings. The Word and Dword buttons show the same data, but grouped as words or DWORDs, respectively. These settings are most useful for viewing binary or DWORD values. 5.8.2 Modifying ValuesOnce you've selected a value in the data pane, you can modify it by double-clicking it, pressing the Enter key, or using the commands on the Edit menu: Binary, String, DWORD, and Multistring.[4] Each data type has its own editing dialog. While they all basically work the same way, some have subtle differences or additional controls.
5.8.2.1 Modifying a string valueThe String Editor dialog, shown in Figure 5.6, is arguably the simplest of all the data editors in RegEdt32. The current string value is shown in the String field; you can type or paste any data you'd like into the field. When you click OK, your changes are stored as the new contents for the value you're editing. Figure 5.6. String editing This string editor works for REG_EXPAND_SZ and plain old REG_SZ strings; there's a separate editor (discussed later) for REG_MULTI_SZ values. 5.8.2.2 Modifying a DWORD valueIf strings are the simplest type of value to modify, DWORD runs a close second. The DWORD Editor dialog is shown in Figure 5.7. Like the String Editor, it offers you a field in which you type the desired new value. The three radio buttons in the Radix group allow you to specify what number base you're using. The default is Hex, so you can enter quantities such as "FF00" and "a29d" without any prefix or suffix. If you prefer, you can use the Binary and Decimal buttons to select base-2 or base-10 instead. Figure 5.7. The DWORD editor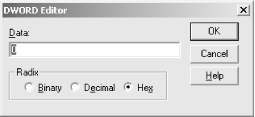 5.8.2.3 Modifying a multiple-string valueThe Registry stores multiple-string values as a concatenation of all the individual strings, separated by null characters (hex 0x00). While you can edit these multi-string blocks as binary data, remembering where to put the null character that terminates each individual string gets to be tedious pretty quickly. RegEdt32 offers a better solution in the form of the Multi-String Editor dialog (see Figure 5.8). Figure 5.8. The Multi-String Editor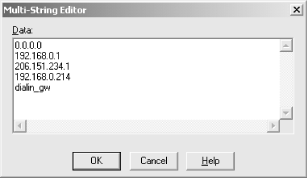 You may enter as many (or as few) strings as you like in this dialog's Data field. Each string is treated as an individual entity. When you hit Return at the end of a line, RegEdt32 takes that as a signal to move to the next line and start another string. As with the other editors, you can use the standard Windows keyboard shortcuts to cut, copy, and paste text into this dialog. 5.8.2.4 Modifying a binary valueMany of the Registry's most important values are stored as raw binary data. This can pose a problem when you need to change (or undo a change!) their contents. After all, strings and numbers are easy to edit, but binary data can be a little tougher. RegEdt32 includes a binary editor that makes it easier to inspect and change binary values when the need arises. The Binary Editor itself, shown in Figure 5.9, is fairly straightforward. Figure 5.9. The Binary Editor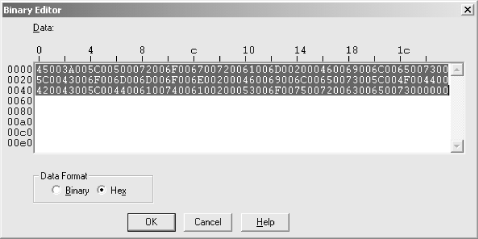 The column of digits on the left side of the edit field shows the offset of that line's data from the beginning of the data block. For example, the row labeled "0020" indicates that the first byte on that line starts 32 bytes (or hex 0x20) from the start of the data item. Likewise, the scale across the top of the edit field shows the offset within the line. The 44th byte in Figure 5.9 is at offset 0x2c from the beginning of the block. To find it, you'd first use the left column to find the row labeled "0020", then read across to "c" to find the correct byte. The Binary and Hex radio buttons control how RegEdt32 actually displays the data. When you change from one mode to another, the contents of the edit field changes, as do the horizontal and vertical scales. The edit field itself shows the value's contents. RegEdt32 treats the data there as text, so you can insert, remove, cut, copy, and paste in this field as much as you'd like. If you hit a key that's not legal (for example, "2" while editing binary data, or "J" in hex mode) RegEdt32 ignores it. If you enter data that ends with an incomplete byte, RegEdt32 warns you with a dialog, then pads the data with zeroes until it's the proper length. One final caveat: unlike Windows 95 and 98, Windows 2000 and NT stores their strings in Unicode format. That means that each character in a string actually takes up two bytes of storage space. When you edit an ordinary ASCII string using the binary editor, you'll see that every other byte is zero: that's because ASCII strings only need one byte of the two reserved for each character. Don't fool with the zero bytes, or you risk turning your strings from ASCII to a weird hybrid of ASCII, Japanese, Cyrillic, and maybe even Pinyin Chinese. 5.8.2.5 Modifying a value of a different typeRegEdt32 is helpful enough to remember, and
store, a data type for every value in the Registry. However,
you're free to ignore that data and edit a value as though its
type were different. You've already seen one example of how
this works: the View When you have a value selected, if you double-click it you'll see its data displayed in whatever editor is appropriate. If instead you use the Binary, String, DWORD, or Multistring commands in the Edit menu, you can open any value's data as any of those types. For example, if you open a string as binary data, you see a display like the one shown in Figure 5.9. While this is a useful trick, be careful. It's easy to corrupt data when editing it with an editor that has no knowledge of the data's native format. The safest course of action is to use the native format editor whenever possible. If you need to tweak a value without using its native format, I recommend using the binary editor instead. 5.8.3 Adding New Keys or ValuesLike RegEdit, RegEdt32 allows you to add new keys and values. The same cautions discussed in Section 4.7.3 in Chapter 4 apply here too. For the most part, you won't need to add new keys unless you're adding one of the famous Microsoft hidden keys that are sometimes needed to activate (or deactivate) a particular feature. 5.8.3.1 Adding new keysWhen you add a new key, it has to be a subkey of one of the existing root keys, and you must have appropriate access to that subkey. You tell RegEdt32 where you want the new key by selecting a key in the tree pane of any root key window; the new key is created immediately beneath the selected key. There's no way to relocate a key once it's in place, so make sure you put it in the right location the first time. Once you've picked out a good spot for your key, you can use
the Edit Figure 5.10. The Add Key dialog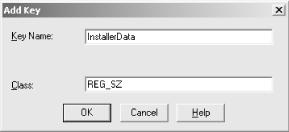 5.8.3.2 Adding new valuesAdding a new value is a three-step process. The first, and arguably hardest, step is to select the key to which you want to add the new value. This is important, since RegEdt32 doesn't give you a good way to move a value from one key to another. Be sure to visually confirm that the key you want the new value on is actually the one that's highlighted. The second step (once you've selected the desired key) is to
use the Edit Figure 5.11. The Add Value dialog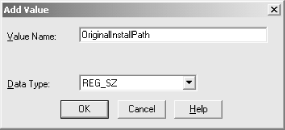 The third and final step is to actually give the value some contents. You use the dialogs shown earlier in Section 5.8.2; which dialog pops up in this third step depends on the type of data you selected in the second step. Once you enter a value into the appropriate editor dialog, RegEdt32 adds the new value and stores it permanently in the Registry. At any prior point, you can cancel the operation without actually adding the new value. 5.8.4 Deleting Keys and ValuesContrary to what you might think, deleting data from the Registry is required somewhat more often than adding it. The biggest reason for deleting keys or values is to remove traces of applications or system components whose uninstallers are nonexistent or (more commonly) too poorly written to fully reverse whatever the original installation program did. Of course, sometimes it's necessary to undo something you've done yourself. For example, if you add one of the magic Microsoft keys sprinkled throughout their knowledge base, you may one day find it necessary to remove it again.
Whether you're deleting a key or a value, the basic procedure
is the same: highlight the key or value you want to remove, then
either hit the DEL key or use the Edit When you delete a key, RegEdt32 also deletes all its subkeys and their values, so be sure to visually confirm that the key you want to delete is actually the one that's highlighted. The confirmation dialog unfortunately doesn't tell you what key or value is about to bite the dust, so it's up to you to double-check. |
|
|
|