|
|
|
6.3 Managing Policies with POLEDITFor the most part, creating policies with POLEDIT is simple and straightforward. Even though what you're really doing is editing the Registry on one or many machines, the interface lends itself to quickly making needed changes and saving them for later application. The sequence of operation to apply policies is simple; there are only six steps:
6.3.1 Attaching Policy TemplatesPOLEDIT supports attaching an arbitrary number of policy templates. Templates you attach add their policies to the policy properties dialog; once you attach a template, its policies are available whenever you create new policies. This argues in favor of attaching policy templates to POLEDIT before creating any policies. That way, whatever templates you attach contribute to the policies you create without adding the extra work of going back and revising previously built policies. When you first start POLEDIT, it automatically
attaches the two policy templates needed for Windows 2000 machines,
COMMON.ADM and WINNT.ADM.
You may attach other templates using the Options Figure 6.2. The Policy Template Options dialog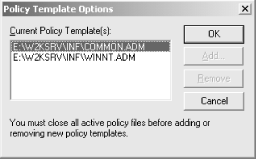 There are a number of additional policy templates floating around. For example, the Office 97 and Office 2000 resource kits include templates for their respective settings, as does the Internet Explorer Administration Kit (IEAK). You can write your own if you wish; for example, I wrote one for Exchange 5.5 (see http://www.robichaux.net/writing/man-exchange.html ). The Current Policy Template(s) list shows which templates are currently attached; you can use the Add... and Remove buttons to change this list's contents. Once you're satisfied with your changes, you can click OK to preserve the attachments or Cancel to dismiss the dialog without changing anything. One final note: POLEDIT won't let you attach or detach policy templates while you have a policy file or Registry open. This restriction prevents you from accidentally overwriting an open policy with a new template's contents. 6.3.2 Creating PoliciesAfter you've attached the appropriate policy templates, you're ready to start creating new policies. One of the nice things about POLEDIT is that it lets you make changes, store them, and make more changes without immediately affecting the Registry. Like most other document-oriented applications, changes you make to the currently open policy won't take effect until you save the policy document in the appropriate place. 6.3.2.1 Creating a new policy fileWhen you start POLEDIT, it opens with a new
policy file named Untitled. However, at any time
you may create a new, empty policy with the File 6.3.2.2 Creating a new user policyYou create new user policies with the Edit Figure 6.3. The Add User dialog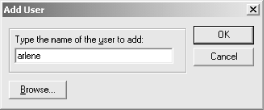 The name you enter in the "Type the name of the user to add" field is the name the policy downloader uses when trying to find a user's policy. If you're creating a policy for a user whose account is named oreilly, the policy won't be applied if it's named anything other than oreilly (althoughit's not case-sensitive). Be careful to ensure that you get the right username for the user you want the policy applied to; this is especially important on large networks where there might be several users with similar account names. 6.3.2.3 Creating a new computer policyYou create policies for individual computers in much the same way you
do for users; the Edit The same caveat about names applies to computer accounts, too; if you're trying to apply a policy to a machine named titan but type in titian instead, the policy won't take effect as you expect it to. 6.3.2.4 Creating a new group policyLike computer and user policies, creating group policies is
straightforward: you use the Edit
6.3.3 Editing PoliciesCreating new policies is easy, mostly because just creating the policy doesn't do anything! All the policy templates that Microsoft provides use the "leave as is" setting. This means that if you create a bunch of new policies and don't edit them, no changes will be enforced. This approach satisfies the Principle of Least Astonishment ("when forced to make decisions on its own, your software should always do whatever will least surprise the user"), but it means that you still have some work to do once your policies are created.
6.3.3.1 Setting user, group, and computer policy optionsOnce you've created user policies for all the users, groups, and computers you want to control, the next step is to set appropriate values for each individual part within the categories and policies for each user. Each user policy has a properties dialog, which displays all categories, policies, and parts for that user policy. You can open the properties dialog for a policy in two ways: you can
double-click the icon or list item corresponding to the user policy
you want to edit, or you can select it with the mouse and use the
Edit Figure 6.4. The Properties dialog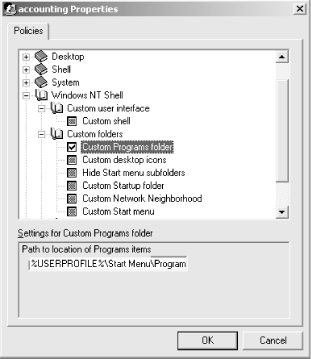 The upper part of the properties dialog shows a tree view of the categories within the active user policy. When you first open a user policy, the categories all are collapsed; you can expand or collapse individual items by clicking the small +/- icon next to the category's name. As you expand categories, you'll see checkboxes appear beneath them. Unlike normal Windows checkbox controls, these checkboxes can have three states:
You must pay careful attention to the wording of the policy to make sure that the effect is what you want: when the checkbox next to "Disable Registry editing tools" is on, the tools are disabled. When it's off, the tools are not disabled, and when it's gray, whatever settings are currently in effect on each target machine, group, or user remain intact. As you select individual policies within a category, notice that the contents of the settings area at the bottom of the properties dialog change. Some policies can have multiple parts; for example, the "Restrict display" policy shown in Figure 6.4 has a total of five parts. You can set the value of each part independently of the others. Parts may accept on/off, numeric, or list selection choices, depending on what the policy template specifies. You can move through the properties dialog, making changes as you go. POLEDIT preserves the changes within the current editing session, but they'll be lost unless you explicitly save the policy file. 6.3.3.2 Removing user policiesYou can easily remove a user policy from within
POLEDIT: select the policy you want to remove,
then use the Edit It's worth noting that the only way to remove a policy category or part is to open the policy template file that defines it and remove it; you can't remove individual template items from a single policy, though you can use the "leave as is" setting to force the policy downloader to take no action on that part. 6.3.3.3 Policies and the clipboardPOLEDIT offers a measure of clipboard support.
You can use the Edit
Although it's not evident from the program or its
documentation, you can copy from group to user policies and vice
versa: select the source item, use Edit 6.3.3.4 Setting group policy prioritiesAs soon as you start creating group policies, you run the risk of a collision between two groups' mutually exclusive policies. As long as no user belongs to more than one group, you won't run into this problem. However, since Microsoft recommends putting users into groups for controlling access to network resources like file shares and printers, the odds of having one user in more than one group are pretty good. The Section 6.1.4.3 earlier in this
chapter explains how the policy downloader decides which group policy
parts to apply and which to ignore. For this approach to work, you
must do your part by specifying the priority of each group's
policy. You do this with the Options Figure 6.5. The Group Priority dialog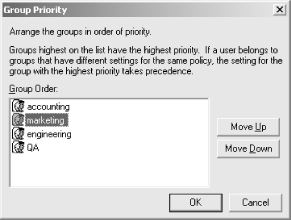 The initial priority order comes from the order in which you created the group policies: the first policy you create has the highest priority. You can rearrange group priorities using the Move Up and Move Down buttons; when you're happy with the ordering, save it by clicking OK. Once you set a group priority ordering, it's stored as part of the policy file and is available to the policy downloader. If you change the priority ordering later, the new order takes effect every time the policy's applied at logon time. 6.3.4 Saving and Loading PoliciesAs you create and modify user policies, you'll often need to save those policies to a file and load them again later. Like most other document-oriented Windows applications, POLEDIT has commands in its File menu for loading and saving policy files. The File Once you've created an initial policy, it's simple to add
to or modify its user, group, or computer policies: just open the
file with File 6.3.5 Creating Your Own Policy TemplatesThe .ADM policy template files POLEDIT uses are just plain text files. If you open one of them up with a text editor, you'll find that the files are structured so that POLEDIT can figure out which categories, policies, and parts to display, where to store their values in the Registry, and what user interface controls to display so you can edit these values.
You can create your own policy templates and attach them to POLEDIT. For example, you can create a template that controls your standard distribution of Dial-Up Networking settings, configuration parameters for Netscape Navigator, or almost any other Registry data that lives in HKLM or HKCU. Here's a small sample of an .ADM file that allows you to set the default search engine and home page Internet Explorer uses: CLASS MACHINE
CATEGORY InternetExplorer
KEYNAME "Software\Microsoft\Internet Explorer\Main"
POLICY "Default search engine"
PART "URL of default search engine" EDITTEXT REQUIRED
VALUENAME "Default_Search_URL"
DEFAULT "http://www.ljl.com/intrasearch/"
END PART
PART "URL of default home page" EDITTEXT REQUIRED
VALUENAME "Default_Page_URL"
DEFAULT "http://www.ljl.com"
END PART
END POLICY
END CATEGORY
As you can see from the sample, the format of these files is pretty structured. Let's look at what each piece of the example actually does:
|
|
|
|
