9.10 Spying on the Registry with RegMon
Ask a private investigator what the
best way to gather evidence is, and you're likely to get a
simple answer: watch and wait. Unfortunately, trying to use
RegEdt32 or RegEdit to
watch the Registry as it changes is a difficult and unrewarding way
to work. Unless you know ahead of time exactly which keys or values
you want to watch, it's difficult to monitor individual
changes, and there's no easy way to tell which application,
process, or driver changed the setting you're trying to watch.
Mark Russinovich and Bryce Cogswell have solved this problem, to the
delight of administrators and programmers everywhere. They wrote a
utility called RegMon (available with source
code from http://www.sysinternals.com) that lets
you spy on every Registry access made anywhere in the system. It can
monitor reads, writes, and queries and record them in a log that you
can peruse at will; it can also limit the Registry accesses it
records based on filtering criteria you supply.
RegMon makes short work of figuring out who
modified a particular key or value, and it's a great resource
for watching what the system's doing with Registry data.
RegMon works by installing a small device driver
when you run the application; this driver installs hooks to all the
Registry API routines, so it can see what parameters callers pass in
and what results the system returns. The RegMon
application itself just opens the device driver and waits for it to
send along the data it's captured.
|
RegMon isn't the only way to spy on the
Registry. The following steps are a handy trick that allows you to
see even the SAM and SECURITY hives, which are normally inaccessible:
Enable the Scheduler service and have it log in as the SYSTEM account
by selecting the "System Account" radio button in the
Services dialog. Once the Scheduler is running, open a command-line window and use the
at command to schedule an invocation of
RegEdt32 in the near future. For example, if
it's 1:35 P.M. when you start off, schedule
RegEdt32 to run at 1:36 P.M. like this: at 13:36 /interactive regedt32.exe If you prefer, and if you're using Windows 2000, you can
schedule the task using the Scheduled Tasks wizard.
At the appointed time, RegEdt32 opens, but
it's running under the SYSTEM account
instead of your normal account. HKLM\SYSTEM and HKLM\SAM is enabled,
so you can open and inspect them. Don't expect to see much,
since their contents are all binary data. Don't edit
anything in these hives.
One extremely valuable thing you can do with this trick is to enable
auditing on the SAM hive. This can give you an audit trail of
attempted and successful misbehavior, including grabbing the password
hashes or changing passwords on the Administrator account.
|
9.10.1 Learning the RegMon Interface
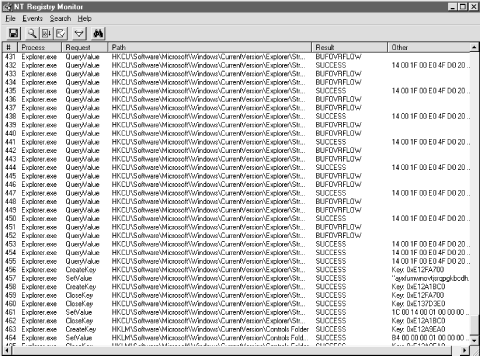
RegMon has an extremely simple interface. As you
can see in Figure 9.9, it uses a single document
window to display the Registry data it captures. The toolbar offers
access to all six menu commands; the bulk of the window is devoted to
the list of captured data. Each column of the list has its own header
at the top of the list window; you can resize each column in the list
by dragging the small vertical lines next to each header. Each entry
in the list displays seven fields' worth of data:
- ID
A sequence number assigned by RegMon. The first
thing it logs gets ID #1, and the ID is incremented from there.
However, these IDs are assigned by the device driver. If events occur
faster than RegMon can add them to its display
list, you'll notice gaps in the numbering. - Time
Either the elapsed time since the last request or the date and time
of the request. - Process
The name of the process that made the request. Since DLLs are loaded
into a process' address space, RegMon
shows only the process name, not the name of the individual DLL
making the request. - Request
What action the requesting process asked for. Most often, you see
QueryValue, OpenKey, CloseKey, and SetValue, but
RegMon also reports enumerations, security
changes, and all the other Registry services available through the
Registry API documented in Chapter 8. - Path
The path supplied as part of the request. RegMon
always shows the path including the topmost root key. - Result
The numeric result code returned by whatever Registry API routine was
called. You see a lot of "SUCCESS" entries here, with an
occasional "NOTFOUND." It's rare to see anything
other than these two. - Other
A catch-all field. For Registry calls that return data,
RegMon shows the data here as a value of
whatever type is appropriate. You see string values in quotes, but
DWORDs, HKEYs, and other binary data appears as a block of hex
digits. It's up to you to interpret binary data and make sense
out of it.
9.10.1.1 Controlling what you see
Besides dragging the column headers to resize each individual column,
RegMon doesn't offer much in the way of
user interface. The Edit Clear Display command erases the
current list of logged Registry accesses, and the OptionsAuto
Scroll command toggles whether RegMon attempts
to automatically scroll the displayed list to always show the most
recently added item. Clear Display command erases the
current list of logged Registry accesses, and the OptionsAuto
Scroll command toggles whether RegMon attempts
to automatically scroll the displayed list to always show the most
recently added item.
9.10.1.2 Some other useful Edit menu commands
There are several other useful commands in the Edit menu, too:
The EditCopy command copies the selected entry's
information as a single plain-ASCII text line. The EditHistory Depth... command lets you control how
many events RegMon buffers. The default value of
means that it attempts to keep all the entries it logs, but you can
restrict it to a smaller number. The EditFont... and EditHighlight
Colors... commands let you control how the captured data are
displayed. The EditFind... command allows you to search the
capture buffer for a particular event The EditRegedit Jump... command opens
RegEdit and opens the value referenced in the
selected log entry.
9.10.2 Capturing and Filtering
Using RegMon to figure out what's going on
in the Registry is a two-step process. The first step is optional:
you may choose which events you want to see (and which you
don't) by building a capture filter.
RegMon applies this filter during the second
step--the actual capture of events.
9.10.2.1 Turning capture on and off
When
you first start RegMon, it's in capture
mode. If you just sit there for a minute and let it run, you see an
occasional Registry access recorded in its window; you can see many
more if you switch to Explorer and open a file, or even click on an
icon in your My Computer window. If you leave
RegMon in capture mode, it's likely to
capture an overwhelming amount of data, much of which won't
bear any relation to the data you're actually looking for.
The best way to reduce this information overload is simple: turn off
capture mode when you don't need it. The OptionsCapture Events command (Ctrl+E is its
accelerator) toggles capture mode off and on (as does the toolbar
button).
9.10.2.2 Using capture filters
The EditFilter/Highlight... command is arguably the
most useful command in the whole program. The Regmon Filter dialog
(see Figure 9.10) lets you specify in detail which
events you want to see in the capture list and which you don't.
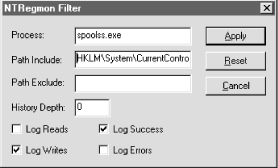
Here are the filter criteria you may specify:
- Include
Includes only those events you specify. If you leave it blank,
nothing is included. More likely, you'll want to include only
specific keys, results, or executable names. The default value of
* indicates that you want to include everything.
You can use multiple values, too, by separating them with commas. For
example, a value of lsass.exe,explorer.exe
includes activity generated by those two processes only. - Exclude
Lets you filter out things you don't want to see. As with the
Include field, you can use wildcards and multiple values. In Figure 9.10, I've specified that I want to see all
activity except that generated by lsass.exe and
the DLLs it loads into its process space. - The Highlight field
Lets you pick which Registry calls you want to highlight, using the
color you selected with the EditHighlight
Colors... command. Notice that in this field, I've added a
process ID (the :1136 after the process name). You
can use process IDs in the Include and Exclude fields as well. - The Log checkboxes
Let you control what actions RegMon logs. By
default, it logs reads, writes, successes, and errors, but you may
adjust this to narrow the breadth of the data you have to wade
through.
9.10.2.3 Saving your captured data
RegMon can save its logged
data as a tab-delimited text file. There's no provision for
saving part of a log; you can either save every logged event, or
none. This is easy to work around, though; all you need to do is
define an appropriate capture filter before you capture data, then
there won't be any extraneous stuff in your capture log.
The FileSave... and FileSave As...
commands let you save logged data to a file you specify. Unlike the
Performance Monitor, there's no way to load a file of saved
data for further review; you have to use a spreadsheet or text editor
to view the saved data if you need it later.
9.10.2.4 Logging boot-to-boot activity
If you've ever wondered what happens behind Windows
2000's chunky-pixeled boot screens, RegMon
gives you an easy way to find out. If you choose the EditLog
Boot command, RegMon logs pretty much every
Registry access from the beginning of the boot cycle. This generates
a lot of data (25+ MB on a Windows 2000 Professional machine), but
there's a lot of interesting stuff in there.
|