9.1 Setting Defaults for New User Accounts
Windows NT was designed from the start to support multiple user
accounts sharing a single computer. Unlike DOS and Windows 3.x,
Windows NT provided a way (through the Registry, actually) to keep
individual settings for each user. However, the original versions of
NT didn't provide any way for these settings to be shared
between computers, and there were no mechanisms for collecting all of
a user's settings data in a single place.
NT 4.0 was the first version of NT to support the concept of
user profiles. Like the profiles in Win95, NT
4.0 profiles contain a user's desktop environment, application
settings, and other preferences. These profiles can be configured to
roam from computer to computer, so that users can have their own
personalized environment follow them to every machine they log onto.
In addition, administrators can configure these profiles to prevent
users from changing all or part of the settings, thus making it
easier to set up shared computer labs and other facilities where
it's important to protect machines against tampering.
Windows 2000 expands the profile concept by allowing you to store
more data in the profile, as well as by supporting folder
redirection, a trick that allows each user's "My
Documents" folder to appear on their desktop no matter where
they log on, even though it's actually stored on a remote
server somewhere else. In addition to typical user files stored in a
server-based home directory, Windows 2000 profiles can hold
application-specific data like custom template or dictionary files,
temporary files (like browser caches) that follow the user around,
favorites, and other preference information.
In Windows 2000 and Windows NT, the profile consists of the contents
of HKCU (stored in ntuser.dat), plus information
from the user's local profile file (either
%systemroot%\profiles\userName or
\Documents and Settings\userName).
9.1.1  Under Windows 2000 Under Windows 2000
Microsoft recommends a simple strategy for preconfiguring user
accounts under Windows 2000. The Windows NT approach (which
you'll see in the next section) doesn't take into account
the expanded contents of the profile. Here's what to do:
Create a new local user account on a target workstation. This account
holds the settings you want the preconfigured account to use. For
example, if you're building a new account to hold defaults for
the legal department, name the account something like "Legal
Profile." Log on to the newly created account, then apply whatever settings you
want to be in force for that account. Log on as an administrator and use the Active Directory management
tools (including the Group Policy snap-in) to apply whatever policy
settings you want tacked onto that class of accounts. You can also
apply group settings if desired.
Once you've configured the profile, you're ready to move
it to the servers your users will actually be using. You do this with
the Profiles tab of the System control panel:
Open the System control panel (Start Settings
Control PanelsSystem). Settings
Control PanelsSystem). Switch to the User Profiles tab (see Figure 9.1),
then select the profile you want to copy.
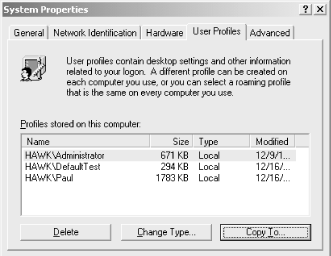
Click the Copy To button: the Copy To dialog then appears. Put the
local or network path where you want the profile to be stored in the
Copy profile to field. Use the Change... button in the Permitted to use control group to
specify who can use this profile. Normally, you should specify that
Everyone can use the profile; if you do, the profile is used
automatically as the default profile for new users.
You must also specify where the users' profile directory is by
using either the Local Users and Groups or Active Directory Users and
Computers snap-in; you can do so before or after you actually move
the profile:
Open the appropriate snap-in and find the user path you want to
modify. Open the account's Properties dialog with the ActionProperties command or by right-clicking the
account and choosing Properties from the context menu. Switch to the Profile tab of the properties dialog, then enter the
path to the user's profile directory. This must match the path
you entered in Step 3 in the previous list.
9.1.2 Under Windows NT
When you install Windows NT on a
machine, the system uses a default profile to provide settings for
your user accounts. The first time a newly created account logs in,
the default profile is copied into HKCU, thus making the new account
inherit the default settings. Unfortunately, there's no direct
way to change settings in this default profile. You can use the
System Policy Editor (as described in Chapter 6) to set policies for the
"Default User" account on Windows NT machines but if you
want to change a setting that's not in one of the policy
templates--say, the default currency format or the list of
predefined URLs that Internet Explorer stores--you have two
choices. You can create a new policy template that contains the new
settings you want to apply, or you can edit the default user profile
directly.
NT stores the default user profile in a file. On individual
workstations and servers, the profile is stored in
%systemroot%\profiles\Default User. You can also
force the default profile to apply to all domain logons by putting it
in the NETLOGON share of your domain
controller. When it's there, the file must be named
Ntuser.dat. Whatever settings are in this file are
applied to new user accounts, but they won't affect existing
accounts. Ntuser.dat is really just a Registry
hive; when a new account logs on interactively for the first time, NT
copies the contents of the hive to HKCU, then writes the changes to
the appropriate subkey of HKU. By changing what's in the
initial hive, you affect what settings go into that user's HKCU
when he logs on.
Because the default user profile is just a Registry hive, you can
edit it with RegEdt32. Here's what to do:
Start RegEdt32. When it opens, open up the HKU
window and select the HKU root key. Use the RegistryLoad Hive... menu command to select the
default user profile you want to edit. You can open
%systemroot%\profiles\Default User directly, or
you can edit NTuser.man if it's available. When RegEdt32 asks for a key name, make up any
name that reminds you what the hive is for. I usually use
"DefaultUserProfile." RegEdt32 then
imports the hive and attaches it under the name you supply. Select the new hive key and use the SecurityPermissions...
command to add Everyone:Read access to the key and its subkeys. This
enables the profile-sharing mechanism to copy keys from the default
profile to users' HKCU. Use RegEdt32 to make the desired changes to
subkeys of your new hive. As you make changes, they are stored
transparently in the hive file. Once you've finished editing all the hive keys, use the
RegistryUnload Hive command to detach the hive. Until
you do this, no other computer or user can get access to the changes
you've made.
|