 |  |

TIP: Check out the OpenView scripts located in OpenView's bin directory (normally /opt/OV/bin). One particularly important group of scripts sets environment variables that allow you to traverse OpenView's directory structure much more easily. These scripts are named ov.envvars.csh, ov.envvars.sh, etc. (that is, ov.envvars followed by the name of the shell you're using). When you run the appropriate script for your shell, it defines environment variables such as $OV_BIN, $OV_MAN, and $OV_TMP, which point to the OpenView bin, man, and tmp directories. Thus, you can easily go to the directory containing OpenView's manual pages with the command cd $OV_MAN. These environment variables are used throughout this book and in all of OpenView's documentation.
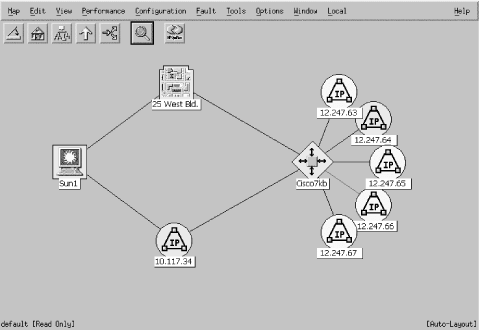
When the GUI starts, it presents you with a clickable high-level map. This map, called the Root map, provides a top-level view of your network. The map gives you the ability to see your network without having to see every detail at once. If you want more information about any item in the display, whether it's a subnet or an individual node, click on it. You can drill down to see any level of detail you want -- for example, you can look at an interface card on a particular node. The more detail you want, the more you click. Figure 6-1 shows a typical NNM map.
[18]You can set any map as your Home map. When you've found the map you'd like to use, go to "MapSubmap
Set This Submap as Home."
[19]This is a special map in which you can place objects that you need to watch frequently. It allows you to access them quickly without having to find them by searching through the network map.
TIP: Before you get sick looking at your newly discovered network, keep in mind that you can add some quick and easy customizations that will transform your hodgepodge of names, numbers, and icons into a coordinated picture of your network.
 Network Polling Configurations: IP." A
window should appear that looks similar to Figure 6-3.
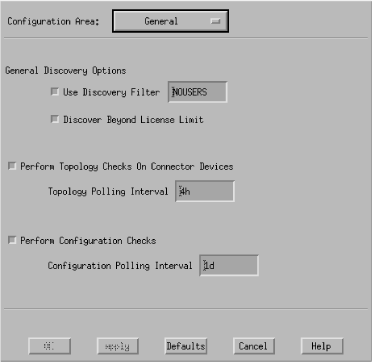
The IP Discovery area (Figure 6-4) lets us enable or disable the discovery of IP nodes. Using the "auto adjust" discovery feature allows NNM to figure out how often to probe the network for new devices. The more new devices it finds, the more often it polls; if it doesn't find any new devices it slows down, eventually waiting one day (1d) before checking for any new devices. If you don't like the idea that the discovery interval varies (or perhaps more realistically, if you think that probing the network to find new devices will consume more resources than you like, either on your network-management station or the network itself), you can specify a fixed discovery interval. Finally, the "Discover Level-2 Objects" button tells NNM to discover and report devices that are at the second layer of the OSI network model. This category includes things such as unmanaged hubs and switches, many AppleTalk devices, and so on.
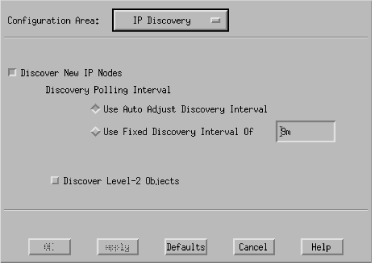
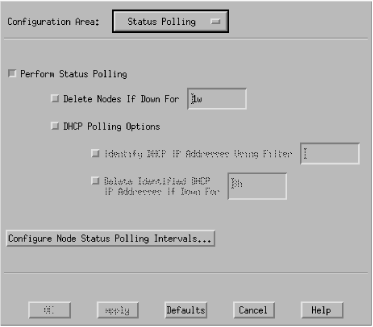
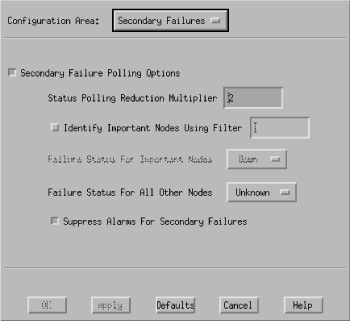
Finally, the Secondary Failures configuration area shown in Figure 6-6 allows you to tell the poller how to react when it sees a secondary failure. This occurs when a node beyond a failed device is unreachable; for example, when a router goes down, making the file server that is connected via one of the router's interfaces unreachable. In this configuration area, you can state whether to show alarms for the secondary failures or suppress them. If you choose to suppress them, you can set up a filter that identifies important nodes in your network that won't get suppressed even if they are deemed secondary failures.
 Manage Objects" tells NNM to begin
managing this network and allows netmon to start
discovering nodes within it. You can quit managing nodes at any time
by clicking on UnManage instead of Manage.
[20]In NNM, go to "HelpIf your routers do not show any adjacent networks, you should try testing them with "FaultDisplay Legend" for a list of icons and their colors.
 Test IP/TCP/SNMP." Add the name of your router, click
"Restart," and see what kind of results you get back. If
you get "OK except for SNMP," review Chapter 7, "Configuring SNMP Agents" and read Section 6.1.3, "Configuring Polling Intervals", on setting up the default community
names within OpenView.
netmon also allows you to specify a seed file that helps it to discover objects faster. The seed file contains individual IP addresses, IP address ranges, or domain names that narrow the scope of hosts that are discovered. You can create the seed file with any text editor -- just put one address or hostname on each line. Placing the addresses of your gateways in the seed file sometimes makes the most sense, since gateways maintain ARP tables for your network. netmon will subsequently discover all the other nodes on your network, thus freeing you from having to add all your hosts to the seed file. For more useful information, see the documentation for the -s switch to netmon and the Local Registration Files (LRF).
NNM has another utility, called loadhosts, that lets you add nodes to the map one at a time. Here is an example of how you can add hosts, in a sort of freeform mode, to the OpenView map. Note the use of the -m option, which sets the subnet to 255.255.255.0:
Once you have finished adding as many nodes as you'd like, press Ctrl-d to exit the command.$ loadhosts -m 255.255.255.0 10.1.1.12 gwrouter1
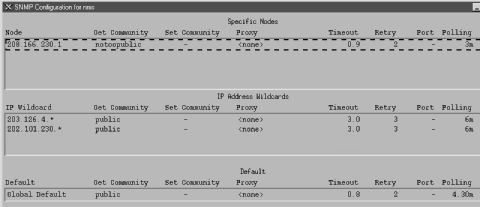
 SNMP Configuration." A window similar to
the one in Figure 6-7 should appear. This window
has four sections: Specific Nodes, IP Address Wildcards, Default, and
the entry area (chopped off for viewing purposes). Each section
contains the same general areas: Node or IP Address, Get Community,
Set Community, Proxy (if any), Timeout, Retry, Port, and Polling. The
Default area, which unfortunately is at the bottom of the screen,
sets up the default behavior for SNMP on your network -- that is,
the behavior (community strings, etc.) for all hosts that
aren't listed as "specific nodes" or that match one
of the wildcards. The Specific Nodes section allows you to specify
exceptions, on a per node basis. IP Address Wildcards allows you to
configure properties for a range of addresses. This is especially
useful if you have networks that have different
get and set community
names.[21] All areas allow you to
specify a Timeout in seconds and a Retry value. The Port field gives
you the option of inserting a different port number (the default port
is 161). Polling is the frequency at which you would like to poll
your nodes.
[21]These community names are used in different parts throughout NNM. For example, when polling an object with xnmbrowser, you won't need to enter (or remember) the community string if it (or its network) is defined in the SNMP configurations.
Imagine what would happen if we had a Timeout of 4 seconds and a Retry of 5. By the fifth try we would be waiting 128 seconds, and the total process would take 252 seconds. That's over four minutes! For a mission-critical device, four minutes can be a long time for a failure to go unnoticed.
This example shows that you must be very careful about your Timeout and Retry settings -- particularly in the Default area, because these settings apply to most of your network. Setting your Timeout and Retry too high and your Polling periods too low will make netmon fall behind; it will be time to start over before the poller has worked through all your devices.[22] This is a frequent problem when you have many nodes, slow networks, small polling times, and high numbers for Timeout and Retry.[23] Once a system falls behind, it will take a long time to discover problems with the devices it is currently monitoring, as well as to discover new devices. In some cases, NNM may not discover problems with downed devices at all! If your Timeout and Retry values are set inappropriately, you won't be able to find problems and will be unable to respond to outages.
[22]Keep in mind that most of NNM's map is polled using regular pings and not SNMP.
[23]Check the manpage for netmon for the -a switch, especially around -a12. You can try to execute netmon with an -a \ ?, which will list all the valid -a options. If you see any negative numbers in netmon.trace after running netmon -a12, your system is running behind.Falling behind can be very frustrating. We recommend starting your Polling period very high and working your way down until you feel comfortable. Ten to twenty minutes is a good starting point for the Polling period. During your initial testing phase, you can always set a wildcard range for your test servers, etc.
It's always fun to shut off or unplug a machine and watch its icon turn red on the map. This can be a great way to demonstrate the value of the new management system to your boss. You can also learn how to cheat and make OpenView miss a device, even though it was unplugged. With a relatively long polling interval, it's easy to unplug a device and plug it back in before OpenView has a chance to notice that the device isn't there. By the time OpenView gets around to it, the node is back up and looks fine. Long polling intervals make it easy to miss such temporary failures. Lower polling intervals make it less likely that OpenView will miss something, but more likely that netmon will fall behind, and in turn miss other failures. Take small steps so as not to crash or overload netmon or your network.
In this book, we warn you repeatedly that polling your network the wrong way can generate huge amounts of management traffic. This happens when people or programs use default polling intervals that are too fast for the network or the devices on the network to handle. For example, a management system might poll every node in your 10.1.0.0 network -- conceivably thousands of them -- every two minutes. The poll may consist of SNMP get or set requests, simple pings, or both. OpenView's NNM uses a combination of these to determine if a node is up and running. Filtering saves you (and your management) the trouble of having to pick through a lot of useless nodes and reduces the load on your network. Using a filter allows you to keep the critical nodes on your network in view. It allows you to poll the devices you care about and ignore the devices you don't care about. The last thing you want is to receive notification each time a user turns off his PC when he leaves for the night.
Filters also help network management by letting you exclude DHCP users from network discovery and polling. DHCP and BOOTP are used in many environments to manage large IP address pools. While these protocols are useful, they can make network management a nightmare, since it's often hard to figure out what's going on when addresses are being assigned, deallocated, and recycled.
In my environment we use DHCP only for our users. All servers and printers have hardcoded IP addresses. With our setup, we can specify all the DHCP clients and then state that we want everything but these clients in our discovery, maps, etc. The following example should get most users up and running with some pretty good filtering. Take some time to review OpenView's "A Guide to Scalability and Distribution for Network Node Manager" manual for more in-depth information on filtering.
The default filter file, which is located in $OV_CONF/C, is broken up into three sections:
Sets allow you to place individual nodes into a group. This can be useful if you want to separate users based on their geographic locations, for example. You can then use these groups or any combination of IP addresses to specify your Filters, which are also grouped by name. You then can take all of these groupings and combine them into FilterExpressions. If this seems a bit confusing, it is! Filters can be very confusing, especially when you add complex syntax and not so logical logic (&&, ||, etc.). The basic syntax for defining Sets, Filters, and FilterExpressions looks like this:
name "comments or description" { contents }[24]Your filter, if right out of the box, will look much different. The one shown here is trimmed to ease the pains of writing a filter.
// lines that begin with // are considered COMMENTS and are ignored!
// Begin of MyCompanyName Filters

Sets {

    dialupusers "DialUp Users" { "dialup100", " dialup101", \
                 " dialup102" }
}

Filters {

    ALLIPRouters "All IP Routers" { isRouter }

    SinatraUsers "All Users in the Sinatra Plant" { \
        ("IP Address" ~ 199.127.4.50-254) || \
        ("IP Address" ~ 199.127.5.50-254) || \
        ("IP Address" ~ 199.127.6.50-254) }

    MarkelUsers "All Users in the Markel Plant" { \
        ("IP Address" ~ 172.247.63.17-42) }

    DialAccess "All DialAccess Users" { "IP Hostname" in dialupusers }
}

FilterExpressions
{
    ALLUSERS "All Users" { SinatraUsers || MarkelUsers || DialAccess }

    NOUSERS "No Users " { !ALLUSERS }
}[25]These Sets have nothing to do with the snmpset operation with which we have become familiar.
[26]Check out the $OV_FIELDS area for a list of fields.The next two filters specify IP address ranges. The SinatraUsers filter is the more complex of the two. In it, we specify three IP address ranges, each separated by logical OR symbols (||). The first range (("IP Address" ~ 199.127.6.50-254)) says that if the IP address is in the range 199.127.6.50-199.127.6.254, then filter it and ignore it. If it's not in this range, the filter looks at the next range to see if it's in that one. If it's not, the filter looks at the final IP range. If the IP address isn't in any of the three ranges, the filter allows it to be discovered and subsequently managed by NNM. Other logical operators should be familiar to most programmers: && represents a logical AND, and ! represents a logical NOT.
The final filter, DialAccess, allows us to exclude all systems that have a hostname listed in the dialupusers set, which was defined at the beginning of the file.
Now that we have our filters defined, we can apply them by using the ovtopofix command or the polling configuration menu shown in Figure 6-3.
If you want to remove nodes from your map, use $OV_BIN/ovtopofix -f FILTER_NAME. Let's say that someone created a new DHCP scope without telling you and suddenly all the new users are now on the map. You can edit the filters file, create a new group with the IP address range of the new DHCP scope, add it to the ALLUSERS FilterExpression, run ovfiltercheck, and, if there are no errors, run $OV_BIN/ovtopofix -f NOUSERS to update the map on the fly. Then stop and restart netmon -- otherwise it will keep discovering these unwanted nodes using the old filter. I find myself running ovtopofix every month or so to take out some random nodes.
 Load/Unload MIBs: SNMP." This presents you with a window in
which you can add vendor-specific MIBs to your database.
Alternatively, you can run the command
$OV_BIN/xnmloadmib and bypass having to go through
NNM directly.
[27]Some platforms and environments refer to loading a MIB as compiling it.That's the end of our brief tour of OpenView configuration. It's impossible to provide a complete introduction to configuring OpenView in this chapter, so we tried to provide a survey of the most important aspects of getting it running. There can be no substitute for the documentation and manual pages that come with the product itself.

Copyright © 2002 O'Reilly & Associates. All rights reserved.