| [ Team LiB ] |
|
18.3 AuthenticationASP.NET supports four authentication modes: None, Windows, Forms, and Passport. Enable these authentication modes using a combination of IIS administration, configuration settings, and code. Configure different authentication modes for different ASP.NET applications using settings in your application's Web.config file; however, you cannot configure authentication modes below the level of an application root. Understand that before a client request reaches your ASP.NET application, it must pass through IIS authentication. The result of IIS authentication provides the input that drives the .NET authentication mechanism. For the Windows authentication of ASP.NET, IIS authentication provides your application with the information about the authenticated Windows user. However, for the None, Forms, and Passport authentication modes, it is most likely that you will want to turn off IIS authentication by enabling anonymous access to IIS. Unless you enable impersonation (discussed in Section 18.5 later in this chapter), ASP.NET authentication has no effect on the Windows user context under which your ASP.NET application executes. Your application executes in the context of the ASP.NET worker process identity, which we discussed in the previous section. ASP.NET authentication controls the identity and principal assigned to your ASP.NET application. We introduced the concepts of identities and principals in Chapter 10 and showed how to use them to enforce role-based security. In the following sections, we discuss each of the ASP.NET authentication modes, but first we summarize the IIS authentication modes, which you must configure correctly to make ASP.NET authentication and impersonation function. 18.3.1 Configuring IIS Authentication ModesIIS supports a variety of authentication modes, which are configured through Internet Services Manager. IIS allows you to configure authentication down to the individual file level, and enable multiple authentication mechanisms simultaneously.
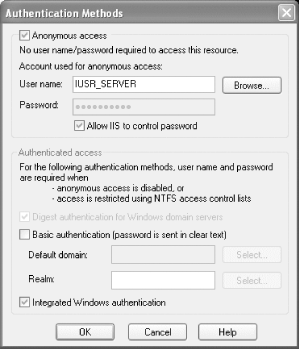
To configure the IIS authentication mode for a folder or file, you must select it in Internet Service Manager, open its properties window, and select the Directory Security tab. From the Anonymous access and authentication control group on this tab, click the Edit button to open the Authentication Methods window shown in Figure 18-2. Figure 18-2 shows the Authentication Methods window as it appears for IIS Version 5.1 running on Windows XP Professional. Figure 18-2. Configuring IIS authentication modes The Authentication Methods window allows you to configure four of the five authentication mechanisms supported by IIS. Except for anonymous access, each method depends on a client application providing credentials that IIS can map to a valid Windows user account. If the credentials do not match a valid Windows account, IIS rejects the client request. This dependency on Windows user accounts is the key factor you must consider when deciding to implement IIS authentication and ASP.NET Windows authentication (which we discuss later in this section). For large-scale, web-based, and cross-platform projects, depending on a Windows user accounts database may be inappropriate. We summarize each of the IIS authentication mechanisms here:
18.3.2 No AuthenticationIf you are not concerned about authenticating users, or intend to use some custom authentication mechanism implemented within your ASP.NET application, you can turn off ASP.NET authentication with the following configuration file setting: <configuration>
<system.web>
<authentication mode="None">
</system.web>
</configuration>
Even if you are not concerned about using ASP.NET authentication mechanisms, you can still enable IIS authentication so that you can allow only permitted Windows users to access your application. To allow truly unrestricted access to your application, enable anonymous access to IIS. 18.3.3 Windows AuthenticationWindows authentication relies on IIS to authenticate any inbound requests using one of its built-in Basic, Digest, Integrated, or Client Certificate Certificate authentication mechanisms before the request reaches your ASP.NET application. As long as IIS anonymous authentication is not enabled, IIS will ensure that the requesting user has a valid Windows account and pass the authenticated user's information to the ASP.NET application. With Windows authentication enabled, the ASP.NET application principal is set to an instance of System.Security.Principal.WindowsPrincipal configured to represent the authenticated Windows user. See Chapter 10 for details on how you can use the WindowsPrincipal object to enforce role-based security within your ASP.NET application. To enable Windows authentication, configure the <authentication> element as shown in the following example: <configuration>
<system.web>
<authentication mode="Windows">
</system.web>
</configuration>
18.3.4 Forms AuthenticationWindows authentication requires users of your ASP.NET application to have Windows user accounts. As we have mentioned, for large web-based and cross-platform applications, this may not be feasible or desirable. Forms authentication allows you to implement a custom authentication mechanism where you can authenticate users against any type of authority.
Forms authentication relies on URL authorization to trigger the authentication process; we discuss URL authorization in Section 18.4 later in this chapter. For now, it is enough to understand that authorization controls the application resources an authenticated user is permitted to access. The Forms authentication process works as follows:
Although ASP.NET provides much of the infrastructure and a number of utility classes to simplify the Forms authentication process, much of the implementation comes down to you. In the following sections, we implement a simple Forms authentication mechanism to demonstrate the steps required. The example consists of three files: Web.config, Logon.aspx, and Main.aspx. To run the application, place each of these files in a folder accessible through IIS, and configure the folder as an application root using Internet Service Manager. In the two .aspx pages, there are only small sections of code, which we include inline instead of in code-behind files. In any but the most trivial of ASP.NET application, we recommend that you use code-behind modules to improve the readability and maintainability of your application.
18.3.4.1 Configuring Forms authenticationThe first step in implementing Forms authentication is to configure your ASP.NET application. The following Web.config file demonstrates each of the configuration elements that affect Forms authentication: <configuration>
<system.web>
<authentication mode="Forms">
<forms name="ProgDotNetSecurity" loginUrl="Logon.aspx" protection="All"
timeout="180" path="/" requireSSL="false" slidingExpiration="true">
<credentials passwordFormat="Clear">
<user name="Alice" password="secret1"/>
<user name="Bob" password="secret2"/>
<user name="Eve" password="secret3"/>
</credentials>
</forms>
</authentication>
<authorization>
<deny users="?"/>
</authorization>
</system.web>
</configuration>
Most essential is the <authentication mode="Forms"> element, which is the main switch to tell ASP.NET that you want to use Forms authentication. The child <forms> element configures some aspects of the Forms authentication process and the structure of the authentication cookie that ASP.NET will create. The most important attribute is loginUrl, which specifies the URL to where ASP.NET will redirect an unauthenticated client request. We specify the Logon.aspx file, which will reside in the same folder as this Web.config file and the rest of our sample application. The <credentials> element and its child <user> elements provide a static authority against which you can authenticate named users. In our example, we have defined three user accounts: Alice, Bob, and Eve. Passwords for each account can be stored in clear text, as we have done in the example, or hashed using either SHA-1 or MD5; the passwordFormat attribute of the <credentials> element specifies the password format. Use of the <credentials> element is optional; though it is easy to use and useful for testing purposes, it rarely provides a suitable solution for a secure production system. Table 18-2 lists the attributes of the <forms>, <credentials>, and <user> elements and describes their purpose.
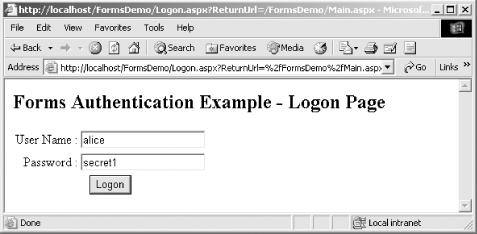
Also critical to the Forms authentication configuration is the <authorization> element, which lists the application resources that require authorization to access. The need for authorization is what triggers ASP.NET to enforce Forms authentication. If a client tries to access an application resource (SomeFile.aspx), for example, that does not require authorization; the client will not be required to have an authentication cookie. We discuss the syntax of the <authorization> element in Section 18.4 later in this chapter. For now, it is enough to know that the configuration shown here means that all anonymous users are denied access to all files; this requires all client request to have an authentication cookie. 18.3.4.2 Creating the logon pageFollowing the configuration of our ASP.NET application, the next step is to create a login page. This is the page where ASP.NET redirects all unauthenticated user requests. Remember that client requests containing a valid authentication cookie are routed directly to the requested application resource; only those without an authentication cookie are redirected to the login page. In our Web.config file in the previous section, we used the loginUrl attribute of the <forms> elements to specify that the name of our login page is Logon.aspx, and that it is located in the application directory; Logon.aspx displays the interface shown in Figure 18-3. Figure 18-3. Forms authentication logon page The following code implements the Logon.aspx page; most of the code is responsible for drawing the static interface elements. After the user enters his credentials and clicks on Logon, the Logon_Click method executes. We have highlighted the two lines that perform the most crucial elements of the Forms authentication: # C#
<html>
<script language="C#" runat="server">
void Logon_Click(Object sender, EventArgs e) {
// Perform authentication of the user credentials.
// Use the static FormsAuthentication.Authenticate method
// to authenticate the credentials against those contained
// in the <credentials> element of Web.config.
if (FormsAuthentication.Authenticate(Name.Text,Password.Text)) {
// Credentials OK, redirect to originally requested page.
FormsAuthentication.RedirectFromLoginPage(Name.Text,true);
}
}
</script>
<body>
<h2>Forms Authentication Example - Logon Page</h2>
<form id="LogonForm" method="post" runat="server">
<table>
<tr align="right">
<td>User Name : </td>
<td><asp:TextBox id="Name" runat="server"/></td>
</tr>
<tr align="right">
<td>Password : </td>
<td><asp:TextBox id="Password" runat="server"/></td>
</tr>
<tr align="center">
<td colspan="2">
<asp:Button id="Logon" runat="server" Text="Logon"
OnClick="Logon_Click"/>
</td>
</tr>
</table>
</form>
</body>
</html>
# Visual Basic .NET
<html>
<script language="vb" runat="server">
Sub Logon_Click(ByVal sender As Object, ByVal e As EventArgs)
' Perform authentication of the user credentials.
' Use the static FormsAuthentication.Authenticate method
' to authenticate the credentials against those contained
' in the <credentials> element of Web.config.
If FormsAuthentication.Authenticate(Name.Text,Password.Text) Then
' Credentials OK, redirect to originally requested page.
FormsAuthentication.RedirectFromLoginPage(Name.Text, True)
End If
End Sub
</script>
<body>
<h2>Forms Authentication Example - Logon Page</h2>
<form id="LogonForm" method="post" runat="server">
<table>
<tr align="right">
<td>User Name : </td>
<td><asp:TextBox id="Name" runat="server"/></td>
</tr>
<tr align="right">
<td>Password : </td>
<td><asp:TextBox id="Password" runat="server"/></td>
</tr>
<tr align="center">
<td colspan="2">
<asp:Button id="Logon" runat="server" Text="Logon"
OnClick="Logon_Click"/>
</td>
</tr>
</table>
</form>
</body>
</html>
The first highlighted line calls the static FormsAuthentication.Authenticate method, which looks at the users you have defined in the <credentials> element of our Web.config file. If the supplied username and password match one of the listed user accounts, the Authenticate method returns true, and you should authenticate the user. Note that you could use any mechanism at this point to authenticate the user; we have used the Web.config <credentials> element for simplicity. It would be more common to reference a database or directory to authenticate a user in most production systems.
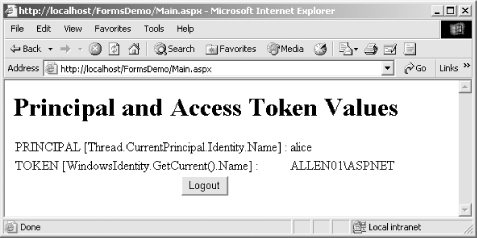
The second highlighted line calls the static FormsAuthentication.RedirectFromLoginPage method once you have authenticated the user's credentials successfully. The first argument to the RedirectFromLoginPage method is the name of the authenticated user. This is stored in the authentication cookie. On future client requests, ASP.NET extracts the username from the authentication cookie and creates a System.Web.Security.FormsIdentity object from it; FormsIdentity implements the System.Security.Principal.IIdentity interface. ASP.NET places the FormsIdentity inside a System.Security.Principal.GenericPrincipal object, which it assigns to the ASP.NET process. The second argument to the RedirectFromLoginPage method is a Boolean, which specifies whether the authentication cookie should be persisted or remain valid only for the session. In this instance, we have specified true in order to persist the cookie. 18.3.4.3 Creating the protected pageThe Web.config and Logon.aspx files are all that is required to implement simple Forms authentication. With the configuration specified, any request for an ASP.NET application resource in the application must contain a valid authentication cookie, or ASP.NET will redirect the request to the Logon.aspx page. To complete our example, we create a page named Main.aspx. The Main.aspx page presents the user with the interface shown in Figure 18-4. It shows the identity represented by the current thread's principal (accessed using System.Threading.Thread.CurrentPrincipal.Identity.Name) and the Windows account under which the ASP.NET worker process is executing (accessed through System.Security.Principal.WindowsIdentity.GetCurrent( ).Name). Figure 18-4. Forms authentication protected page Example 18-1 contains the code for Main.aspx. Most of the code implements the static user interface elements or displays the user identity details when the page is first loaded. However, we have included a Logout button to demonstrate how to terminate a client session: Example 18-1. Main.aspx# C#
<html>
<script language="C#" runat="server">
void Page_Load(Object sender, EventArgs e) {
// Initialize the Label values to show the Identity represented
// by the current thread's Principal and Windows access token.
Principal.Text =
System.Threading.Thread.CurrentPrincipal.Identity.Name;
Token.Text =
System.Security.Principal.WindowsIdentity.GetCurrent( ).Name;
}
void Logout_Click(Object sender, EventArgs e) {
// Remove the cookie
FormsAuthentication.SignOut( );
// Redirect back to logon page
Response.Redirect("Main.aspx");
}
</script>
<body>
<h1>Principal and Access Token Values</h1>
<form id="Form1" method="post" runat="server">
<table>
<tr>
<td>PRINCIPAL [Thread.CurrentPrincipal.Identity.Name] :</td>
<td><asp:Label id="Principal" runat="server"/></td>
</tr>
<tr>
<td>TOKEN [WindowsIdentity.GetCurrent( ).Name] :</asp:Label></td>
<td><asp:Label id="Token" runat="server"/></td>
</tr>
<tr align="center">
<td colspan="2">
<asp:Button id="Logout" runat="server" Text="Logout"
OnCLick="Logout_Click"/>
</td>
</tr>
</table>
</form>
</body>
</html>
# Visual Basic .NET
<html>
<script language="vb" runat="server">
Sub Page_Load(ByVal sender As Object, ByVal e As EventArgs)
' Initialize the Label values to show the Identity represented
' by the current thread's Principal and Windows access token.
Principal.Text = _
System.Threading.Thread.CurrentPrincipal.Identity.Name
Token.Text = _
System.Security.Principal.WindowsIdentity.GetCurrent( ).Name
End Sub
Sub Logout_Click(ByVal sender As Object, ByVal e As EventArgs)
' Remove the cookie
FormsAuthentication.SignOut( )
' Redirect back to logon page
Response.Redirect("Main.aspx")
End Sub
</script>
<body>
<h1>Principal and Access Token Values</h1>
<form id="Form1" method="post" runat="server">
<table>
<tr>
<td>PRINCIPAL [Thread.CurrentPrincipal.Identity.Name] :</td>
<td><asp:Label id="Principal" runat="server"/></td>
</tr>
<tr>
<td>TOKEN [WindowsIdentity.GetCurrent( ).Name] :</asp:Label></td>
<td><asp:Label id="Token" runat="server"/></td>
</tr>
<tr align="center">
<td colspan="2">
<asp:Button id="Logout" runat="server" Text="Logout"
OnCLick="Logout_Click"/>
</td>
</tr>
</table>
</form>
</body>
</html>
When the user clicks the Logout button, ASP.NET executes the Logout_Click method, which contains two highlighted lines of code that constitute our logout functionality. The first line calls the FormsAuthentication.SignOut method, which forces the deletion of the client's authentication cookie. In the second line, we call the Response.Redirect method to redirect the client back to the Main.aspx page. This causes the client to reload the current page, but because the client no longer has a valid authentication cookie, ASP.NET redirects the request to the Logon.aspx page for authentication. 18.3.5 Passport AuthenticationMicrosoft Passport .NET provides a suite of web-based services designed to centralize and simplify Internet authentication and purchasing. ASP.NET Passport authentication uses the single-sign-in (SSI) capabilities of Passport .NET to authenticate users requesting access to your ASP.NET applications. SSI allows a you to use a single username and password to access all services that participate in the Passport .NET service. This frees you from having to remember multiple usernames and passwords, or ensuring that they are kept the same on all sites. As more web sites adopt the use of Passport .NET, the value of SSI will grow, making your web experience simpler and more pleasurable; however, to date the uptake has been limited. The requirements of implementing Passport authentication make a useable demonstration beyond the scope of this book. You must install the Passport .NET SDK on your development machine, and learn how to use it. Then you need to license the Passport .NET service to use it from your web site, and you must have a publicly accessible domain name that the Passport .NET service can use to communicate with your site. Finally, all of your users need to create Passport .NET accounts to access your system. For further details on Microsoft Passport .NET, visit its home page at http://www.passport.net. |
| [ Team LiB ] |
|