15.4 Configuring Video Under Windows 98/Me/2000/XP
Windows 98/Me/
2000/XP video is
configured from the Display Properties  Settings
dialog and the Display Properties
Settings Advanced dialog. The
Advanced Settings dialog can be used to configure specific settings
for the adapter and monitor, to enable or disable video acceleration
settings, and to choose Color Management options. The exact pages in
this dialog vary according to the video adapter and driver installed.
To view Display Properties, run the Display applet from Control Panel
or right-click on a vacant area of the desktop and choose Properties.
The following sections describe how to use Display Properties to
configure Window 98/Me video settings. Windows 2000/XP is similar,
with minor differences in the appearance, names, and functions of the
dialogs. Settings
dialog and the Display Properties
Settings Advanced dialog. The
Advanced Settings dialog can be used to configure specific settings
for the adapter and monitor, to enable or disable video acceleration
settings, and to choose Color Management options. The exact pages in
this dialog vary according to the video adapter and driver installed.
To view Display Properties, run the Display applet from Control Panel
or right-click on a vacant area of the desktop and choose Properties.
The following sections describe how to use Display Properties to
configure Window 98/Me video settings. Windows 2000/XP is similar,
with minor differences in the appearance, names, and functions of the
dialogs.
15.4.1 Installing or Changing Video Drivers
Windows 98/Me does reasonably well
at detecting common video adapters and installing the proper drivers
for them. However, you may need to install a video driver manually in
one of the following circumstances:
Windows 98/Me does not have a driver for your adapter. This situation
is more common than you might expect. For example, Windows 98/Me does
not provide a driver for the ubiquitous Intel i740 video adapter.
This situation may also arise if you install a new video adapter in
an existing Windows 98/Me system.
Windows 98/Me has a driver for your adapter and recognizes the
hardware, but you have a more recent driver supplied by the adapter
manufacturer. Manufacturers often provide enhanced drivers that are
faster or support more features than the vanilla drivers included
with Windows 98/Me.
Windows 98/Me has a driver for your adapter, but fails to autodetect
the presence of the adapter, or autodetects the adapter as a
different model than is actually present. This situation also arises
more often than it should.
To install a new or updated video adapter, first visit the video
adapter manufacturer's web site and download the
latest Windows 98/Me drivers for your adapter. Get the most recent
release version of the driver, avoiding beta or unsupported versions.
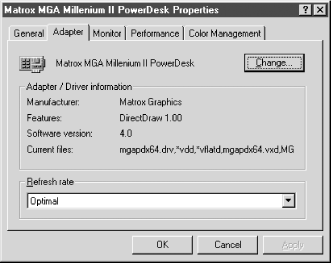
To install the driver, display the Settings page, click Advanced,
choose the Adapter tab, and click Change to start the Update Device
Driver Wizard.
Also use this dialog to set Refresh rate. Available options depend on
the combination of monitor, adapter, and driver being used. When
using a PnP monitor, the usual choices are
Optimal, which selects the highest refresh rate
supported by both the monitor and adapter at the current resolution,
and Adapter default, which simply uses the
(usually low) refresh rate that the adapter defaults to. Some
configurations allow you to specify actual refresh rates, e.g., 60,
70, 72, 75, and 85 Hz. Before you specify a refresh rate manually,
make sure your monitor supports that refresh rate at the resolution
and color depth you have selected. Some configurations do not allow
changing refresh rate, in which case the refresh rate drop-down list
does not appear.
 |
Some manufacturers supply video drivers as executable files. Running
the program installs the driver and may add a custom tab to the
Display Properties dialog that allows you to set properties for that
driver and adapter. Such drivers also often put a video management
utility in the system tray, which you can use to change settings on
the fly.
|
|
When you change resolution or refresh rate, some
monitors automatically adjust to the new settings and display a
properly centered image. Others require changing vertical and
horizontal size and centering adjustments on the monitor to display
the image properly. If you select a resolution and refresh rate that
the monitor cannot display, the screen may be blank or filled with
wavy lines. To correct this problem, restart the computer in Safe
Mode by pressing F8 during boot and choosing Safe Mode. Choose the
Standard VGA driver, restart the system normally, use Display
Properties to select the proper driver and display settings that your
monitor supports, and then restart the system normally.
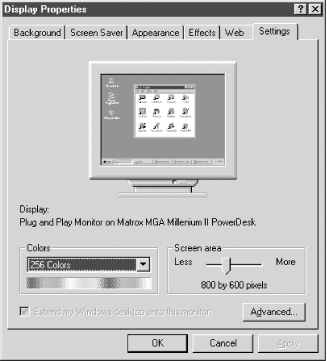
15.4.2 Changing the Screen Area Setting
The screen area setting determines how much
information is displayed on the screen by specifying the resolution
of the image that the video adapter delivers to the monitor. The
default resolution installed by Setup will be within the capabilities
of your video adapter and monitor, but may not be optimum. Use the
screen area slider in Display Properties
Settings to change resolution (see Figure 15-2).
Note that the selection range is not continuous. If your monitor is
Plug-N-Play compliant and recognized by Windows 98/Me, Windows allows
you to select only those discrete values that are supported by both
the video adapter and monitor.
Although Windows 98/Me itself supports changing resolution on the
fly, doing so requires that the video adapter and driver support that
feature. Changing resolution with some older video adapters and
drivers requires shutting down and restarting Windows. If so, Windows
notifies you that a shutdown is required to put the change into
effect and allows you to shut down immediately or defer doing so. If
you choose the latter, configuration changes do not take effect until
you later restart the system manually.
 |
If the
monitor type is not recognized by Windows, be careful when changing
resolution settings. Depending on the default monitor setting,
Windows may allow you to select a resolution setting higher than the
monitor actually supports. At best, this results in an unreadable
display. At worst, it may overdrive and damage the monitor. A
seriously overdriven monitor may begin whining like a Star Trek
phaser about to self-destruct, with similarly catastrophic results
likely. If this happens, turn off the monitor
immediately. More than a few seconds of this
abuse may turn a monitor into scrap.
If you find yourself with Windows
set to a resolution that the monitor cannot display, shut down and
restart Windows in Safe Mode. Use the procedure described at the end
of the preceding section to reconfigure Windows to use a video driver
and display settings that are supported by your hardware.
|
|
| Deciding
which video driver to use is nontrivial. If Windows 98/Me supplies a
driver for your video card, you can assume that it is at least stable
and provides the basic functions, although it may well be slower or
have fewer features than the latest driver from the video card
manufacturer. The alternative is using a driver from the adapter
manufacturer, which may or may not be a good idea. Some
manufacturers have become famous for their "driver
of the week." Each new release adds features,
improves speed, kills old bugs, and (usually) introduces new bugs.
Use such drivers at your own risk, and be prepared for a lot of
crashes. Other manufacturers, notably Matrox, treat video drivers
with the seriousness they deserve. Our advice: choose a
video card from a manufacturer that treats drivers with respect. For
clients and standalone PCs, use the latest release driver certified
by the adapter maker. For servers and other critical systems, use
either the vanilla Microsoft driver or a later Microsoft-certified
driver supplied by the adapter manufacturer. In either case, avoid
subsequently upgrading video drivers unless there is a compelling
reason to do so. Avoid beta and other bleeding-edge drivers unless
you enjoy having your system crash unpredictably. In
particular, avoid using unreleased or beta nVIDIA
video drivers, which nVIDIA itself says should
be avoided. nVIDIA's business
model requires them to provide early versions of drivers to their
OEMs, and those drivers somehow always escape onto the Internet
despite the efforts of nVIDIA to prevent that
from happening. Gamers trying to wring the last drop of performance
from their video cards download and install these unfinished drivers,
and then wonder why their systems crash. If you're
using an nVIDIA-based card, never install
anything other than the latest official drivers for it. You have been
warned. |
15.4.3 Enabling and Using QuickRes
If you frequently need to change
resolution or color depths, the preceding
procedure gets old fast. Enabling the
Windows
98/Me QuickRes utility allows you to change resolution and color
depth on the fly. To enable QuickRes, choose Display Properties
Settings Advanced (shown in
Figure 15-3). On the General page of that dialog,
mark the Show settings icon on task bar
checkbox. With QuickRes enabled, clicking its icon in the system tray
displays a menu that displays all combinations of resolution and
color depth supported by the video adapter and monitor, and marks the
active settings with a check mark. Change resolution or color depth
by clicking on the combination you want to use. The Adjust Display
Properties menu item provides a one-click method for invoking Display
Properties when you need to change properties other than those shown
on the QuickRes menu.
|
QuickRes was first released as one of the unsupported Windows 95
Power Toys utilities, but is integral to Windows 98/Me. If you
installed QuickRes under Windows 95 and then upgraded to Windows
98/Me, the Windows 95 version of QuickRes may still appear in your
system tray. If so, you can continue to use it. If you prefer to
remove the older version and install the Windows 98/Me version,
you'll have to edit the registry. To do so, start
Registry Editor and open the key
HKEY_CURRENT_USER\Software\Microsoft\Windows\CurrentVersion\Run.
Double-click the value entry Taskbar Display Controls
to edit the entry. Change the value entry, which should be
RunDLL deskcp16.dll,QUICKRES_RUNDLLENTRY to
RunDLL deskcp16.dll and save the change. You can
then enable QuickRes 98 by marking the checkbox as described
previously.
|
|
15.4.4 Changing Performance Setting
By default, Windows 98/Me configures the
video driver it
installs to use all accelerator functions. Ordinarily, this setting
works properly and can be left as is. If you experience video
problems, including a mouse pointer that is jerky (check that your
mouse is clean first) or that disappears entirely, odd video
artifacts, or program crashes, Windows 98/Me permits you to
selectively disable some video acceleration functions (Display
Properties Settings Advanced
Performance). Before you use this feature, first
attempt to locate and install an updated video driver. Otherwise,
choose an accelerator setting as follows:
- Full
-
All accelerator functions enabled.
- High
-
Most accelerator functions enabled. Use this setting if you
experience minor video or mouse problems. Performance will be
degraded somewhat but may be acceptable, particularly for simple 2D
applications such as word processing.
- Low
-
Most accelerator functions disabled. Use this setting if you
experience severe video problems or have one or more programs that
routinely hang. With this setting enabled, performance may be
marginally acceptable for text applications, but little else. Make
getting a better video card a high priority.
- None
-
All accelerator functions disabled. Use this setting only if it is
required to allow your system to run without crashing. When this
setting is enabled, your video card is acting as a simple frame
grabber, and its performance will almost certainly be unacceptable
even for text applications. If you find this setting is required,
replace your video card as soon as possible.
15.4.5 Setting Font Size
Windows uses Small Fonts by default,
but allows you to select predefined Large Fonts, or to specify a
custom font size by choosing Other. The font size setting you select
provides a "baseline" value from
which the size of vector-based fonts used in applications is
calculated. Choosing one of the predefined settings also installs a
set of raster fonts that are used for such things as icon labels. A
common reason for using Large Fonts is when you run higher than
standard resolution, e.g., 1024 x 768 on a 15" monitor,
where using Large Fonts or a custom font size allows you to make the
text large enough to be readable. Be cautious, however. Many
applications do not display properly using anything except Small
Fonts. Note that instead of changing font size directly (Display
Properties Settings Advanced
General), you can achieve similar results by
selecting a different Scheme in the Appearance page of the Display
Properties dialog.
15.4.6 Using Color Management
Getting consistent color across a wide range of
peripherals, including monitors, scanners, and printers, is a
nontrivial task, and is made more difficult by the diverse means used
for producing color. Monitors produce color by illuminating
phosphors. Printers may produce output that uses transmitted or
reflected light to produce color by means of dyes or pigments.
Scanners may capture either transmitted or reflected images. The
color temperature of the lighting used to produce or view an image
differs according to its source, and the gamma (in simple terms,
contrast) varies with the device. With so many variables in play, the
colors on your monitor are likely to be only an approximation of the
original colors you scanned, and printed output is likely to differ
substantially from both the original and the image on your monitor.
The different methods used to produce color mean that it is
impossible to render color with complete consistency. A printed copy,
for example, simply does not have the dynamic range that a
transparency or monitor image has. But for those doing pre-press
work, some means of minimizing those differences is needed. To
address this problem,
Microsoft introduced
Image Color
Management (ICM) with Windows 95. ICM organizes the
characteristics of each device (e.g., for a scanner, the color
temperature of the light source and the gamma of the image sensor;
for a printer, the reflectivity characteristics of its various inks)
and uses those stored characteristics to make color reproduction as
consistent as possible across different devices.
Windows 98/Me includes the ICM V 2.0 API, which improves on the
limited capabilities of ICM V 1.0. Previously, you had to define
color characteristics for each combination of application and device.
Windows 98/Me allows you to define color management profiles, which
take into account the specific imaging color characteristics of each
input and output device and allow all installed applications to use
that shared profile to maintain color consistency. ICM
characteristics for scanners and printers are set in the drivers for
those applications. Those for monitors are set in Display Properties
Settings Advanced
Color Management.
Color management is an extremely complex issue. For more information,
read the Microsoft ICM whitepaper, available online at http://www.microsoft.com/windows/platform/icmwp.htm.
This whitepaper also contains links to various other color
management resources.
|
