
|
|
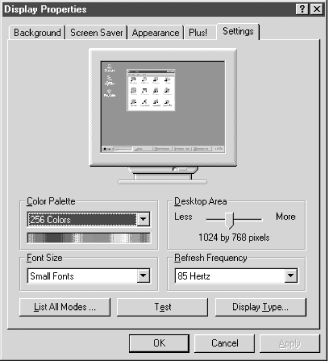
15.5 Configuring Video Under Windows NT 4Like Windows 98/Me, Windows NT 4 centralizes video configuration functions in the Display Properties Settings page, shown in Figure 15-4. Two key differences are that Windows NT 4 does not support PnP (although it automatically detects some video adapters via a different mechanism) and that Windows NT 4 never knows what monitor type is connected unless you tell it. The implications of these differences are that you may have to choose the proper video driver and that using the optimum settings for a monitor require either that you know the detailed specifications for that monitor or that you use trial and error to determine the best settings. Figure 15-4. Use the Display Properties Settings page in Windows NT 4 to configure all video settings 15.5.1 Viewing or Changing Adapter Information and Video DriversTo view information about the currently installed video adapter and its drivers, click Display Type. Windows NT 4 does not support PnP, but it attempts to detect the installed video adapter by searching BIOS memory space for strings contained in the adapter BIOS and comparing the strings it finds against a database of known adapters. Although not as effective as PnP, this method allows Windows NT 4 to detect many common video adapters successfully and install the proper drivers for them. But detection is not perfect, and you may need to install a driver manually, for the same reasons listed in the preceding section for Windows 98/Me. To install a new or updated video adapter, first visit the video adapter manufacturer's web site and download the latest Windows NT drivers for your adapter. Get the most recent release version of the driver, avoiding beta or unsupported versions. To install the driver, click Display Type. Although the resulting dialog includes a Detect button that causes Windows NT to attempt to detect the adapter, we recommend avoiding that process. Instead, click the Change button and follow the prompts to install the new driver you downloaded from the display adapter manufacturer. 15.5.2 Setting Resolution, Color Depth, and Refresh FrequencyAlthough you can change individual settings for Color Palette, Desktop Area, or Refresh Frequency by using the associated drop-down list or slider, we recommend using the List All Modes button instead, which sets all three of these settings at once and guarantees that the combination you choose is supported by the installed adapter and driver. Before you accept a new group of settings, always click Test to verify that the new settings are compatible with your monitor. If your monitor does not display the image properly with the new settings, but you accidentally click Yes to enable them—as we have done more than once—you could simply turn off the power to the computer, but that risks data corruption. Better practice is to recover using the following procedure. You won't have video for the first three steps, so you'll have to do them blind.
This procedure works if you have the correct video driver installed, but what if you've somehow installed the wrong video driver entirely? If that happens, repeat the above procedure to shut down Windows NT gracefully. When the system restarts, choose Last Known Good configuration to restart Windows with the original video driver and then choose a proper set of new settings. 15.5.3 Setting Font SizeWindows NT 4 allows you to select between Small Fonts and Large Fonts by using the Font Size drop-down list on the Settings page of Display Properties. Unlike Windows 98/Me, Windows NT 4 does not allow you to specify an arbitrary font size. The same caveats apply to using Large Fonts in Windows NT 4 as in Windows 98/Me. To change font size in Windows NT, choose the Other font size and follow the prompts. If the new font size was installed previously, Windows NT offers to use the existing font files on disk. Otherwise, you'll be prompted to insert the distribution CD so that Windows can load the new fonts. Once the files are loaded, restart the system to put the font size change into effect. |

|
|