
|
|
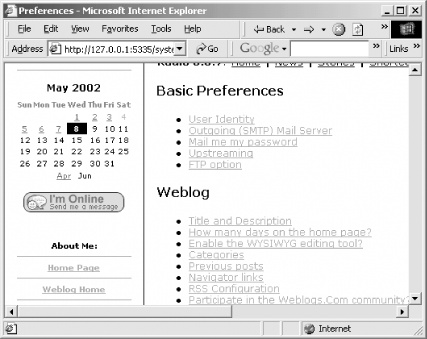
4.6 Setting Your Radio PreferencesRadio is a very configurable product that lets you set many different preferences. Radio's Prefs screen mixes together two very different types of preferences: how your blog operates (blog properties), and how your copy of Radio operates (Radio preferences). In this section, we'll cover the Radio Prefs screen and point out the options that really matter for your blog and for your system. To get to the Radio Prefs screen, click on the Prefs link in your Radio command bar. The Prefs screen is shown in Figure 4-21. Figure 4-21. FTP Preferences The Radio Prefs options are broken down into different categories:
In total, there are approximately 50 different preference screens, each with one or more options. To make configuring Radio easier, we are going to make the following assumptions about how you blog with Radio:
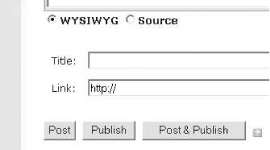
Even though the Radio Prefs screen includes the look and feel of your blog, this is complex enough that we cover it separately in Chapter 7 and not in this section. 4.6.1 Blog Title and DescriptionTo set or change the title and description of your blog, select Title and Description from the Weblog group of preferences. Enter the title of your entire blog (e.g., "The Sherlock Holmes Casebook"). This is shown at the top of your blog. Then enter a description of what's in your blog (e.g., "Gossip from 221B Baker Street"). Click the Submit button to save your changes. The description appears under the title. 4.6.2 Blogdex or Navigator LinksTo create or edit your list of links, select Prefs from the Radio command bar. Select Navigator links. This brings up a form with a text box where you enter URLs and titles for the links as XML. Your block of links should start with <navigator> and end with </navigator>. In between is a set of <item /> tags. The two attributes of an item tag are name and pagename. The name will be shown to the user as a link, the destination of the link is the pagename. For example: <item name="O'Reilly" pagename="http://www.oreilly.com/" /> <item name="Home" pagename="/" /> The URLs given as pagenames can be either absolute (as in the case of the O'Reilly link) or relative to your blog's home page (as in the second link). Save your Navigator links by clicking the Submit button. Reload your blog to see the effect of the navigation bar. 4.6.3 Adding Titles to Your PostsBy default, Radio posts are untitled and simply appear in a series under the date on which they were blogged. To give each post its own title, select the Prefs option from the Radio command bar. Click on Item Level Title and Link. Turn on both checkboxes and then click the Submit button. This adds two extra fields to the Desktop Website page for adding a new blog entry: Title and Link. The Title field is used in your RSS feed to provide a title for your blog post when it is viewed in a reader's News Aggregator; it is not displayed in your blog post. The Link field stores a hyperlink to an alternate representation of your post. For example, you might have a post that talks about a new music CD. The link field could go to the CD's page on Amazon. In general though, you tend to leave the Link field blank and Radio then inserts a PermaLink to your post. Click the Submit button to save your change. Select Home from the Radio command bar to see the blog entry page with its two new fields. 4.6.4 Not Using Internet Explorer?When you start Radio, it launches a web browser to view the Desktop Website. The WYSIWYG editor builds on the editor built into Internet Explorer on the PC and doesn't exist in other browsers and other platforms. One way to get roughly equivalent functionality in another browser is to enable the JavaScript-based editor via Radio's preferences. To do this, click on the Prefs link located on Radio's command bar. Then click on the Enable the WYSIWYG editing tool option. Turn off the checkbox and click on the Submit button. Radio then saves your changes and redisplays the preferences screen so you can see that your changes were saved. Click on the Home link, located on Radio's command bar. The editor now has a slightly different interface. If your browser supports JavaScript to the appropriate level, there's a toolbar. The JavaScript interface, which doesn't offer the same WYSIWYG formatting, does provide the same features, such as applying tags, inserting formatting elements, and creating links. Use this interface by selecting text in the writing area with the mouse and then choosing a command from the toolbar. If your browser doesn't have sufficiently advanced JavaScript, there's simply a rectangular text box and no toolbar. In this case, you must create your blog posts using HTML. See Learning Web Design (O'Reilly) if you are in this situation and don't know HTML. 4.6.5 Saving Without PublishingThe Post to Weblog button below the editing panel saves your content and publishes it. This forces you to go live with things that might not be ready. To save an entry without publishing, set your Radio preferences to have both Post and Publish buttons off. Choose the Prefs link on the Desktop Website's command bar. Under the Weblog grouping, click on the Three Buttons or One option. A checked box corresponds to three buttons, an unchecked box to one. Check it to enable separate Post and Publish buttons. Click the Submit button, then select the Home link at the top left of the command bar to continue adding new entries. If you don't see three buttons where the previous Post button was, Refresh the browser. You should now see something like Figure 4-22. Figure 4-22. Separate Post and Publish buttons The Post button saves the material to your local database. The Publish button makes it public and the Post & Publish button does both. |

|
|