|
|
|
7.3 Managing PoliciesThe Administrative Templates extensions to Group Policies handle all Registry-based policies in Windows 2000. In other words, Administrative Templates provide a mechanism for administrators to configure user interface settings that are stored in the Registry. Two administrative template extensions can be enabled for a GPO, one for computers and one for users. In GUI terms, these extensions enable Administrative Template nodes in the console tree under Computer Configuration and under User Configuration. (Refer back to Figure 7.3 for a console tree that includes both Administrative Templates nodes.) Until administrative templates are added, however, these nodes are empty. 7.3.1 What Is an Administrative Template?Administrative templates are ASCII text files, usually with a .adm extension, that tell the Group Policy interface what Registry settings an administrator can set. The template files specify what categories and subcategories should appear under the Administrative Templates node and how policy options are displayed. The Group Policy interface translates the template files into the GUI representation you see, from the intermediate folders down to the policy settings. The Windows 2000 syntax for administrative templates encompasses the previous template syntax. You can use older NT 4.0-style administrative templates to create user interfaces in Group Policy, however, new templates can't be used with the System Policy Editor. It's not a good idea, however, to allow NT 4.0-style policies to be applied to Windows 2000 clients, as could be the case in a mixed-mode domain with both NT 4.0 and Windows 2000 domain controllers. If, for instance, an NT 4.0 client is upgraded to Windows 2000, but the accounts of users on the machine continue to be managed by a Windows NT 4.0 domain controller rather than Active Directory, the user receives NT 4.0 user System Policy. This could have an adverse effect on the computer's Registry. The reason is that Windows 2000 policies set keys and values in only specific areas of the Registry, namely:
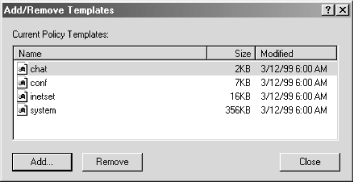
When Windows 2000 policy changes, these trees are cleared, and new policies are copied down. Windows NT 4.0 policies, however, don't recognize these Registry areas. The keys and values they write can invade any part of the Registry and persist until they're either manually deleted or reversed by a counteracting policy. 7.3.2 Adding Administrative TemplatesAssuming you have the Administrative Templates extensions enabled for Group Policy, you can add administrative templates for computer and user configuration of a GPO. Under the GPO you wish to manipulate, expand either the Computer Configuration or User Configuration node. Right-click the Administrative Templates node and select Add/Remove Templates from the menu. The ensuing dialog, shown in Figure 7.4, lists the current policy templates. Figure 7.4. The Add/Remove Templates dialog To add additional templates to this list, select the Add button and browse for the desired template. Templates included with Windows 2000 are installed in the %SystemRoot%\inf directory and come with a .adm extension. I'll talk more about provided templates later in the chapter. Understand that templates you add can contain settings for both Computer and User configuration. That is, there are sections for Registry keys under both HKLM and HKCU. It doesn't matter which node you add the templates from, the template is added to the Group Policy as a whole. As you add administrative templates, category nodes appear beneath the Administrative Template branches in the console tree. Each template consists of a new set of categories, subcategories, and options to display to the user. These are interlaced into the settings of the currently loaded templates. Settings in the Computer section of the template appear under the Computer Configuration node; likewise, the User section populates the User Configuration Node. 7.3.3 Editing PoliciesUsing Group Policies to modify policies is quite easy. The templates you add to Group Policy provides the entire interface you need; what's left is deciding what values you want for your policies. To edit a policy, expand the console tree until you find the category
that holds the policies you want to edit. Once you highlight the
target category, you see the category's policies in the right
pane. If you've taken the advice earlier in this chapter, you
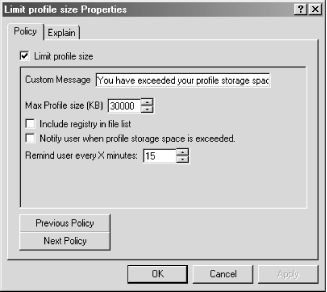
have the display set to View Right-click the policy you want to edit and select Properties (double-clicking works just as well). The property's edit dialog will appear. What you see--that is, what you're able to edit--depends on what parts make up the policy. You'll find that many policies are simply enabled or disabled, without any parts. Figure 7.5 shows the policy edit dialog for the Limit profile size policy, which is found in the user section of the SYSTEM.ADM administration template, under the System category and Logon/Logoff subcategory. Figure 7.5. The Limit profile size policy edit dialog The policy tab is displayed by default. The Explanation tab merely contains a description of the policy. The first thing you see on the policy tab is a checkbox for the policy name. This is actually a checkbox with three states representing whether the policy is enabled (checked), disabled (cleared), or not configured (grayed out). When this checkbox is cleared or grayed out, the policy part inputs are disabled. The policy in Figure 7.5 contains five parts that pertain to Registry keys and can be modified. The first part is an edit text box filled with a default string. The second and fifth fields are numeric inputs filled with default values. In addition to default values for numeric input fields, templates can also specify minimum and maximum values for acceptable user input. Lastly, two checkboxes accept Boolean input. In addition to strings, numbers, and Boolean values, part types include combo boxes and list boxes. Static text may also appear for directions or user information. The buttons at the bottom of this dialog, Previous Policy and Next Policy, allow you to iterate through all the policies of this category without having to close and reopen the dialog. 7.3.4 Creating Your Own Administrative TemplatesSince administrative templates are merely ASCII files, they can be opened with a text editor, modified, and loaded back into Group Policy. As you'll see in a moment, the syntax and language used in these files, while perhaps not instantly intuitive, is far from cryptic. These templates afford administrators the flexibility to create a "safe" conduit to nearly all Registry data that lives in HKLM or HKCU.[2] This can include configuration parameters for common programs such as Internet Explorer, as well as network and desktop settings. (However, note that there are already Group Policy templates for Office 2000 and Internet Explorer, provided as part of the Office Resource Kit. See http://www.microsoft.com/office for more details.)
Administrative Template files follow a basic structure that represents the hierarchy of categories, subcategories, policies, and parts you see in the Administrative Templates namespace. To illustrate the template format, here is an example template I cannibalized from the provided system template, system.adm: CLASS USER
CATEGORY !!SystemControl
KEYNAME Software\Microsoft\Windows\CurrentVersion\Policies\System
POLICY !!LimitSize
KEYNAME "Software\Microsoft\Windows\CurrentVersion\Policies\System"
EXPLAIN !!LimitSize_Help
VALUENAME "EnableProfileQuota"
PART !!SizeMessage EDITTEXT
VALUENAME "ProfileQuotaMessage"
DEFAULT !!DefaultSizeMessage
END PART
PART !!WarnUser CHECKBOX
VALUENAME "WarnUser"
END PART
PART !!WarnUserTimeout NUMERIC REQUIRED SPIN 5
VALUENAME "WarnUserTimeout"
DEFAULT 15
MIN 0
END PART
END POLICY ;LimitSize
END CATEGORY ;SystemControl
[strings]
DefaultSizeMessage="Storage space exceeded."
LimitSize="Limit profile size"
LimitSize_Help="Limits size of Profile."
SizeMessage="Custom Message"
SystemControl="System"
WarnUser="Notify user when profile storage space is exceeded."
WarnUserTimeout="Remind user every X minutes:"
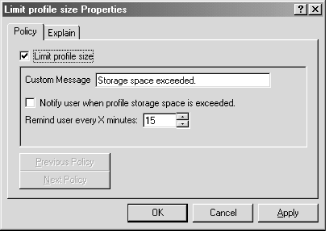
Notice that this template consists of one category, SystemControl. Inside that category is a single policy, LimitSize. That policy is comprised of three parts, SizeMessage, WarnUser, and WarnUserTimeout. Let's dissect the template:
The preceding Administrative Template contains a single, multipart policy. Figure 7.6 shows how the property dialog for this policy looks. Figure 7.6. The example policy properties dialog |
|
|
|