9.5 Adding Registry ACLs to Group Policy Objects
One of the most useful features in Windows 2000 is the new Group
Policy mechanism, explained in more detail in Chapter 7. The GPO mechanism allows you to designate a
wide range of settings that you want applied to users and computers
in your administrative domain. One feature of GPOs that's worth
a special mention in this chapter is that you can assign ACLs to
Registry keys, then propagate those ACLs to computers throughout your
domain as part of the domain GPO.
The actual process of adding Registry ACLs to a GPO is pretty
straightforward:
Open the MMC and navigate to the Group Policy snap-in that owns the
scope over which you want to apply these restrictions. Expand the GPO's node; you're looking for the Computer
Configuration Windows Settings Windows Settings Security
Settings Security
Settings Registry node. Registry node. Use the Add Key... command (available by right-clicking the Registry
folder, from the Action menu, or right-clicking in the right half of
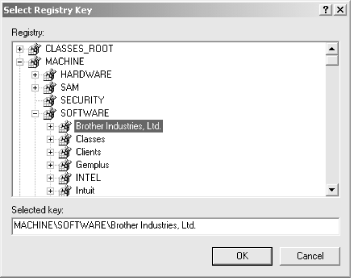
the MMC console window). The Select Registry Key dialog (see Figure 9.3)
appears. Use it to either navigate directly to the key of interest or
to specify the path by typing it into the Selected key field, then
click OK.

The standard Registry security dialog then appears (jump way back to
Figure 5.12 if you need to see it again). Use it to
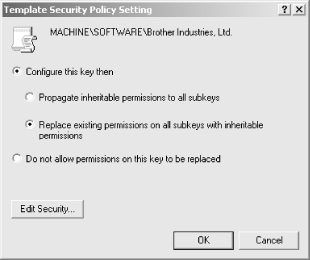
apply the ACEs you want on this key, then click OK. The Template Security Policy Setting dialog (see Figure 9.4) then appears. Use it to specify how you want
the ACL applied to the key:
The "Configure this key then" radio button has two
subordinate radio buttons. The first, "Propagate inheritable
permissions to all subkeys", forces the ACL you specify onto
all subkeys of the target key. The second,
"Replace existing permissions on all subkeys with inheritable
permissions", forces only the new ACL onto subkeys that inherit
from the target key. The "Do not allow permissions on this key to be replaced"
button indicates that you don't want any change to the
permissions, and that you don't want anyone else to be able to
change them either. Click OK. The Template Security Policy dialog disappears, and the new
ACL appears in the list on the right side of the MMC window.

That's all you have to do; once you make the change, it's
propagated automaticallyto wherever the specified GPO carries its
settings.
|

