| [ Team LiB ] |
|
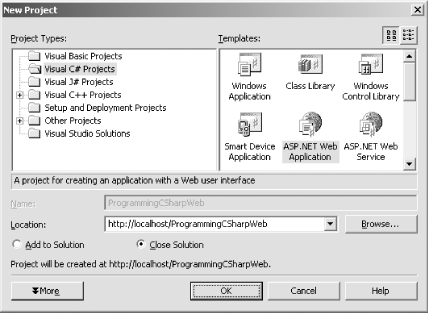
15.2 Creating a Web FormTo create the simple Web Form that will be used in the next example, start up Visual Studio .NET and open a New Project named ProgrammingCSharpWeb. Select the Visual C# Projects folder (because C# is your language of choice), select ASP.NET Web Application as the project type, and type in its name, ProgrammingCSharpWeb. Visual Studio .NET will display http://localhost/ as the default location, as shown in Figure 15-1. Figure 15-1. Creating a project in the New Project window of Visual Studio .NET Visual Studio places nearly all the files it creates for the project in a folder within your local machine's default web site (for example, C:\Inetpub\wwwroot\ProgrammingCSharpWeb). The solution files and other Visual Studio-specific files are stored in <drive>\Documents and Settings\<user name>\My Documents\Visual Studio Projects (where <drive> and <user name> are specific to your machine).
When the application is created, Visual Studio places a number of files in your project. The Web Form itself is stored in a file named WebForm1.aspx. This file will contain only HTML. A second, equally important file, WebForm1.aspx.cs, stores the C# associated with your form; this is the code-behind file. Notice that the code-behind file does not appear in the Solution Explorer. To see the code-behind (.cs) file, you must place the cursor within Visual Studio .NET, right-click the form, and choose "View Code" in the pop-up menu. You can now tab back and forth between the form itself, WebForm1.aspx, and the C# code-behind file, WebForm1.aspx.cs. When viewing the form, WebForm1.aspx, you can choose between Design mode and HTML mode by clicking the tabs at the bottom of the Editor window. Design mode lets you drag controls onto your form; HTML mode allows you to view and edit the HTML code directly. Let's take a closer look at the .aspx and code-behind files that Visual Studio creates. Start by renaming WebForm1.aspx to HelloWeb.aspx. To do this, close WebForm1.aspx, and then right-click its name in the Solution Explorer. Choose Rename and enter the name HelloWeb.aspx. After you rename it, open HelloWeb.aspx and view the code; you will find that the code-behind file has been renamed as well to HelloWeb.aspx.cs. When you create a new Web Form application, Visual Studio .NET will generate a bit of boilerplate code to get you started, as shown in Example 15-1. Example 15-1. Wizard-generated code for a Web Form<%@ Page language="c#"
Codebehind="HelloWeb.aspx.cs"
AutoEventWireup="false"
Inherits="ProgrammingCSharpWeb.WebForm1" %>
<!DOCTYPE HTML PUBLIC "-//W3C//DTD HTML 4.0 Transitional//EN" >
<html>
<head>
<title>WebForm1</title>
<meta name="GENERATOR"
Content="Microsoft Visual Studio 7.1">
<meta name="CODE_LANGUAGE" Content="C#">
<meta name="vs_defaultClientScript" content="JavaScript">
<meta name="vs_targetSchema"
content="http://schemas.microsoft.com/intellisense/ie5">
</head>
<body MS_POSITIONING="GridLayout">
<form id="Form1" method="post" runat="server">
</form>
</body>
</html>
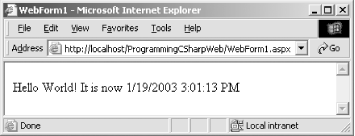
What you see is typical boilerplate HTML except for the first line, which contains the following ASP.NET code: <%@ Page language="c#" Codebehind="HelloWeb.aspx.cs" AutoEventWireup="false" Inherits="ProgrammingCSharpWeb.WebForm1" %> The language attribute indicates that the language used on the code-behind page is C#. The Codebehind attribute designates that the filename of that page is HelloWeb.aspx.cs, and the Inherits attribute indicates that this page derives from WebForm1. WebForm1 is a class declared in HelloWeb.aspx.cs. public class WebForm1 : System.Web.UI.Page As the C# code makes clear, WebForm1 inherits from System.Web.UI.Page, which is the class that defines the properties, methods, and events common to all server-side pages. Returning to the HTML view of HelloWeb.aspx, you see that a form has been specified in the body of the page using the standard HTML form tag: <form id="Form1" method="post" runat="server"> Web Forms assumes that you need at least one form to manage the user interaction, and creates one when you open a project. The attribute runat="server" is the key to the server-side magic. Any tag that includes this attribute is considered a server-side control to be executed by the ASP.NET framework on the server. Having created an empty Web Form, the first thing you might want to do is add some text to the page. By switching to HTML view, you can add script and HTML directly to the file just as you could with classic ASP. Adding the following line to the body segment of the HTML page will cause it to display a greeting and the current local time: Hello World! It is now <% = DateTime.Now.ToString( ) %> The <% and %> marks work just as they did in classic ASP, indicating that code falls between them (in this case, C#). The = sign immediately following the opening tag causes ASP.NET to display the value, just like a call to Response.Write( ). You could just as easily write the line as: Hello World! It is now <% Response.Write(DateTime.Now.ToString( )); %> Run the page by pressing Ctrl-F5 (or save it and navigate to it in your browser). You should see the string printed to the browser, as in Figure 15-2. Figure 15-2. Output generated by the HelloWorld.aspx file |
| [ Team LiB ] |
|