| [ Team LiB ] |
|
15.4 Data BindingVarious technologies have offered programmers the opportunity to bind controls to data so that as the data was modified, the controls responded automatically. As Rocky used to say to Bullwinkle, "But that trick never works." Bound controls often provided only limited control over their look and feel, and performance was usually pretty terrible. The ASP.NET designers set out to solve these problems and provide a suite of robust data-bound controls, which simplify display and modification of data, sacrificing neither performance nor control over the UI. In the previous section, you hardcoded radio buttons onto a form, one for each of three shippers in the Northwinds database. That can't be the best way to do it; if you change the shippers in the database, you have to go back and rewire the controls. This section shows how you can create these controls dynamically and then bind them to data in the database. You might want to create the radio buttons based on data in the database because you can't know at design time what text the buttons will have, or even how many buttons you'll need. To accomplish this, use a RadioButtonList. RadioButtonList is a control that allows you to create radio buttons programmatically: you provide the name and values for the buttons, and ASP.NET takes care of the plumbing. Delete the radio buttons already on the form, and drag-and-drop a RadioButtonList in their place. Once it is there, you can use the Properties window to rename it to rbl1. 15.4.1 Setting Initial PropertiesWeb Forms programming is event-based: you write your code to respond to various events. Typically, the events you're responding to are user-initiated. For example, when the user clicks a button, a ButtonClick event is generated. The most important initial event is the Page_Load event, which is fired every time a Web Form is loaded. When the page is loaded, you want to fill the radio buttons with values from the database. For example, if you are creating a purchase form, you might create one radio button for each possible shipping method, such as UPS, FedEx, and so forth. You should therefore put your code into the Page_Load method to create the buttons. You only want to load these values into the radio buttons the first time the page is loaded. If the user clicks a button or takes another action that sends the page back to the server, you do not want to retrieve the values again when the page is reloaded. ASP.NET can differentiate the first time the page is displayed from subsequent displays after a client postback of the page to the server. Every Web Form page has the property IsPostBack, which will be true if the page is being loaded in response to a client postback, and false if it is being loaded for the first time. You can check the value of IsPostBack. If it is false, you know that this is the first time the page is being displayed, and it's therefore time to get the values out of the database: protected void Page_Load(object sender, EventArgs e)
{
if (!IsPostBack)
{//... }
}
The arguments to the Page_Load method are the normal arguments for events, as discussed in Chapter 12. 15.4.2 Connecting to the DatabaseThe code for making the connection to the database and filling a data set will look very familiar; it is almost identical to what you saw in Chapter 14. There is no difference in creating a data set for Web Forms and creating a data set for Windows Forms. Start by declaring the member variables you need: private System.Data.SqlClient.SqlConnection myConnection; private System.Data.DataSet myDataSet; private System.Data.SqlClient.SqlCommand myCommand; private System.Data.SqlClient.SqlDataAdapter dataAdapter; As in Chapter 14, use the Structured Query Language (SQL) versions of SqlConnection and dataAdapter. Create the connectionString for the Northwinds database, and use that to instantiate and open the SQLConnection object: string connectionString = "server=(local)\\NetSDK;" +
"Trusted_Connection=yes; database=northwind";
myConnection =
new System.Data.SqlClient.SqlConnection(connectionString);
myConnection.Open( );
Create the data set and set it to handle case-sensitive queries: myDataSet = new System.Data.DataSet( ); myDataSet.CaseSensitive=true; Next, create the SqlCommand object and assign it the connection object and the Select statement, which are needed to get the ShipperID and company name identifying each potential shipper. Use the name as the text for the radio button and the ShipperID as the value: myCommand = new System.Data.SqlClient.SqlCommand( ); myCommand.Connection=myConnection; myCommand.CommandText = "Select ShipperID, CompanyName from Shippers"; Now create the dataAdapter object, set its SelectCommand property with your command object, and add the Shippers table to its table mappings: dataAdapter = new System.Data.SqlClient.SqlDataAdapter( );
dataAdapter.SelectCommand= myCommand;
dataAdapter.TableMappings.Add("Table","Shippers");
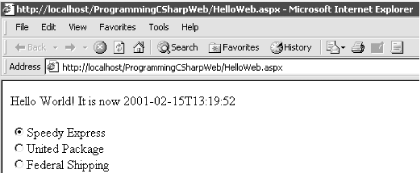
Finally, fill the dataAdapter with the results of the query: dataAdapter.Fill(myDataSet); This is all virtually identical to what you saw in Chapter 14. This time, however, you're going to bind this data to the RadioButtonList you created earlier. The first step is to set the properties on the RadioButtonList object. The first property of interest tells the RadioButtonList how to flow the radio buttons on the page: rbl1.RepeatLayout = System.Web.UI.WebControls.RepeatLayout.Flow; Flow is one of the two possible values in the RepeatLayout enumeration. The other is Table, which displays the radio buttons using a tabular layout. Next you must tell the RadioButtonList which values from the data set are to be used for display (the DataTextField) and which is the value to be returned when selected by the user (the DataValueField): rbl1.DataTextField = "CompanyName"; rbl1.DataValueField = "ShipperID"; The final steps are to tell the RadioButtonList which view of the data to use. For this example, use the default view of the Shippers table within the data set: rbl1.DataSource = myDataSet.Tables["Shippers"].DefaultView; With that done, you're ready to bind the RadioButtonList to the data set: rbl1.DataBind( ); Finally, you should ensure that one of the radio buttons is selected, so select the first: rbl1.Items[0].Selected = true; This statement accesses the Items collection within the RadioButtonList, chooses the first item (the first radio button), and sets its Selected property to true. When you run the program and navigate to the page in your browser, the buttons will be displayed, as shown in Figure 15-4. Figure 15-4. RadioButtonList If you examine the page source, you will not find a RadioButtonList. Instead, standard HTML radio buttons have been created, and each has been given a shared ID. This allows the browser to treat them as a group. Their labels have been created, and each radio button and its label have been wrapped in a <span> tag: <span id="rbl1" style="...">
<input id="rbl1_0" type="radio" name="rbl1"
value="1" checked="checked" />
<label for="rbl1_0">Speedy Express</label>
<br>
<!-- remaining buttons omitted for brevity -->
</span>
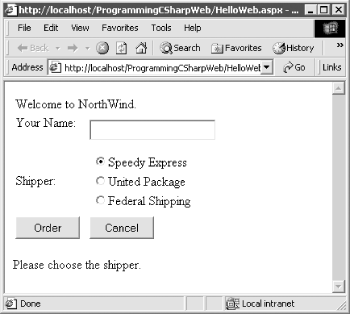
This HTML is generated by the server by combining the RadioButtonList you added to your HTML with the processing of the code-behind page. When the page is loaded, the Page_Load( ) method is called and the data adapter is filled. When you assign the rbl1.DataTextField to CompanyName and the rbl1.DataValueField to shipperID and assign the rbl1.DataSource to the Shipper's table default view, you prepare the radio button list to generate the buttons. When you call DataBind, the radio buttons are created from the data in the data source. By adding just a few more controls, you can create a complete form with which users can interact. You will do this by adding a more appropriate greeting ("Welcome to Northwind"), a text box to accept the name of the user, two new buttons (Order and Cancel), and text that provides feedback to the user. Figure 15-5 shows the finished form. Figure 15-5. The form This form will not win any awards for design, but its use will illustrate a number of key points about Web Forms.
Example 15-2 is the complete HTML for the .aspx file. Example 15-2. The .aspx file<%@ Page language="c#"
Codebehind="HelloWeb.aspx.cs"
AutoEventWireup="false"
Inherits="ProgrammingCSharpWeb.WebForm1" %>
<!DOCTYPE HTML PUBLIC "-//W3C//DTD HTML 4.0 Transitional//EN" >
<HTML>
<HEAD>
<title>WebForm1</title>
<meta name="GENERATOR"
Content="Microsoft Visual Studio 7.1">
<meta name="CODE_LANGUAGE" Content="C#">
<meta name="vs_defaultClientScript"
content="JavaScript">
<meta name="vs_targetSchema"
content="http://schemas.microsoft.com/intellisense/ie5">
</HEAD>
<body MS_POSITIONING="GridLayout">
<form id="Form1" method="post" runat="server">
<asp:Label id="Label1"
style="Z-INDEX: 101; LEFT: 20px; POSITION: absolute; TOP: 28px"
runat="server">Welcome to NorthWind.</asp:Label>
<asp:Label id="Label2"
style="Z-INDEX: 102; LEFT: 20px; POSITION: absolute; TOP: 67px"
runat="server">Your Name:</asp:Label>
<asp:Label id="Label3"
style="Z-INDEX: 103; LEFT: 20px; POSITION: absolute; TOP: 134px"
runat="server">Shipper:</asp:Label>
<asp:Label id="lblFeedBack"
style="Z-INDEX: 104; LEFT: 20px; POSITION: absolute; TOP: 241px"
runat="server">Please choose the shipper.</asp:Label>
<asp:Button id="Order"
style="Z-INDEX: 105; LEFT: 20px; POSITION: absolute; TOP: 197px"
runat="server" Text="Order"></asp:Button>
<asp:Button id="Cancel"
style="Z-INDEX: 106; LEFT: 128px; POSITION: absolute; TOP: 197px"
runat="server" Text="Cancel"></asp:Button>
<asp:TextBox id="txtName"
style="Z-INDEX: 107; LEFT: 128px; POSITION: absolute; TOP: 64px"
runat="server"></asp:TextBox>
<asp:RadioButtonList id="rbl1"
style="Z-INDEX: 108; LEFT: 112px; POSITION: absolute; TOP: 130px"
runat="server"></asp:RadioButtonList>
</form>
</body>
</HTML>
The <asp:Button> controls will be converted into a standard HTML <input> tag. Again, the advantage of using ASP controls is that they provide a more consistent object model for the programmer and yet they generate standard HTML that every browser can display. Because they are marked with the runat=Server attribute as well as given an id attribute, you can access these buttons programmatically in server-side code if you choose to do so. Example 15-3 is the complete code-behind page to support this HTML. Example 15-3. The code-behind page supporting the HTMLusing System;
using System.Collections;
using System.ComponentModel;
using System.Data;
using System.Drawing;
using System.Web;
using System.Web.SessionState;
using System.Web.UI;
using System.Web.UI.WebControls;
using System.Web.UI.HtmlControls;
namespace ProgrammingCSharpWeb
{
// page constructor
public class WebForm1 : System.Web.UI.Page
{
protected System.Web.UI.WebControls.Label Label1;
protected System.Web.UI.WebControls.Label Label2;
protected System.Web.UI.WebControls.Label Label3;
protected System.Web.UI.WebControls.Label lblFeedBack;
protected System.Web.UI.WebControls.Button Order;
protected System.Web.UI.WebControls.Button Cancel;
protected System.Web.UI.WebControls.TextBox txtName;
protected System.Web.UI.WebControls.RadioButtonList rbl1;
private System.Data.SqlClient.SqlConnection myConnection;
private System.Data.DataSet myDataSet;
private System.Data.SqlClient.SqlCommand myCommand;
private System.Data.SqlClient.SqlDataAdapter dataAdapter;
private void Page_Load(object sender, System.EventArgs e)
{
// the first time we load the page, get the data and
// set the radio buttons
if (!IsPostBack)
{
string connectionString = "server=(local)\\NetSDK;" +
"Trusted_Connection=yes; database=northwind";
myConnection = new System.Data.SqlClient.SqlConnection(
connectionString);
myConnection.Open( );
// create the data set and set a property
myDataSet = new System.Data.DataSet( );
myDataSet.CaseSensitive=true;
// create the SqlCommand object and assign the
// connection and the select statement
myCommand = new System.Data.SqlClient.SqlCommand( );
myCommand.Connection=myConnection;
myCommand.CommandText = "Select ShipperID, CompanyName from Shippers";
// create the dataAdapter object and pass in the
// SqlCommand object and establish the data mappings
dataAdapter = new System.Data.SqlClient.SqlDataAdapter( );
dataAdapter.SelectCommand= myCommand;
dataAdapter.TableMappings.Add("Table","Shippers");
// Tell the dataAdapter object to fill the dataSet
dataAdapter.Fill(myDataSet);
// set up the properties for the RadioButtonList
rbl1.RepeatLayout =
  System.Web.UI.WebControls.RepeatLayout.Flow;
rbl1.DataTextField = "CompanyName";
rbl1.DataValueField = "ShipperID";
// set the data source and bind to i
rbl1.DataSource = myDataSet.Tables["Shippers"].DefaultView;
rbl1.DataBind( );
// select the first button
rbl1.Items[0].Selected = true;
}
}
#region Web Form Designer generated code
override protected void OnInit(EventArgs e)
{
//
// CODEGEN: This call is required by
// the ASP.NET Web Form Designer.
//
InitializeComponent( );
base.OnInit(e);
}
/// <summary>
/// Required method for Designer support - do not modify
/// the contents of this method with the code editor.
/// </summary>
private void InitializeComponent( )
{
this.Order.Click += new System.EventHandler(this.Order_Click);
this.Load += new System.EventHandler(this.Page_Load);
}
#endregion
private void Order_Click(object sender, System.EventArgs e)
{
// create the message by getting
// the values from the controls
string msg;
msg = "Thank you " + txtName.Text +". You chose " ;
// iterate over the radio buttons
for (int i = 0;i<rbl1.Items.Count;i++)
{
// if it is selected, add it to the msg.
if (rbl1.Items[i].Selected)
{
msg = msg + rbl1.Items[i].Text;
lblFeedBack.Text = msg;
} // end if selected
} // end for loop
} // end Order_Click
} // end class WebForm1
} // end namespace ProgrammingCSharpWeb
|
| [ Team LiB ] |
|