
|
|
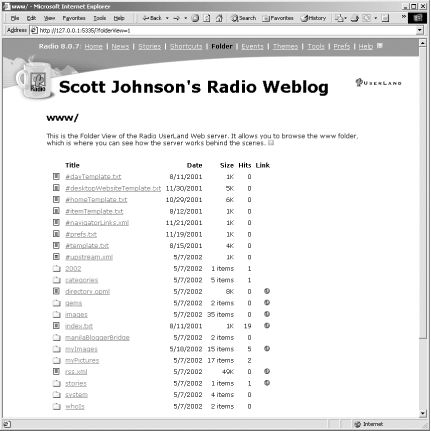
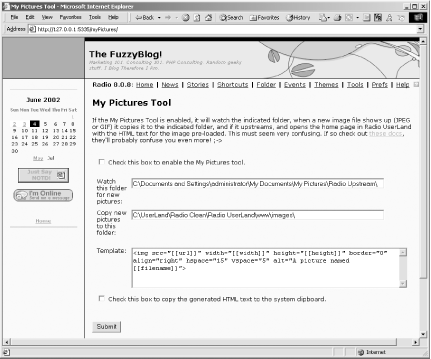
4.9 Adding Pictures to Your PostsRadio offers several different ways to add pictures to your posts ranging from shortcuts and global shortcuts to pasting from Internet Explorer and image uploading, using Radio's upstreaming model. 4.9.1 Pasting from Internet ExplorerIf you use Internet Explorer for Windows, the easiest way to add pictures to your blog is to copy them from another source on the Web. Let's say, for example, that you have an existing web site where your pictures are stored. The Copy command in Internet Explorer lets you copy images from other URLs and paste them into Radio. To paste an image from Internet Explorer, find a picture on your web site and view in your web browser. Right-click the mouse button with the mouse pointer over the picture you want to copy. Choose the Copy command from the pop-up menu. Go to a story or post in Radio's WYSIWYG editor, set the cursor where you want the image, and press Ctrl-V, or choose Paste from the right click pop-up menu. The picture is then pasted into your editor. Make it available to your readers by publishing the post or story. 4.9.2 Adding Pictures by Uploading FilesThe problem with adding pictures using the WYSIWYG editor, is that the picture file must already be somewhere on the Internet, accessible as a URL. If you have local picture files on your computer, you can use Radio's upstreamingfeature to upload your pictures to the server where your blog is located. Upstreaming occurs every 10 seconds when Radio is running. This time interval can be set using Prefs if you need to change it. Upstreaming can also be turned off by right-clicking the Radio icon located in the Windows System Tray. Upstreaming works when your blog is located at radio.weblogs.com/usernum/, as well as when you use FTP to publish your blog to your own site. To upstream a picture or pictures to your blog, open the wwwfolder contained in the folder where Radio is installed. On Windows, this is usually C:\program files\Radio UserLand\. Find a picture or pictures on your filesystem and drag them into the myPictures folder that was created for you when Radio was installed. Provided that you have an Internet connection, Radio will automatically upstream any pictures you moved into the directory and save them into your myPictures folder on your server. Once the picture has been upstreamed to your blog, you can insert it into a blog posting or link to it, using the Folder command. Selecting the Folder command from the Radio command bar displays all the files and directories located on your server in the www directory, as in Figure 4-29. Figure 4-29. The Folder view Click on the link to the myPictures folder. This displays all the files in that folder. If you click on the globe icon next to the picture to which you want to link, the picture will be displayed. If you are using Internet Explorer for Windows, you can insert the picture into your blog by right-clicking it, selecting Copy, and going to your blog and pasting it into a post or story. This is the same process described in the preceding section. To get an uploaded picture into a blog post or story if you aren't using Internet Explorer for Windows, you need to copy the URL of the picture, not the picture itself. Once the URL is copied, go to the blog story or post where you want the picture. If you want to create a link to the picture, you need to enter the HTML code for a hyperlink. This is entered in this format: <A HREF="PASTE_PICTURE_URL_HERE">Link Anchor</A> If you want to insert the picture itself into the blog post or story, enter the HTML for an image. This is entered in this format: <IMG SRC="PASTE_PICTURE_URL_HERE"> Of course, any standard HTML code for formatting pictures can also be specified (borders, alignment, etc.). 4.9.3 Notes on Upstreaming FilesThis approach of dragging a picture file into a folder within the www folder can be used to upload any type of file to your blog (except for .avi files). Radio uploads all files, not just picture files. You can also create any folders you need beneath the www directory to organize your uploaded files, and those folders with their contents will be uploaded to the server. You can use the same linking method discussed above to create links to any uploaded files. For a very powerful picture gallery for Radio, see: 4.9.4 Limitations on Upstreaming FilesRadio operates differently when upstreaming files to a web site via FTP than it does when upstreaming files to radio.weblogs.com/usernum/. When your files go to a blog located at radio.weblogs.com, they always remain in the myPictures directory. When you use FTP, these files are moved up to the server and deleted from the myPictures directory. An additional limitation is that Radio's linking mechanism via the Folder command does not show the correct URL for FTP'd files. You will have to correct the URLs that Radio creates. 4.9.5 Using the MyPictures ToolIn the preceding sections, we discussed manually uploading individual image files. This is fine when you have only a few images, but what about when you have many images? The MyPictures tool monitors a specific folder on your computer and automatically uploads any images placed to a folder where your blog resides. The MyPictures tool is not enabled by default. To turn it on, click on the Tools link in the Radio command bar. Tools are extensions to Radio that give it new features. This displays all installed tools. Click on the MyPictures link. Clicking the MyPictures link gives you the configuration options for MyPictures, as shown in Figure 4-30. Figure 4-30. MyPictures Preferences You probably don't want to use your main image directory such as "My Pictures" (in Windows). You should create a directory below this so that images you don't want put online can still be in this folder. The default folder name that Radio uses is Radio Upstream and, if you use this, all you have to do to start using MyPictures is create this folder, select the MyPictures checkbox, and click the Submit button. If you need to change the folder on your blog where images go when they are uploaded, just modify the option for x:\www\images. For example, if you were uploading photos, you might want them stored in a photos directory on your blog. In this case, set the folder to C:\UserLand\Radio Clean\Radio UserLand\www\photos\ to access them at http://yourblog/photos/ or set it to C:\UserLand\Radio Clean\Radio UserLand\www\images\photos\ to access them at http://yourblog/images/photos. If the MyPictures tool isn't installed with your copy of Radio, it can be downloaded and installed from: This is also the place to go for more information on MyPictures. |

|
|