| [ Team LiB ] |
|
22.2 Importing COM ComponentsImporting ActiveX controls turns out to be fairly straightforward. Many of the COM components that companies develop are not ActiveX controls, however: they are standard COM dynamic link library (DLL) files. To see how to use these with .NET, return to VB6 and create a COM business object that will act exactly as the component from the previous section did. The first step is to create a new ActiveX DLL project. This is how VB6 creates standard COM DLLs. Name the class ComCalc and name the project ComCalculator. Save the file and project. Copy the methods from Example 22-4 into the code window. Example 22-4. Implementing the methods for ComCalcPublic Function _
Add(left As Double, right As Double) _
As Double
Add = left + right
End Function
Public Function _
Subtract(left As Double, right As Double) _
As Double
Subtract = left - right
End Function
Public Function _
Multiply(left As Double, right As Double) _
As Double
Multiply = left * right
End Function
Public Function _
Divide(left As Double, right As Double) _
As Double
Divide = left / right
End Function
Build the DLL by using the menu sequence File, Make ComCalculator.dll. You can test this by returning to your earlier test program and removing the Calculator control from the form. Add the new DLL by opening the project reference window and navigating to the ComCalculator, as shown in Figure 22-11. Figure 22-11. Adding a reference to ComCalculator.dll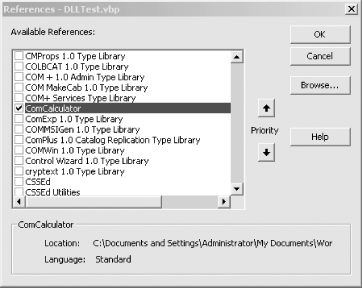 22.2.1 Coding the COMTestForm ProgramThe code to exercise the COM component is very similar to the earlier example. This time, however, you instantiate a ComCalc object and call its methods, as shown in Example 22-5. Example 22-5. The driver program for ComCalc.dllPrivate Sub btnAdd_Click( )
Dim theCalc As New ComCalc
Label1.Caption = _
theCalc.Add(CDbl(Text1.Text), _
CDbl(Text2.Text))
End Sub
Private Sub btnDivide_Click( )
Dim theCalc As New ComCalc
Label1.Caption = _
theCalc.Divide(CDbl(Text1.Text), _
CDbl(Text2.Text))
End Sub
Private Sub btnMultiply_Click( )
Dim theCalc As New ComCalc
Label1.Caption = _
theCalc.Multiply(CDbl(Text1.Text), _
CDbl(Text2.Text))
End Sub
Private Sub btnSubtract_Click( )
Dim theCalc As New ComCalc
Label1.Caption = _
theCalc.Subtract(CDbl(Text1.Text), _
CDbl(Text2.Text))
End Sub
22.2.2 Importing the COM .DLL to .NETNow that you have a working ComCalc DLL, you can import it to .NET. Before you can import it, however, you must choose between early and late binding. When the client calls a method on the server, the address of the server's method in memory must be resolved. That process is called binding. With early binding, the resolution of the address of a method on the server occurs when the client project is compiled and metadata is added to the client .NET module. With late binding, the resolution does not happen until runtime, when COM explores the server to see if it supports the method. Early binding has many advantages. The most significant is performance. Early-bound methods are invoked far more quickly than late-bound methods. For the compiler to perform early binding, it must interrogate the server's type library. For the compiler to interrogate the server's type library, it must first be imported into .NET. 22.2.3 Importing the Type LibraryThe VB6-created COM DLL has a type library within it, but the format of a COM type library cannot be used by a .NET application. To solve this problem, you must import the COM type library into an assembly. Once again, you have two ways of doing this: You can allow the Integrated Development Environment (IDE) to import the class by registering the component, as shown in the following section, or you can import the type library manually by using the standalone program TlbImp.exe. TlbImp.exe will produce a proxy assembly with a manifest within it. This proxy assembly is called a Runtime Class Wrapper (RCW). The .NET client will use the RCW to bind to the methods in the COM object, as shown in the following section. 22.2.4 Importing ManuallyStart by copying the ComCalculator.dll file to your .NET environment and registering it with Regsvr32. Then you're ready to import the COM object into .NET, by running TlbImp.exe. The syntax is to enter the name of the COM component, followed by an optional name for the filename produced, as shown in Figure 22-12. Figure 22-12. Running TlbImp.exe 22.2.5 Creating a Test ProgramNow it's time to create a driver program to test the COM object, which you'll name COMDllTest. If you decide not to import the library manually, you import it through the IDE. To do so, select the COM tab on the Add Reference dialog box and select the registered COM object, as shown in Figure 22-13. Figure 22-13. Adding a reference to ComCalculator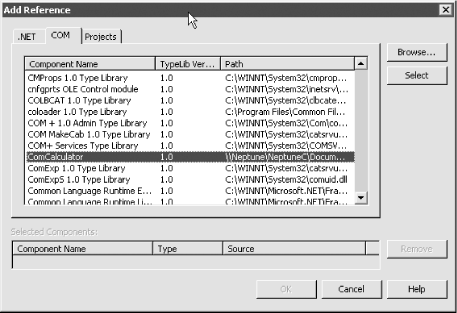 This will invoke TlbImp for you and will copy the resulting RCW to: C:/Documents and Settings/Administrator/Application Data/Microsoft/VisualStudio/RCW You'll have to be careful, however, because the DLL it produces has the same name as the COM DLL. If you do use TlbImp.exe, you can add the reference from the Projects tab. Browse to the directory in which ComCalculatorDLLNET.dll was created, and add it to the references. In either case, you can now create the user interface, which is, again, similar to that used for testing the ActiveX control, as shown in Figure 22-14. Figure 22-14. The form for testing the COM object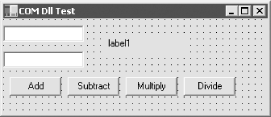 All that is left is to wire up the event handlers for the four buttons, as shown in Example 22-6. Example 22-6. Implementing event handlers for the VB6 COM DLL test formprivate void btnAdd_Click(
object sender, System.EventArgs e)
{
Double left, right, result;
left = Double.Parse(textBox1.Text);
right = Double.Parse(textBox2.Text);
ComCalculator.ComCalc theCalc = new ComCalculator.ComCalc( );
result = theCalc.Add(ref left, ref right);
label1.Text = result.ToString( );
}
private void btnSubtract_Click(
object sender, System.EventArgs e)
{
Double left, right, result;
left = Double.Parse(textBox1.Text);
right = Double.Parse(textBox2.Text);
ComCalculator.ComCalc theCalc = new ComCalculator.ComCalc( )
result = theCalc.Subtract(ref left, ref right);
label1.Text = result.ToString( );
}
private void btnMultiply_Click(
object sender, System.EventArgs e)
{
Double left, right, result;
left = Double.Parse(textBox1.Text);
right = Double.Parse(textBox2.Text);
ComCalculator.ComCalc theCalc = new ComCalculator.ComCalc( );
result = theCalc.Multiply(ref left, ref right);
label1.Text = result.ToString( );
}
private void btnDivide_Click(
object sender, System.EventArgs e)
{
Double left, right, result;
left = Double.Parse(textBox1.Text);
right = Double.Parse(textBox2.Text);
ComCalculator.ComCalc theCalc = new ComCalculator.ComCalc( );
result = theCalc.Divide(ref left, ref right);
label1.Text = result.ToString( );
}
Rather than referring to an ActiveX control that is on the form, you must instantiate the ComCalculator.ComCalc object. The COM object is then available for use as if it had been created in a .NET assembly, and the running program works as expected, as shown in Figure 22-15. Figure 22-15. The test driver program in action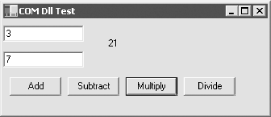 22.2.6 Using Late Binding and ReflectionIf you do not have a type library file for your third-party COM object, you must use late binding with reflection. In Chapter 18, you saw how to invoke methods dynamically in .NET assemblies; the process with COM objects is not terribly different. To see how to do this, start with the application shown in Example 22-6, but remove the reference to the imported library. The four button handlers must now be rewritten. You can no longer instantiate a ComCalculator.comCalc object, so instead you must invoke its methods dynamically. Just as you saw in Chapter 18, you begin by creating a Type object to hold information about the comCalc type. Type comCalcType;
comCalcType = Type.GetTypeFromProgID("ComCalculator.ComCalc");
The call to GetTypeFromProgID instructs the .NET Framework to open the registered COM DLL and retrieve the necessary type information for the specified object. This is the equivalent to calling GetType, as you did in Chapter 8: Type theMathType = Type.GetType("System.Math");
You can now proceed exactly as you would if you were invoking this method on a class described in a .NET assembly. Start by calling CreateInstance to get back an instance of the comCalc object: object comCalcObject = Activator.CreateInstance(comCalcType); Next create an array to hold the arguments, and then invoke the method using InvokeMember, passing in the method you want to invoke as a string, a binder flag, a null binder, the object returned by CreateInstance, and the input argument array: object[] inputArguments = {left, right };
result = (Double) comCalcType.InvokeMember(
"Subtract", // the method to invoke
BindingFlags.InvokeMethod, // how to bind
null, // binder
comCalcObject, // the COM object
inputArguments); // the method arguments
The results of this invocation are cast to Double and stored in the local variable result. You can then display this result in the user interface, as shown in Figure 22-16. Figure 22-16. Late-binding test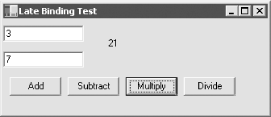 Because all four event handlers must replicate this work, differing only in the method they call, you'll factor the common code to a private helper method named Invoke, as shown in Example 22-7. You also need to add a using statement for System.Reflection in the source code. Example 22-7. Late binding of COM objectsprivate void btnAdd_Click(
object sender, System.EventArgs e)
{
Invoke("Add");
}
private void btnSubtract_Click(
object sender, System.EventArgs e)
{
Invoke("Subtract");
}
private void btnMultiply_Click(
object sender, System.EventArgs e)
{
Invoke("Multiply");
}
private void btnDivide_Click(
object sender, System.EventArgs e)
{
Invoke("Divide");
}
private void Invoke(string whichMethod)
{
Double left, right, result;
left = Double.Parse(textBox1.Text);
right = Double.Parse(textBox2.Text);
// create a Type object to hold type information
Type comCalcType;
// an array for the arguments
object[] inputArguments =
{left, right };
// get the type info from the COM object
comCalcType =
Type.GetTypeFromProgID(
"ComCalculator.ComCalc");
// create an instance
object comCalcObject =
Activator.CreateInstance(comCalcType);
// invoke the method dynamically and
// cast the result to Double
result = (Double) comCalcType.InvokeMember(
whichMethod, // the method to invoke
BindingFlags.InvokeMethod, // how to bind
null, // binder
comCalcObject, // the COM object
inputArguments); // the method arguments
label1.Text = result.ToString( );
}
|
| [ Team LiB ] |
|